15
Connecting the A-933
—Continued
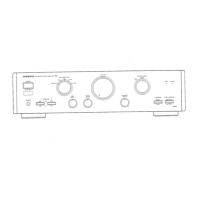
Connecting a Turntable
The A-933’s PHONO input jacks are for use with mov-
ing-magnet (MM) type cartridges.
Use an analog audio cable to connect the A-933’s
PHONO L/R jacks to the audio output jacks on the turn-
table, as shown.
Notes:
• If the turntable has a ground wire, connect it to
A-933’s GND terminal. With some turntables, con-
necting the ground wire may cause hum, in which
case it should be disconnected.
• If the turntable has a moving-coil (MC) type car-
tridge, you’ll need a commercially available MC
phono preamp. In this case, connect the turntable to
the phono preamp’s input, and connect the phono
preamp’s output to the A-933’s PHONO L/R jacks.
Connecting a TV or Other Component with
an Audio Output
Use an analog audio cable to connect the A-933’s LINE
L/R jacks to the analog audio output jacks on the TV or
other component, as shown.
Note:
If your TV has no audio output, you can connect the
A-933 to an audio output on your VCR and use its tuner.
Connecting a Preamp
The A-933 can be used as a power amplifier with a sep-
arate preamp.
In this case, use an analog audio cable to connect the
A-933’s MAIN IN jacks to the preamp’s output jacks.
Connect the speakers to the A-933, and connect the
playback components to the preamp.
Notes:
• Do not connect a component that does not have an
output volume control, because the sound will be out-
put at maximum volume and may damage the A-933
and your speakers.
•To turn on the MAIN IN function, press the [MAIN
IN] button for 3 seconds until the indicator lights up
blue (page 19).
• When the A-933 is used as a power amplifier, the
remote controller and the following functions are dis-
abled: Volume control, Muting, system functions,
Tone/Direct function, subwoofer output, and Record-
ing. Some of these functions can be performed on the
connected preamp.
Connecting Another Component’s Power
Cord
The A-933 has an AC OUTLET on its rear panel. This
can be used to connect the power cord of another audio
component that you intend to use with the A-933.
Caution:
• Make sure that the maximum power requirement of
the component connected to the AC OUTLET does
not exceed the capacity printed on the A-933’s rear
panel (100W).
AC OUTLET
UNSWITCHED
TOTAL
100W MAX.
AC 230-240 V
50 Hz
CAUTION: SPEAKER IMPEDANCE
A or B : 4 OHMS MIN. /SPEAKER
A + B : 8 OHMS MIN. /SPEAKER
MODEL NO. A
-
933
INTEGRATED AMPLIFIER
MD
SPEAKERS
R
R
L
R
L
L
R
L
R
L
SUBWOOFER
PREOUT
OUT
IN
OUT
IN
GND
REMOTE
CONTROL
TAPE/CDR
MAIN IN
CD
LINE
TUNERPHONO (MM)
A
B
R
L
R
L
R
L
R
L
GND
PHONO (MM)
L
R
L
R
PHONO (MM)
AUDIO OUT
Ground wire
AC OUTLET
UNSWITCHED
TOTAL
100W MAX.
AC 230-240 V
50 Hz
CAUTION: SPEAKER IMPEDANCE
A or B : 4 OHMS MIN. /SPEAKER
A + B : 8 OHMS MIN. /SPEAKER
MODEL NO. A
-
933
INTEGRATED AMPLIFIER
MD
SPEAKERS
R
R
L
R
L
L
R
L
R
L
SUBWOOFER
PREOUT
OUT
IN
OUT
IN
GND
REMOTE
CONTROL
TAPE/CDR
MAIN IN
CD
LINE
TUNERPHONO (MM)
A
B
R
L
R
L
R
L
LINE
R
L
LINE
AUDIO OUT
L
R
L
R
MODEL NO. A
-
933
INTEGRATED AMPLIFIER
MD
SPEAKERS
R
R
L
R
L
L
R
L
R
L
SUBWOOFER
PREOUT
OUT
IN
OUT
IN
GND
REMOTE
CONTROL
TAPE/CDR
MAIN IN
CD
LINE
TUNERPHONO (MM)
A
B
R
L
R
L
R
L
MAIN IN
PRE OUT
L
R
L
R
R
L
MAIN IN
AC OUTLET
UNSWITCHED
TOTAL
100W MAX.
AC 230-240 V
50 Hz
CAUTION: SPEAKER IMPEDANCE
A or B : 4 OHMS MIN. /SPEAKER
A + B : 8 OHMS MIN. /SPEAKER
MODEL NO. A
-
933
INTEGRATED AMPLIFIER
SPEAKERS
R
L
OUT
IN
REMOTE
CONTROL
TAPE/CDR
CD
LINE
A
B
R
L
R
L
R
L
AC OUTLET
UNSWITCHED
TOTAL
100W MAX.
AC 230-240 V
50 Hz
*EnA93302.fm Page 15 Tuesday, January 25, 2005 1:46 PM
 Loading...