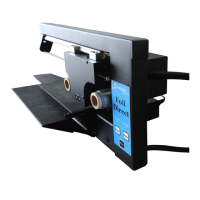
SETTING UP PAPER SIZE
Select Paper Size from the drop down
Menu. The default is 8 x 12 inches.
Other page sizes include 8 x 10 Inches,
5 x 7 Inches, and A4. It is possible to cre-
ate Custom Page Sizes in Windows.
Note: Do not create Landscape pages sizes
(for example 7 x 5 Inches). Foil Xpress
Direct will not operate properly.
[Wpisz tekst] 48 [Wpisz tekst]
Zmiana fabrycznych
ustawień
domyślnych
Zmiana fabrycznych ustawień domyślnych jest
możliwa przez wybranie: Control Panel (Panel
sterujący); Printers (Drukarki); i kliknięcie ikonki
Foil Direct prawym klawiszem myszy. Wybrać “
Printing Preferences (Preferencje druku)”
Wybrać „Advanced (Zaawansowane)”
Wybrać nowe ustawienia domyślne w oknie “Foil
Direct Advanced Options (Zaawansowane opcje Foil
Direct)” i kliknąć “OK”.
Przy otwarciu nowego pliku pojawią się teraz te
ustawienia.
Uwaga: Kilka następnych stron opisuje bardziej
szczegółowo wypracowywanie Ustawień Drukarki.
Wybieranie formatu
papieru
Wybrać format papieru z menu rozwijalnego.
Domyślnie ustawiono 8 x 12 cali.
[Wpisz tekst] 50 [Wpisz tekst]
Uwaga: Tworzenie Niestandardowych formatów
papieru możliwe jest w Panelu Sterującym przez
kliknięcie prawym klawiszem myszy w oknie
Drukarki (nie ikonki Foil Direct) i wybranie
“Server Properties (Własności serwera)”.
Poniższe wskazówki dotyczą Windows XP. Przy
pracy w Windows 7 lub 8,wybrać “Printer Server
Properties (Własności serwera drukarki)” na pasku
Menu.
Ustawić format niestandardowy wybierając “Utwórz
nowy format”, nadając mu nazwę w oknie “Form
Name (Nazwa formatu)”.
Określić niestandardową wysokość i szerokość
formatu papieru. Wybrać “Save Form (Zapisz
format)” i “OK”.
Uwaga: Ten format niestandardowy będzie się odtąd
pojawiał w pozycjach Paper/Output
(Papier/Wyjście) -- Paper Size (Format papieru) w
oknie Advanced Options (Opcji zaawansowanych)
Foil Direct
PRINTABLE AREA POSITIONING
Review the Application Note: Information on Printable Area that is included with the
Quick Set-Up Guide for more information regarding positioning.
Information in the file will be printed without any breaks or seams as long as the file
does not include graphic images that are wider than 2.24 inches. The printhead mecha-
nism will move to each position automatically until the entire file has been printed.
Caution: Do not include graphics that are wider than 2.24 inches. If a graphic image
included in the setup is wider than 2.24 inches, the image will be printed in multiple
passes. Also, any text that is in line with the graphic will also be seamed.
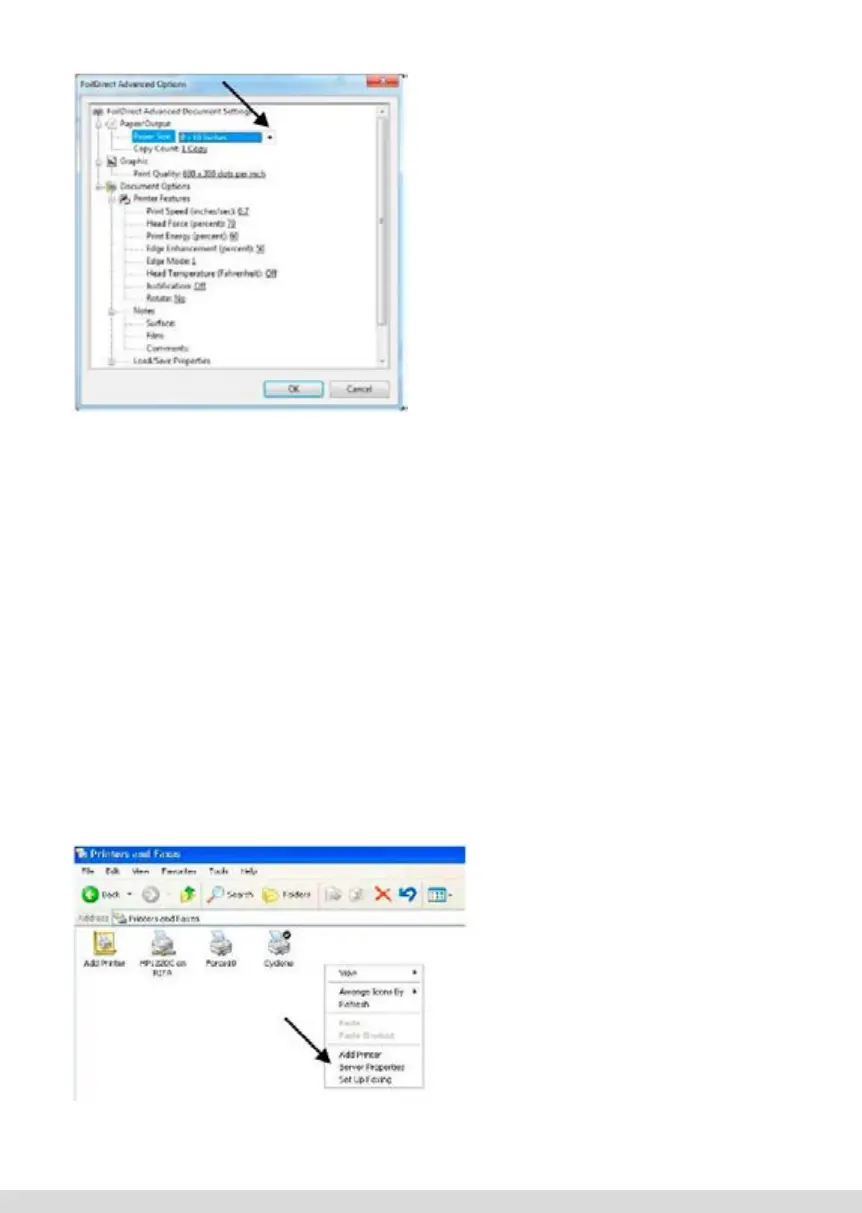
Note: Creating Custom paper sizes is possible in Control Panel by right clicking in the
Printer Window (not on Foil Xpress Direct Icon) and Selecting “Server Properties”.
Instructions below are for Windows XP. When working with Windows 7 or 8, select
“Printer Server Properties” in Menu Bar.
Set up Custom Size by selecting “Cre-
ate a new form”; naming that Form in
the “Form Name” Window.
Set the Custom Width and Height of
the Paper Size. Select “Save Form”
and “OK”.
Note: This Custom Size will now
appear in the Paper/Output -- Paper
Size in Foil Xpress Direct Advanced
Options Window.
67