EasyManua.ls Logo

Panasonic AJ-PD500P

Panasonic AJ-PD500P
126 pages
To Next Page IconTo Next Page
Loading...
Operating Instructions
Memory Card Recorder
ModelNo.AJ-PD500P
ModelNo.AJ-PD500E
Before operating this product, please read the instructions carefully and save this manual for future use.
AVCHD capability is available when the optional AVCHD Codec board AJ-YCX500G is installed.
VQT5C69A(E)
ENGLISH
M1013KT0 -PS
Register now!!
ヵㄉㄊㄔチㄑㄓㄐㄅㄖ㄄ㄕチㄊㄔチㄆㄍㄊㄈㄊ㄃ㄍㄆチㄇㄐㄓ
ㄕㄉㄆチヱビラュチブチヺㄆ㄂ㄓチヸ㄂ㄓㄓ㄂ㄏㄕㄚ
ンㄆㄑ㄂ㄊㄓチヱㄓㄐㄈㄓ㄂ㄎハ
ョㄐㄓチㄅㄆㄕ㄂ㄊㄍㄔネチㄔㄆㄆチㄑ㄂ㄈㄆチヒヒハ
ㄉㄕㄕㄑホババㄑ㄂ㄏ㄂ㄔㄐㄏㄊ㄄ハ㄃ㄊㄛバㄔ㄂ㄗバㄑ㄂ㄔㄔ㄀ㄆバ

Table of Contents

Question and Answer IconNeed help?

Do you have a question about the Panasonic AJ-PD500P and is the answer not in the manual?

Panasonic AJ-PD500P Specifications

General IconGeneral
BrandPanasonic
ModelAJ-PD500P
CategoryRecording Equipment
LanguageEnglish

Summary

Read this first!

CAUTION

General warnings about electrical safety, ventilation, and accessory usage.

WARNING

Safety instructions regarding moisture, liquids, and handling of memory cards.

IMPORTANT SAFETY INSTRUCTIONS

Usage Precautions

Regarding this unit

General advice on operating conditions, environment, and device care.

Notes on security

Before Use

Compatible storage media

Lists supported memory card types and their usage for recording and playback.

Control Reference Guide

Controls

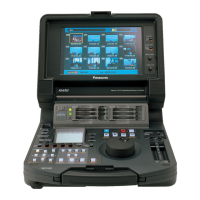
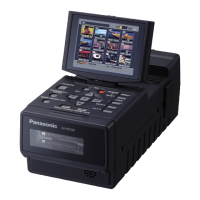
Identifies and explains the functions of various buttons and controls on the unit.

Slots and Other Parts

IO Connectors

Preparation

Setting the Year, Month, Day, and Time

P2 Cards

P2 Card Access Lamp and P2 Card Status

Explains the indicator lamps and status messages related to P2 card insertion and operation.

Handling of Recording Data

Using SDSDHCSDXC Memory Cards

Available Modes

Main Mode

RecordingPlayback Screen

Interface for recording video and audio, managing clip settings, and adjusting audio levels.

Various types of recording

Proxy recording

Playing Back Clips

Thumbnail Screen

Displaying the Thumbnail Screen

Procedure to access and view the screen for managing recorded clips.

Names and Functions of the Parts of the Thumbnail Screen

Playing Back Clips

Selecting and Deselecting Clips

Adding Text Memos and Shot Marks

Deleting Clips

Repairing and Reconnecting Clips

Viewing and Editing the Clip Information

Adding Metadata to Clips During Recording

Formatting P2 Cards and SD Memory Cards

Checking the Card Status

Manual and Automatic CPS Authentication

Automatic CPS authentication

Connecting an External Device via the USB HOST Port

Connecting a storage device

Formatting a storage device

Exporting data to a storage device by card

Copying clips to a storage device

Viewing clip information

Importing Data from a TYPE S storage device or P2 Store by partition

Copying to a P2 card by clip

Using the Unit Connected to a Network

Network Settings

Configuration options for connecting the unit to a network.

LAN settings

Specific network parameters like IP address, subnet mask, and gateway.

Client settings

Operation check tools, status indication, and initialization

Using FTP Client Functions

FTP server folder list (FTP EXPLORE screen)

Writing back from an FTP server (copy)

Transferring SD Memory Card Data

Transferring to an FTP server (export)

Writing back from an FTP server (import)

USB Device Mode

AVCHD Playback Mode

Using an Optional AVCHD Board

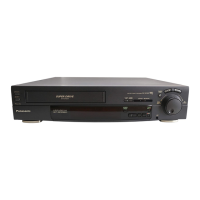
Instructions for using the unit with an AVCHD codec board for playback.

Operating the AVCHD Thumbnail Screen

Checking the clip or card information (CARD FUNCTIONS)

Setting Playback

Setting the playback format (PB FORMAT)

How to select the video format for clip playback to match the source.

Playing Back AVCHD Clips

Handling of SD Memory Card Recording Data

Screen Display

OSD Display

Explanation of on-screen display elements like time codes, formats, and modes.

Deck Information (DIAG) Display

Waveform Monitor (WFM) Display

Time Code, User Bits, and CTL

Time Code

Information on how time code is used and displayed during recording.

User Bits

Details on the 32-bit data frame available for recording operator numbers and other values.

Setting the Time Code and User Bits

Procedure for setting internal time code and user bit values.

Internal mode

Settings for the internal time code generator.

External mode

Setup Menu

Menu Operations

Step-by-step guide on navigating and operating the unit's setup menu system.

Menu Structure

Menu List

CLIP

Operations related to managing recorded clips.

PROPERTY

Displays detailed clip information and allows editing.

REPOSITION

Selects clips to display in the thumbnail screen.

FORMAT

COPY

EXPORT

IMPORT

REPAIR

RE-CONNECT

AUTHENTICATE

THUMBNAIL SETUP

PROPERTY DISP.

RECPB

RECPB FUNCTION

Settings for recording and playback functions.

RECORDING

AUTO REC

RECPB SETUP

REC MEDIA

PROXY SETUP

TCUBCTL

EXT TC SEL

REC META DATA

LOAD

RECORD

USER CLIP NAME

INITIALIZE

PROPERTY

IF SETUP

CLOCK

KEYBOARD

VIDEO

AUDIO

LAN

NETWORK SEL

Selects network connection method.

CLIENT SERVICE

NETWORK TOOLS

INITIALIZE

DISPLAY

LCD MONITOR

CONTRAST

Adjusts the contrast of the LCD monitor.

EXT DC IN

USER BUTTON

PARALLEL PORT

FILE

SYSTEM

RECPB

CLIP

IF SETUP

LOAD FACTORY DATA

Saving and loading setup data

Creating a new file

Loading a setup file

Writing setup data to the user area

Loading written user data

SYSTEM MODE

LINE&FREQ

Sets system frequency, lines, and recording format.

REC FORMAT

Selects the recording codec for video.

SYSTEM SETUP

List of Compatible Input and Output Formats

Using a Keyboard

For Long and Trouble-Free Operation

Maintenance

Guidelines for cleaning and general care of the unit.

Warning System

Updating the Firmware in This Unit

Specifications

Related product manuals