Service/Spare Parts Manual
Series V12
MSG30-5506-M1/UK
11
Parker Hannifin
Pump & Motor Division Europe
Trollhättan, Sweden
Parker Hannifin
Pump & Motor Division Europe
Trollhättan, Sweden
Aassembling, end cap
11
Parker Hannin
PumpandMotorDivision
Trollhättan,Sweden
ServiceManual
Series V12
HY30-5506-M1/UK
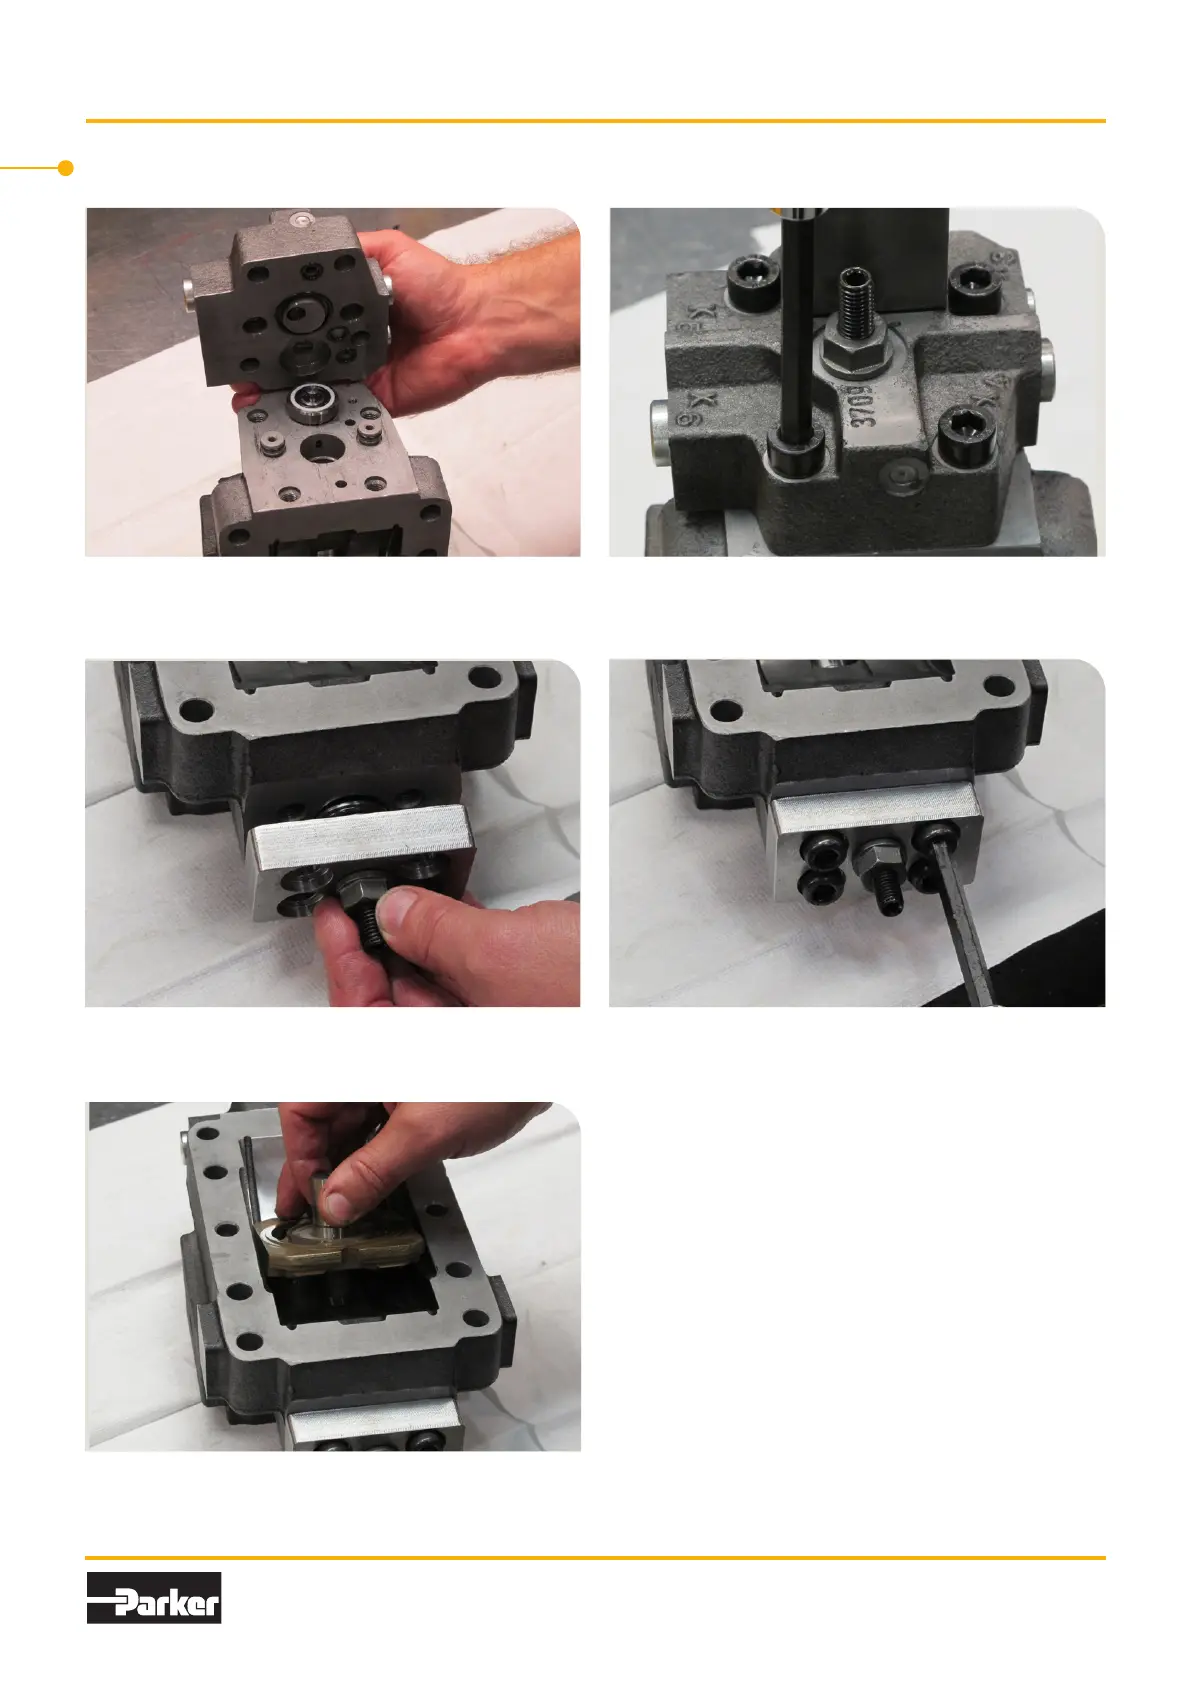
37.Assemblethecontrolcoverassy.Make
suretheO-ringsareincorrectposition.
38.Torquethescrewsto65±10Nmfor
V12-60--110,105±20NmforV12-160.
39.Assemblethecoverassy.Makesurenot
todamagetheO-ring.
40.Torquethescrewsto65±10Nmfor
V12-60--110,105±20NmforV12-160.
41.Assemblethevalvesegmentintheend
cap.Theslotinthevalvesegmentagainst
thecoverside.
Assembling, end cap (old version)
11
Parker Hannin
PumpandMotorDivision
Trollhättan,Sweden
ServiceManual
Series V12
HY30-5506-M1/UK
37.Assemblethecontrolcoverassy.Make
suretheO-ringsareincorrectposition.
38.Torquethescrewsto65±10Nmfor
V12-60--110,105±20NmforV12-160.
39.Assemblethecoverassy.Makesurenot
todamagetheO-ring.
40.Torquethescrewsto65±10Nmfor
V12-60--110,105±20NmforV12-160.
41.Assemblethevalvesegmentintheend
cap.Theslotinthevalvesegmentagainst
thecoverside.
Assembling, end cap (old version)
Assembling, end cap (old version)
37. Assemble the control cover assy. Make sure the
O-rings are in correct position.
38. Torque the screws to 65±10 Nm for V12-60 – -110,
105±20 Nm for V12-160.
39. Assemble the cover assy. Make sure not to damage
the O-ring.
40. Torque the screws to 65±10 Nm for V12-60 – -110,
105±20 Nm for V12-160.
11
Parker Hannin
PumpandMotorDivision
Trollhättan,Sweden
ServiceManual
Series V12
HY30-5506-M1/UK
37.Assemblethecontrolcoverassy.Make
suretheO-ringsareincorrectposition.
38.Torquethescrewsto65±10Nmfor
V12-60--110,105±20NmforV12-160.
39.Assemblethecoverassy.Makesurenot
todamagetheO-ring.
40.Torquethescrewsto65±10Nmfor
V12-60--110,105±20NmforV12-160.
41.Assemblethevalvesegmentintheend
cap.Theslotinthevalvesegmentagainst
thecoverside.
Assembling, end cap (old version)
41. Assemble the valve segment in the end cap. The
slot in the valve segment against the cover side.
11
Parker Hannin
PumpandMotorDivision
Trollhättan,Sweden
ServiceManual
Series V12
HY30-5506-M1/UK
37.Assemblethecontrolcoverassy.Make
suretheO-ringsareincorrectposition.
38.Torquethescrewsto65±10Nmfor
V12-60--110,105±20NmforV12-160.
39.Assemblethecoverassy.Makesurenot
todamagetheO-ring.
40.Torquethescrewsto65±10Nmfor
V12-60--110,105±20NmforV12-160.
41.Assemblethevalvesegmentintheend
cap.Theslotinthevalvesegmentagainst
thecoverside.
Assembling, end cap (old version)
 Loading...