EasyManua.ls Logo

Parker XLR Series User Manual

Parker XLR Series
4 pages
To Next Page IconTo Next Page
Page #1 background imageLoading...
Page #1 background image
1
Parker Hannifin Corporation
Automation Actuator Division
135 Quadral Drive
Wadsworth, Ohio 44281
Telephone 330/336-3511
Facsimile 330/334-3335
PM-XLR-B
Service Information & Parts List
Issued: February 15, 1994
Supersedes: April 1, 1993
GENERAL
XLR Series Reach Slides are pneumatic linear actuators that
incorporate linear ball bearings and support shafts which pro-
vide positive load support and torque resistance.
This manual contains maintenance instructions, replacement
parts information and information on various slide options.
Consult the factory or product catalog for additional information.
SPECIFICATIONS
Maximum Operating Pressure: 100 psi
Operating Characteristics: Double Acting Standard
(Single Acting Available)
Four Support Rod Sizes: 1/4", 3/8", 1/2", 3/4"
Output Force @ 60 psi: 15 - 105 lb
Maximum Breakaway Pressure: 5 psi
Operating Temperature Range:
Standard 0° to +180°F
Viton Seals 0° to +250°F
304 Stainless Steel Cylinder Body
Stainless Steel Piston Rod
Mounting: Unrestricted
A. Inspection and Replacement Procedure for Bearings,
Seals, Support Shafts and Cylinder.
1. Remove locknut #12.
2. Remove stop collar, #7 and bumper, #6 or rear load
plate, 13c. (bumper, shock option)
3. Unscrew cylinder piston rod from tool plate, #13 and
remove tool plate and shafts, #16 from housing, #5a.
4. Remove cylinder mounting nut, #11.
5. Pull cylinder, #1 from slide housing, #5.
6. Remove the four press fit seals, #14.
7. Remove the four bearings, #15.
8. Inspect cylinder, bearings, seals and support shafts
and replace if necessary.
9. Clean all parts thoroughly.
XLR Series Reach Slide
Maintenance Instructions & Parts List
Provide Model Number and Serial Number When Ordering Spare Parts.
B. Reassembly Procedure.
1. Apply a few drops of Loctite RC/609 to the outside
diameter of the bearings, #15.
2. Press the four bearings, #15 into housing, #5a.
3. Press the four seals, #14 into the housing, #5a, securing
the bearings with no play.
4. Apply a liberal amount of bearing lubricant to all four
bearings.
NOTE: Recommended lubricant is Synco Super Lube with
Teflon or compatible NLG1 Grade 2 grease.
5. Replace cylinder, #1. Install using nut, #11.
6. Replace support shafts, #16 and tool plate, #13.
7. Screw piston rod of cylinder into tool plate and replace
locknut, #12.
8. Replace bumpers & stop collars.
(Applies to bumper option only.)
MOUNTING
The XLR Reach Slide incorporates square nut "T" slots on all
mounting surfaces and four through holes. The "T" slot feature
allows the slide housing to be positioned after mounting. An
assortment of square nuts are included with the slide to facilitate
mounting. Additional square nuts can be ordered - each kit
contains 8 square nuts (4 primary, 4 secondary).
LUBRICATION
The pneumatic cylinder and internal bearings are pre-lubricated
at the factory and are suitable for non-lubricated applications.
However, additional airline lubrication will increase the life of the
unit.
Model Kit Number
04 NK04
06 NK06
08 NK08
12 NK12
Question and Answer IconNeed help?

Do you have a question about the Parker XLR Series and is the answer not in the manual?

Parker XLR Series Specifications

General IconGeneral
BrandParker
ModelXLR Series
CategoryController
LanguageEnglish

Summary

General Information

General Description

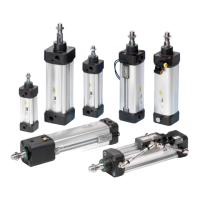
Pneumatic linear actuators with linear ball bearings and support shafts for positive load support and torque resistance.

Specifications

Key operating parameters including pressure, force, temperature range, materials, and operating characteristics.

Maintenance Procedures

Inspection and Replacement Procedure

Procedure for inspecting and replacing bearings, seals, support shafts, and cylinder components.

Reassembly Procedure

Steps for reassembling the slide after maintenance, including lubrication and component installation.

Mounting and Lubrication

Mounting

Details on slide mounting using square nut 'T' slots and through holes for positioning.

Lubrication

Information on factory lubrication and recommendations for airline lubrication to increase unit life.

Parts Diagrams and Options

Standard Unit Components

Diagram and parts list for the standard unit with bumper and flow control options.

Bumper/Adjustable Stop Collars

Details on bumpers absorbing shock and adjustable stop collars for stroke adjustment.

Right Angle Flow Control

Information on right angle flow controls for precise cylinder speed adjustment via exhaust air flow.

Proximity Switch Options

Proximity Switch Options (P)

Details on proximity switches sensing extend/retract positions, installation and wiring.

Electrical Specifications

Voltage, current, switching speed, and switching distance for proximity switches.

Replacement Proximity Switch

Part numbers for plug-in style proximity switches (PNP and NPN).

Hall Effect and Reed Switch Specifications

Hall Effect and Reed Switch Overview

Information on Hall effect and reed switches sensing slide position via magnetic bands.

Hall Effect Switch Specifications

Technical details for Hall effect switches including type, voltage, current, and response.

Reed Switch Specifications

Technical details for reed switches including logic, voltage, power, and response.

Integral Circuit for Switching Contact Protection

Recommendations for protecting switching contacts with diodes or RC circuits.

Related product manuals