14
GB/IE/NI/CY/MT
required position and fix it in place by tightening the screw for the depth stop
25
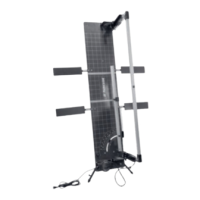
(PLEASE NOTE: In
order to prevent the cutting rails
2
from tilting, the depth stops
28
must be set at the same position on
both sides of the cutting rails
2
). Put the material in place. Press the heating button
6
and keep it
pressed. Push the cutting rails
2
in the direction of the material, until the cutting rails
2
are stopped by
the depth stop
28
. The step depth which has been set will be cut.
When you have reached the step depth, pull the material away in the required direction.
When you have reached the groove length, pull the cutting rails
2
back up. Release the heating button
6
.
The glow wire
3
will cool down in a few seconds.
Rip cut
Set the angle-adjustable guide rails
10
to 90° (see Fig. F) and set the angle adjustment
of the cutting bow
11
to 0°. Using the depth stop
28
: To do this undo the screw for the
depth stop
25
on both sides of the cutting rails
2
. Move each depth stop
28
to the
required position and fix it in place by tightening the screw for the depth stop
25
(PLEASE NOTE: In order to prevent the cutting rails
2
from tilting, the depth stops
28
must be set at the same position on both sides of the cutting rails). Put the material in place. Press the
heating button
6
and keep it pressed. Push the cutting rails
2
in the direction of the cutting board
4
,
until the cutting rails
2
are stopped by the depth stop
28
. Now push the material in the required
direction completely through the glow wire
3
. The material will be rip cut lengthways at the preset step
depth. Release the heating button
6
. The glow wire
3
will cool down in a few seconds.
z Maintenance and cleaning
CAUTION: In order to clean the glow wire hard foam cutter
1
or carry out maintenance work,
always disconnect it first by unplugging the mains plug
8
from the voltage supply and allow it to cool.
There is a risk of electric shock or risk of injury through moving parts.
Clean the cooled glow wire
3
with the brass brush
19
provided.
Only clean the remaining device once the glow wire
3
has cooled down.
Clean the glow wire hard foam cutter
1
with a dry cloth.
Replacing the glow wire
Tension the spring
18
using the tool to replace the glow wire
20
, the tension on the other spring will
be released by doing this. Replace the defective glow wire
3
and release the tension on the spring
18
again (see Fig. D).
CAUTION: There is a risk of burn injuries!
PLEASE NOTE: You must only use accessories and replacement parts which have recommended
by the manufacturer.
 Loading...