12
GB/IE/NI/CY/MT
Only authorised individuals may carry out repairs on this device.
Attention: fragile components! Make sure that the glow wire hard
foam cutter and glow wire are not subject to impacts or knocks.
Do not use the device if you are tired or under the influence of
medicines.
Before carrying out any maintenance work, unplug the mains plug.
z Before using the device
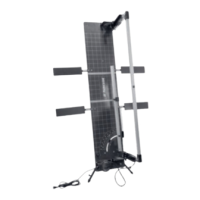
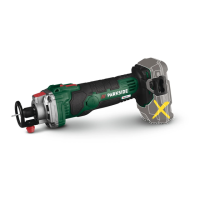
Unpack the glow wire hard foam cutter
1
and check that it is complete and not damaged.
Do not use the device if it is defective.
Check that the electrical socket is in good condition and that it is sufficiently fused (at least 6 A,
RCD switch).
Make sure that the working area is well ventilated.
Select the installation site such that the device, accessories or cable do not present a trip hazard.
PLEASE NOTE: We recommend that the glow wire hard foam cutter
1
is assembled by 2 people.
PLEASE NOTE:
Using the railing fixing
29
the glow wire hard foam cutter
1
can be fixed to
railings
and be secured against tipping over.
WARNING!: Risk of serious injury or death for children and infants! Never leave children unsuper-
vised near packaging material. There is a risk of suffocation.
Flip the rear telescopic foot
15
and the side telescopic feet
7
out. Fix the rear telescopic foot
15
,
by fixing the fixing rails
15a
with the screw
12
. Fix the side telescopic feet
7
using the snap screws
for the side telescopic feet
13
(see Fig. B).
You can adjust to the required working height using the telescopic feet
7
and
15
.
Flip all four cutting board extensions
5
out, by undoing the screws
16
(see Fig. J). Put the locking
pins
26
into the cutting board extension
5
. Re-tighten the screws
16
, once the cutting board
extensions
5
are in the required position (see Fig. B).
Set the required angle for the adjustable guide rails
10
. Fix the adjustable guide rails
10
using the
screw
24
(see Fig. F).
Flip the guide rails
14
out (see Fig. I).
Flip the cutting bow
2
out. Fix the cutting bow
2
with the screws for the angle adjustment of the
cutting bow
23
in the required position (see Fig. E).
To disassemble the glow wire hard foam cutter
1
, you can follow the instructions in reverse order.
The glow wire
3
must be cooled before dismantling.
z Using the device
Connect the electrical connection
17
with the socket for the electrical connection
17a
(see Fig. C).
Connect the mains plug
8
to the socket.
Put the hard foam to be cut on the cutting board
4
, along the adjustable guide rails
10
.
Use the screws for the depth stop
25
to set the stop for the cutting depth
28
. Set the stop for the
cutting depth
28
to the required depth (see Fig. G).
ATTENTION: If the minimum depth selected is too small, the glow wire will hit the cutting board
extensions. Make sure that there is a sufficient gap. FIRE HAZARD!
Press the heating button
6
. The glow wire
3
will heat up in a few seconds.
 Loading...