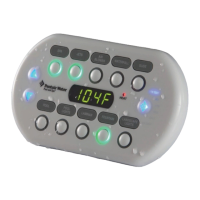
SPACOMMAND
®
Spa-Side Remote Installation and User’s Guide
9
REPLACING EXISTING SPACOMMAND
®
SPA-SIDE REMOTE
SpaCommand Spa-Side Remote Removal/Replacement
To remove and replace the SpaCommand spa-side remote (surface mount and
recess mount):
1. Using a small flat blade screwdriver, carefully pry off the front bezel. Set the
bezel aside for reinstallation.
2. Using a small flat blade screwdriver, carefully pry off the remote from the
bracket. Pull the remote with attached wire away from the bracket.
3. On the rear of the remote, remove the two screws securing the connector to
the remote socket. Set the screws aside for reinstallation.
4. Disconnect the connector from the remote socket. Discard the o-ring. For
reinstallation use the new o-ring provided in the kit.
5. Connect the new remote: Place the o-ring over the round socket on the rear
of the remote. Insert the connector into the socket. The connector is keyed for
the correct pin alignment. Be sure the connector fits flush against the back of
the remote front panel. Secure the connector to the rear of the remote with the
two screws.
6. Feed the remote wire into the conduit leaving some slack. Place the remote
onto the bracket. Be sure that the wire in the conduit is not pinched. Press
evenly on the bracket to snap in place.
7. For recess mount only: Place the bezel on the front of the remote. Press
evenly on the bezel to secure in place. Note: The bezel comes in two colors;
white and black. Be sure to match the colors of the bezel and the remote front
panel.
Remote (rear view)
O-RING
Screw (x2)
Remote
Socket
Bezel (only used for
recess mount)
Connector
Connector (keyed)
 Loading...