Do you have a question about the PFT RITMO L plus and is the answer not in the manual?
Operator tests control and safety devices before and during operation.
Specialist tests construction machines for safe operation at least annually.
Manual provides important info for correct use and safety. Follow guidelines.
Operating manual must be available during the entire service life of the product.
Manual consists of two booklets: Part 1: Safety, Part 2: Overview, operation, servicing.
List of recommended accessories for the machine, findable online.
Details machine weight, dimensions, and hopper specifications.
Provides electrical specifications like voltage, current, power, and fuse.
Details output values for B4-2wf model: delivery rate, pressure, granulation, distance.
Details output values for SD6-3 model: delivery rate, pressure, granulation, distance.
Details output values for SD6-3 soft model: delivery rate, pressure, granulation, distance.
Specifications for the DT4.8 compressor, including output.
Defines ambient conditions and operating period for the machine.
Specifies required water pressure and connection size.
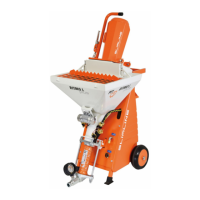
Diagram showing the main components of the RITMO L plus machine.
Description of the main components: gear motor, hopper, vibrator, pump unit.
Details the specifications of the 2.2kW gear motor with tilt flange.
Describes the chassis containing the compressor and control box.
Identifies the components and controls on the machine's control box.
Diagram and labels for the DT4.8 air compressor components.
Diagram and labels for the water manifold components.
Illustrates and labels the connections for water, air, and mortar hose.
Explains the three operating modes of the pump motor selector switch.
Describes the two application areas for the water selector switch.
Explains how to adjust motor speed and delivery rate using the potentiometer.
Details specific parts included in accessories pack item number 00246445.
Describes the primary use and application range of the fitting block.
Explains the application range for solenoid valves for various media.
Describes the function of the flowmeter for measuring liquid and gas flow.
Specifies the intended purpose of the air compressor and cautions for use.
Highlights the importance of functioning safety devices for the air compressor.
Provides guidelines for setting up the air compressor in various environments.
Warns about hot surfaces on the compressor and the risk of injury.
Explains the primary uses of the pressure booster pump, including as a high-pressure pump.
Provides cautions for the proper use of the pressure booster pump, emphasizing clean water.
Instructions for initial setup and operation of the pressure booster pump.
Discusses flow characteristics of different pump units and recommendations for hose length.
Provides safety guidelines for improper transport and suspended loads.
Details the danger of crushing when closing the motor tilt flange.
Ensures the snap lock is closed on the gear motor and hopper when the machine is moving.
Instructions for inspecting goods for damage and missing parts upon delivery.
Steps for disassembling the machine into individual components for easier transport.
Safety instructions for securing loads properly during road transport.
Safety precautions for transporting operational machines, including depressurizing hoses.
Basic safety information for operating the machine, emphasizing proper procedure and environment.
Mandatory protective gear for machine operators.
Instructions for stable installation and hazards associated with the mixing shaft.
Instructions for connecting the machine to a compliant power distributor, including safety requirements.
Guidance on connecting the motor cable to the gear motor.
Procedure for checking and cleaning the dirt trap screen in the pressure reducer.
Steps for connecting the water supply, including checking screens and hoses.
Instructions for connecting a water barrel using a booster pump.
Steps to put the RITMO L plus into operation by setting switches and connecting the water hose.
Guide to setting the water flow rate using the water manifold and flowmeter.
Instructions for flushing the pump with water to facilitate startup.
Procedure for checking mortar consistency using an inspection tube.
Steps for switching on the machine with material, including consistency check.
Steps for preparing mortar hoses, including connecting, flushing, and emptying.
Instructions for connecting the mortar hose to the pressure gauge and laying it correctly.
Guidance on connecting the compressed air hose to the air fitting.
Steps for connecting the compressed air hose to the spray gun and then to the mortar hose.
Instructions for plugging in and switching on the air compressor.
How to connect and switch on the vibrator if needed.
Steps to start applying mortar by turning switches and opening the air valve on the spray gun.
Procedure for brief work interruptions, including closing the air valve.
Steps for a longer work stoppage, involving closing the air valve and switching off the machine.
Procedure for safely switching off the air compressor after use.
Instructions for operating the machine without compressed air using a remote control.
Lists recommended accessories for working with pastes, including an air compressor.
Steps for working with pastes, including switching to 'Without water' mode.
Procedure for emergency shutdown using the main switch and securing it.
Steps to take when a power failure occurs, including turning off the main switch.
Procedure for safely discharging any remaining mortar pressure.
Steps to restart the machine after a power failure, considering the undervoltage trigger.
General rules and procedures for dealing with machine malfunctions.
Explains how the frequency converter display indicates faults.
Introduction to the chapter detailing causes and solutions for malfunctions.
Personal protective equipment required for maintenance and troubleshooting tasks.
A table listing malfunctions, their possible causes, solutions, and who performs them.
Details malfunctions like 'Thick-thin mortar flow' and 'Water level rises', and their causes.
Identifies signs of hose blockages and who can perform remedies.
Procedure for clearing blockages by briefly running the pump motor in reverse.
Lists common causes for clogged hoses, such as worn hoses or interruptions.
Notes on potential damage to mortar hoses due to blockages.
Warns about the danger of overpressure and injury when handling mortar hoses.
Procedure for safely switching off all electrical power supplies and securing them.
Safety precautions for cleaning the machine, avoiding water on sensitive parts.
Steps to check mortar pressure is at 0 bar before opening components.
Procedure for cleaning mortar hoses using a cleaner coupling and sponge ball.
Instructions for coupling the water hose to the mixing tube.
Steps for cleaning the mixing tube, including removing the mixing shaft.
Instructions for inserting the mixing tube cleaner with scrapers pointing downwards.
Procedure for cleaning the mixing tube by running the machine briefly.
Note on placing the machine on its rear for easier pump replacement or cleaning.
Steps for cleaning the rubber mixing zone and pump unit.
Instructions for inserting the mixing shaft and checking wear.
Note on cleaning the material hopper with a water hose after material removal.
Procedure for placing the machine on its rear for easier pump replacement or cleaning.
Steps to take to protect the machine from frost damage by draining water.
Procedure for drying the water manifold using compressed air.
Steps to blow dry the water manifold of the RITMO L plus using compressed air.
General safety guidelines for personnel performing maintenance work.
Instructions for safely removing the electrical connection cable.
Guidelines for environmentally sound maintenance practices, including lubricant disposal.
Overview of recommended maintenance tasks and intervals for optimal operation.
Procedure for daily cleaning and checking of the dirt trap screen in the water inlet.
Procedure for cleaning the dirt trap screen in the pressure reducing valve.
Instructions for checking the setting of the pressure reducing valve.
Notes on replacing the water pressure switch if blockages occur.
Notes on replacing the water pressure switch if blockages occur.
Details pressure switch settings for the compressor and plastering machine.
Steps for cleaning the air compressor's pre-filter and filter insert.
Steps to perform after maintenance is completed before switching the machine back on.
Safety guidelines for personnel and electrical systems during disassembly.
Procedure for decommissioning, cleaning, and dismantling the machine according to regulations.
| Delivery pressure | up to 25 bar |
|---|---|
| Dimensions (L x W x H) | 1, 650 x 750 x 1, 150 mm |
| Weight | 180 kg |
| Max. Pressure | 25 bar |
| Rotor/Stator | D4-3 |
| Engine Power | 4 kW |