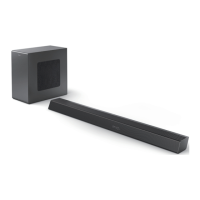
EN 22
DISP XXX
Set to turn o the display automatically
(except the Wi-Fi LED indicator) after 3
seconds of idle when no user operation.
» ON: Set to display on
» OFF: Set to display o
» By default, the display is set to
ON.
BT PAIR NOTE 1
At BT Source :
» Long press 3 secs and release
SOURCE key to trigger BT
pairing.
» Long press 8 secs will clear
pairing info.
MANUAL UPGRADE
» a. Download TAB8947 rmware
from P4C website.
b. Download TAB8947 rmware
from server :
After triggered manual upgrade
via Settings menu, Soundbar
will check if new rmware is
available in the USB ash drive.
Once new rmware is detected,
Soundbar will show “UPDATE
FROM USB” and start rmware
upgrading process.
If there is no new rmware found
in USB ash drive, Soundbar will
prompt end user to accept ToU
(Terms of Use) via local display
“ACCEPT TERMS OF USE IN
USER MANUAL - PRESS PLAY”,
if ToU has not been accepted.
If user do not accept the ToU,
software upgrade over the
network will not take place.
BASS
Adjust the Bass Level.
» BAS -5 ~ BAS +5
» By default, the Bass is set to 0.
TREBLE
Adjust Treble Level.
» TRB -5 ~ TRB +5
» By default, the Treble is set to 0.
SYNC
This function is only available for
sources : HDMI 1/HDMI 2/ARC/Optical)
Set the Audio Delay.
• Video image processing, sometimes
longer than the time required to
process the audio signal. This
is called “delayed.” Audio Delay
feature is designed to remedy this
delay.
• Set the audio delay, provided only
for the current playback mode. (As
provided in the HDMI ARC audio
delay mode, the delay mode is valid
only for the HDMI ARC).
» AV00 ~ AV200
» By default, the audio delay is set
to 00.
CHVOL(C)->
Adjust the Center Channel Gain.
» CT -5 ~ CT +5
» By default, the center channel
Gain is set to 0.
DIM
Set display brightness.
» HIGH / MID / LOW.
» By default, the dimmer is set to
MID.