SendPro
®
C-Series (C200, C300, C400)
3. Install the printhead and ink cartridge.
4a. Connect SendPro C to a power source and turn on the power switch.
3c. Unwrap the printhead and
remove the protective strip.
3f. Unwrap the ink cartridge and
make sure you remove the
silver foil strip from the ink
cartridge.
3g. Install the ink cartridge
and close the guard.
3b. Remove the packing tape from
the ink carriage, and open the
guard.
3h. Close the cover. 4b. Wait for system startup...
Then tap “Get Started”
on the touchscreen and
continue installation steps.
3a. Open the cover to access
the ink carriage.
4. Connect SendPro C to a power source and continue installation steps.
1. CAUTION
Installation Instructions | pitneybowes.com/us/installsendprocseries
Do not connect SendPro C to
a power source yet.
Be sure to grab the entire feeder,
not just the flap.
2. Unpack SendPro
C.
Remove all packing materials
from SendPro C before
assembling them.
This step is critical to
prevent system damage.
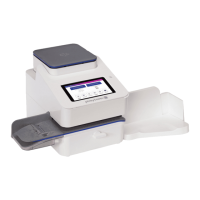
SendPro C
Scale
LAN/Internet
cable
Power cord
Printhead in
package
E-Z Seal
Ink cartridge
Tape sheets
What’s in the box
During installation you’ll be prompted for a Scale Location Code. Find it on the reverse side.
3e. Keep squeezing the tabs and push
the printhead flush against the wall.
Tabs will snap outward when placed
correctly.
3d. Squeeze the tabs and
slide the printhead pegs
into the lower set of grooves.
PegGroove
Tab