F200 and F300 User Manual | 7
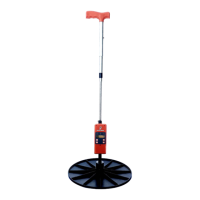
3 - Retrofitting the Platemeter Counter
The Platemeters electronic counter can be attached to most
AgHub, Jenquip, Tru-Test, and FarmWorks and other manual
plate meters with little to or no modification. To purchase
retrofitting kits or counters and view our ‘How To’ instructional
videos visit www.platemeters.co.nz.
Follow the instructions below to attach your platemeter
counter. It must be correctly attached and aligned to ensure
smooth operation.
1. Remove all existing electronic counters from the shaft.
2. Check that a cog is attached to the small shank on the
back of the counter.
3. If the cog isn’t attached, heat the cog in a hot cup
of water prior to pressing onto the shaft - don’t use
excessive pressure as this may damage the cog.
4. Lay the counter face down on a flat surface so that the
cog is to your left.
5. Turn the cog on the counter anti-clockwise (to the left)
until it stops.
6. Hold the Platemeter with the handle to the left. The
hole in the slide tube where the cog fits should face
toward you.
7. Make sure the grooved rod is fully closed to the bottom
end of the black slide tube. If you have difficulty
keeping the plate closed, you can put tape around the
large washer and the bulb of the slide tube.
8. Place the slide tube with the grooved rod inserted onto
the back of the counter, fitting the cog into the slit of
the tube, the cog should be situated in the middle of
the hole in the slide tube.