3. Overview
This chapter introduces the functional characteristics of ATOM, as well as the diagrams of the drone and the remote
controller.
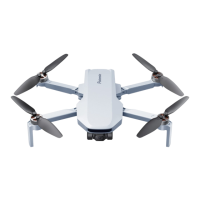
With foldable arms and weight below 250g, the product is portable and easy to use. The product is equipped with
a vision positioning system, to realize precise hovering at low altitude indoor and outdoor environment.
Meanwhile, the product is equipped with a GPS sensor to realize positioning and auto return. With 1/3" Sony
CMOS image sensor, the product can shoot 4K/30FPS HD video and 12MP pictures. The camera is mounted on
a 3-axis gimbal, which allows the camera to acquire stable footages while operating the drone.
By using the brand new PixSync 3.0™ 2.4G digital video transmission technique, the ATOM remote controller
can achieve 6 km communication distance and 720P HD video transmission maximally at ideal conditions. Open
the pull-type and the foldable remote controller to stabilize your mobile device. Connect the remote controller and
mobile device with USB cable to operate and set the product through App and view HD video transmission feed.
The built-in lithium battery of the remote controller can work for approx. 2.3h max.
ATOM uses proprietary SurgeFly™ flight control technology, with a maximum horizontal flight speed of 16m/s
(52ft/s), a maximum flight time of about 32 minutes, and the ability to withstand winds of up to level 5.
3.1 Introduction
Test conditions of the max. flight time: Fly at an even speed of 5m/s at 25°C and in breezeless condition.
Test conditions of the max. transmission distance: Measured at an open and no-interference environment,
with a flight height of 120m, and without considering the return of the drone.
Power consumption will increase considerably when the drone is returning against the wind. If you receive a
prompt of encountering strong wind from the App, please make sure to lower the flight altitude and return in
time to ensure safety of the drone.
Pre-Flight Checklist:
1. Pay attention to the local weather forecast and make sure it is suitable for flying the drone.
2. Make sure the battery is fully charged.
3. Make sure the firmware is updated to the latest version.
4. Make sure the flight environment is open and free of interference.
5. Before takeoff, make sure the battery is secured and the buckle pops out correctly, and no deformed propellers
and loose screws.
6. Power on the drone on open and level ground, wait for the drone to enter GPS Mode before takeoff, and pay
attention to the HOME point.
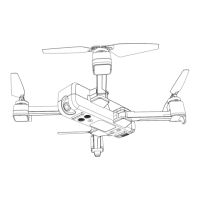
3.2 Drone Diagram
1. Charging indicator
2. TYPE-C charging port
3. Battery buckle
4. SD card slot
5. Tail indicator
6. Monocular visual module
7. TOF module
8. Bottom cooling hole
9. Power indicator
10. Power/frequency pairing button
11. 3-axis gimbal and camera
12. Brushless motor
13. Propeller
14. Arm
15. Antenna tripod
16. Arm shaft
05
4
9
1
5
7
12
13
14
15
16
8
10
11
2
3
6