17
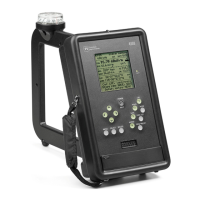
Set the frequency: Change from the factory set 500 kHz to the frequency of the desired station.
A stronger one is better for the first try: Press FREQ SET; a cursor line appears under the 10 kHz digit
(for 9 kHz channel spacing, the 1 kHz digit). Set that digit to the desired value using the up & down
arrow keys (UD). Use the left arrow key to move the underline to the next digit to be changed, and
change it in the same way. Repeat until the display shows the desired frequency.
Press AUDIO to hear the station's audio: The level does not change with field strength. Short
presses of AUDIO will change the sound level through four steps and a long press turns it off. Audio
quality is limited by the receiver's narrow bandwidth and the speaker's small size.
Start Self-Calibration: Press and hold the LPF/F1 key until CAL appears in a box. Self
calibration at the selected frequency proceeds and ends with CAL OK in a box if all is normal.
Measure Field Strength: orient the loop antenna for maximum reading (while keeping it
vertical) by using the analog indicator, a small block which moves right or left as the level increases or
decreases. There is also a trend indicator with an arrow that points up when level is increasing and down
when it is decreasing. To reduce rapid variations in the reading, usually due to modulation, press LPF; on
the display LPF1 changes to LPF2. This reduces variation and slows response time by applying a
lowpass filter. Press LPF again to obtain more filtering; LPF2 changes to LPF3. A third press of LPF
returns to LPF1 for the least filtering.
When the reading is maximum press SAVE to save the reading. The value is held internally
while the screen changes to the Save Screen, in which additional data can be entered and saved with the
measurement. On this screen the operator has the option to enter the pattern being measured, a
letter/number code for the measurement location, operator's ID, and a 14-character note. After the desired
entries are made, press SAVE again to complete the operation and return to the field strength screen.
GPS use: In an outdoor location where GPS reception is possible, latitude and longitude will
appear on the display (the first fix after the 4100 has been shipped a long distance may take several
minutes). Distance, azimuth, and bearing can be displayed if the latitude, longitude, and magnetic
variation are entered in the 4100 for the transmitting antenna location. To do this, press MENU, go to Tx
add, and enter the data. For more detail see Sec. 4.2.2, p.18. The 4100 can now be oriented for
measurements by making the compass reading equal to the bearing value on the display.
Downloading data to a computer: To download data, first, install the 4100 Data Downloader
program supplied with the 4100 and start the program (see Sec. 4.5, p.28). A program window appears
with four buttons indicating the tasks the program can perform. When a USB cable, Type A to Type B, is
connected between the computer and the 4100, “PI 4100 connected” appears at the top of the program
window and the 4100 display blanks. On the computer click the top “Download...” button; specify the
file name of the .csv file that will contain the data and where that file is to be stored. The download then
proceeds. Downloaded data may be viewed in the program or by opening the .csv file in a spreadsheet
program.
To turn the 4100 off, press and hold down POWER/BKLT until the screen text disappears after
about two seconds.