16
4. Operation
4.1 FIRST- TIME OPERATION
After unpacking the 4100, a trial run will help a new user to become familiar with its operation.
The following is suggested:
Connect and charge the supplied battery pack, if either is necessary.
Adjust the compass index
Go outdoors and try some field strength measurements.
Review the menu options and enter the time offset between UTC and local time.
Enter data for a station to be measured.
Use GPS-derived data and the compass to orient the 4100.
Make and save some field strength measurements.
Download the measurement results to a computer.
Details on operating the 4100 can be found throughout this Guide, therefore browsing through the
Manual may reveal information of special interest.
Connect the battery:
The 4100 is shipped with its battery pack connected except in unusual circumstances. If it is
shipped with the pack disconnected (there is no response on pressing the POWER key), connect the
battery as follows:
Open the battery access door at the bottom of the front panel by pulling the upper left-hand
corner of the door away from the panel.
Locate the cable on the battery as well as the cable to the unit above. Both cable ends are
usually found under the battery, after the battery is removed.
Plug the connectors on these two cables together and reinstall the battery with the mated
connectors under the battery.
Close the battery door, pressing in on first the sides and then the top of the door so the flange on
the inside of the door is caught behind the panel edges.
Adjust the compass index:
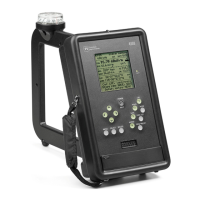
The 4100's compass has a red vertical index line facing the operator, which should be on center,
aligned with the joint line of the two halves of the compass mount. If it is not so aligned, rotate the
compass in its mount to bring the index line into alignment.
Adjust the hand strap:
To adjust the length of the strap, separate the two halves of the wide padded part of the strap,
which are held together by hook-and-loop material. Pull the lower strap end loose from the pad,
reposition it in the bottom metal loop as desired, press the strap back onto the pad it was removed from,
and press the two padded halves together. The strap can be moved to the right-hand side of the 4100 by
removing and reinstalling the screws that fasten the strap mounting rings to the case.
Turn on the 4100 and make a measurement:
Turn the 4100 on: Press POWER/BKLT until text appears on the display. If the battery has
enough charge the main screen appears after a few seconds. If nothing appears on the display the pack
must be charged, see Battery information, Sec. 4.2.5.. When text appears look for the battery voltage
readout BATT 7.2V (7.2V is a typical value) at the right side of the screen near the top. If the voltage is
7.0 or more, go ahead with measurements. Sec. 3.2, p. 14, describes other screen elements.