20
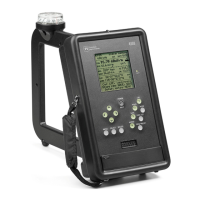
4.2.3 Self-calibration, automatic and manual
Automatic calibration: The 4100 calibrates itself using an internal calibrating source. This
takes place automatically when the unit is turned on, and also when the selected station is changed by
using Tx select or FREQ PRESET.
Manual calibration: To initiate calibration at any time press LPF, holding the key down until a
blinking CAL message appears on the display, followed by CAL OK. Do this when the frequency is
changed using FREQ SET since it will not be done automatically. Do it immediately before critical
measurements, especially when the 4100 has been subjected to a large temperature change. Manual
calibration is intended to be used only for field strength measurements, not for the RF Input mode.
CAUTION: For accurate measurements, all parts of the 4100 must be at least 12 inches (30 cm)
from any large metal surface during self-calibration. If the unit is turned on while resting on a metal
surface, and self-calibration takes place, its readings when handheld will be about three percent too high.
It is best to turn the 4100 on and change its frequency selection after the unit is positioned for
measurements.
How self-calibration works: When LPF is held down, CAL appears blinking in a box on the
display, and the 4100 checks to see if the received signal is large enough to affect the calibration. If so,
the receiver frequency is shifted a few kHz and the check repeated; when this test is passed, the internal
calibrating source is turned on and injected into the loop antenna; the resulting field strength value is
compared to a factory-set reference. The dB difference between the two, which is the CAL number seen
on the display, is saved and added as a correction to all field strength dBuV/m readings until the next self-
calibration. Voltage unit readings are calculated from the corrected dBuV/m values. CAL OK appears in
a box on the display to show that the process is complete, and the new CAL value is displayed. If there is
a problem with the calibration, NO CAL 1 (received signal on the cal frequency too high) or NO CAL 2
(change from the previous CAL value too great) may appear instead of CAL OK, and the previous CAL
value will be retained. The CAL value indicates the receiver internal gain correction; the operator does
not need to make use of it.
4.2.4 Saving measurements: SAVE and HOLD
4.2.4.1 To save a measurement, press SAVE. All screen data is held at the values existing
when SAVE was pressed. The Save screen appears, which allows operator- entered data to be stored with
the measurement. Pressing SAVE a second time stores the measurements together with the following
optional operator notations:
Pat (pattern): Gives the antenna pattern in effect for the measurement, following standard US
practice. The choices are Dy (day), Nda (non-directional), Nt (night), Cr (critical hours), and -- (no
pattern designation). Choose one by using the left and right arrows to move the underline cursor to the
desired pattern. Then press the down arrow to go to the next screen item.
Meas. Point: Enter a predetermined code to identify the measurement point. Enter up to four
characters following the same method given above for entering a call sign for Tx add (see p. 19).
Radial: Enter the radial angle associated with the measurement, if applicable (the azimuth
shown on the field strength screen should be close to this value).
Initials: Enter the initials or other ID of the person making the measurement.
Data point: This is a number that steps up one unit each time a measurement is saved to
provide an identifying number for the measurement. To reset the number to a desired value at the start of
a series of measurements use the methods described for Tx add above. To see the number of the last
measurement saved, to prevent duplication of numbers, press DELETE.
Note: A note of up to 14 characters may be entered, using the Tx add call sign methods. This
could be the call sign of a station measured using FREQ SET, not otherwise saved.