47
Appendix 2
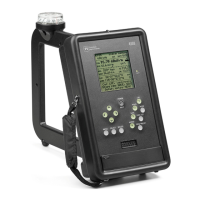
PI 4100 OPERATION QUICK REFERENCE
The 4100 has on-screen help for most operations. In the menu use up & down arrow keys to go to an item.
To select a digit to change use left & right arrow keys. To change the digit value use up & down arrow keys.
Turn the 4100 on: Press POWER/BKLT until text appears.
Turn the backlight on/off: Short press of POWER/BKLT.
Turn the 4100 off: Press POWER/BKLT until text disappears, in approximately 2 sec.
Set frequency and get GPS-derived distance, azimuth, bearing, and time: Press MENU, press
SELECT to get Tx select, choose frequency, press MENU two times.
Enter station data needed to get GPS-derived data: Press MENU, choose Tx add, follow on-screen
help to enter the antenna latitude and longitude and the declination/variation. For declination go to:
www.ngdc.noaa.gov/geomagmodels/Declination.jsp.
Set frequency: (no GPS-derived data) Press FREQ SET. Change frequency digits using on-screen help.
Preset a frequency: 1) Select the frequency in MENU - Tx select; 2) press FREQ PRESET; hold down
an Fn key until a beep is heard.
Set frequency using presets: Press FREQ PRESET; give a short press of the Fn key for the frequency.
Listen to audio: Press AUDIO. To change the level through four steps press AUDIO for each change.
To turn audio off press AUDIO for at least 2 sec. To use headphones and mute the speaker, plug phones into
the rear jack.
Point the 4100 loop antenna using GPS-derived data: Note the on-screen BRG (bearing) reading and
rotate the 4100 with the loop vertical until the compass reading equals the BRG reading.
Start a self-calibration: Set the frequency; hold down LPF until CAL in a box appears on the screen.
Reduce field strength reading variations: Short press of LPF, LPF1 on display changes to LPF2; for
less variation and slower response press LPF again, display shows LPF3. To return to normal response press
LPF again, display shows LPF1.
Hold a field strength reading on the display: Press HOLD. To exit hold press HOLD or SAVE.
Save a field strength reading: Press SAVE, enter SAVE screen data as desired per on-screen help, press
SAVE again.
Enter SAVE screen data for later use: Press SAVE, enter data, press MENU.
Delete a measurement record: Press DELETE, go to the desired record, press SELECT to delete it.
Change the units in which field strength is displayed: Press MENU, go to Fld Str 1 or Fld Str 2,
follow on-screen help.
View a spectrum showing dB below the carrier (dBc): Set the center frequency on the field strength
screen and press MODE once.
View a spectrum showing dBc with peak hold: Do as for dBc above but press MODE two times.
The 4100 needs a stable mount for this.