8
EN
Holdthedressingbrickrmlywithonehand(beingcarefulnottotouchthe
grinding wheel).
- Prolethegrindingwheelbyactivatingthemachineandgrindthegrindingwheel
untilyouobtainaproleliketheoneillustratedin.
- Switchthemachineoffonceyouhavenished.
29. SHARPENING THE DEPTH GAUGE
- Remove the dressing brick and put the chain in the vise.
- Center the cutter compared to the grinding wheel by turning the knobs (P29 and
P30).
- Keeping the arm tilted, adjust the grinding depth on the gauge by turning knob P31
.
- Sharpen the gauge following the instructions given in the “SHARPENING” section.
For this type of sharpening procedure, there is no difference between the right and
left cutters, therefore sharpen all the gauges one after the other.
- Check if the gauge depth is correct, using the template with the shape related to
the type of chain used . Please also consult the chain table, column F.
30. STOPPING AND SHUTTING DOWN
30.1 STOPPING
Turn the machine off by turning the switch to position “0” and unplug the power cable
from the mains.
30.2 SHUTTING DOWN
Onceyouhavenishedusingthemachine,disconnectitandcleanitthoroughly.
Store it in a dry and safe place, protected against dust and damp.
30.3 ROUTINE MAINTENANCE
Follow the instructions given in the “STOPPING” section before you start to
work on the machine.
Maintenance frequency Operation
When the grinding wheel reaches a
minimum diameter of approximately
105 mm
Replace the grinding wheel.
40 hours
Clean the lamp carefully using a rag or a
cleaning brush.
Do not use compressed air.
Clean the grinder carefully using a rag or
a cleaning brush.
Clean the electric motor and the sliding
guides with caution.
Do not use compressed air.
30.4 HANDLING AND TRANSPORT
- If you need to transport the machine, take it off the bench or wall, dismantle the grind-
ing wheel and put all the parts in a packing box to protect them against impact.
30.5 DEMOLITION AND DISPOSAL
Themachineistobedemolishedbyqualiedpersonnelincompliancewithcurrent
laws in force in the country in which it is installed.
The symbol
(on the rating nameplate) points out that the product must not be
disposed of with normal household garbage. Contact an authorized tip or your dealer
for disposal instructions.
Before you scrap the machine, make it unusable by cutting the power supply
cable for example and make the parts safe, which could cause a source of
danger for children if they should play with the machine.
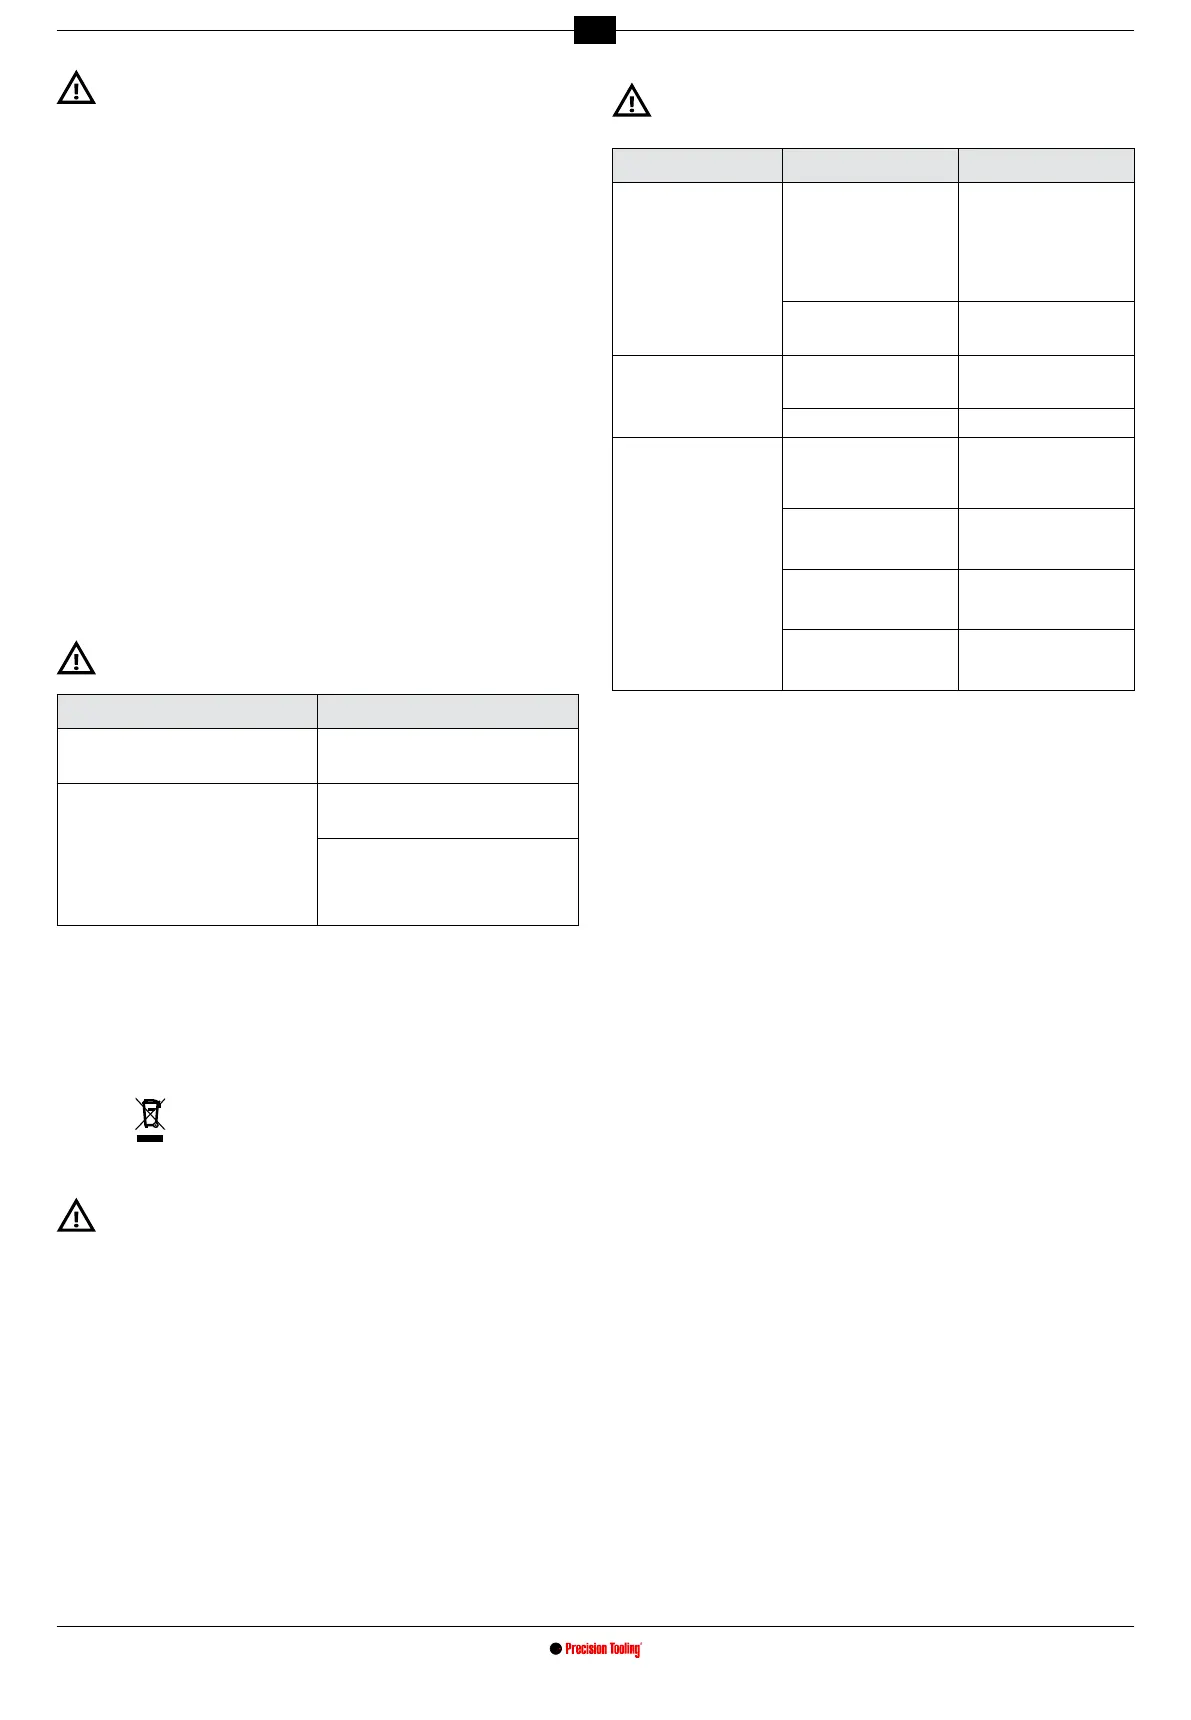
31. TROUBLE SHOOTING
Follow the instructions given in the “STOPPING” section before you start to
work on the machine.
Problem Probable cause Solution
The machine fails to
start when you switch on
(switch in pos. “1”).
One of the safety devices
of the system to which
the machine is connected
has tripped (fuse, circuit
breaker etc.)
Reset the safety device.
If the safety switch trips
again, do not use the
machine, but contact a
Skilled technician.
The machine is not plugged
into the mains properly.
Unplug and plug in again
properly.
The lamp fails to switch on
when the switch is turned
to position “1”.
The lamp is not screwed
properly into its seat.
Screw the lamp in place
properly.
The lamp has blown. Replace the lamp.
The machine vibrates
abnormally.
The grinder is not secured
correctly.
Check its attachment and,
if necessary, tighten the
securing screws correctly.
The arm-motor unit is not
secured correctly to the
base unit.
Tighten the related blocking
handle correctly.
The vise assembly is not
secured correctly to the
base unit.
Tighten the related blocking
handle correctly.
The grinding wheel is not
ttedcorrectly in itsseat
on the hub.
Dismantle the grinding
wheel, check its integrity
andtagaincorrectly.
- Contact a skilled technician if you are still unable to restore the correct operation
of the machine following the instructions given in the chart.