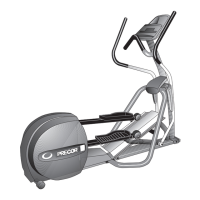
Diagram 7.4 - Bottom and Front Cover Sections
8. Remove the two screws that fasten the A.C. input module to the bottom cover section. Do
not disconnect the wiring from the A.C. input module.
9. Remove the four screws that fasten the bottom cover section to the frame. Unsnap the front
cover section from the bottom cover section and remove the front and bottom cover
sections.
10. Set the bottom cover section in its mounting position and fasten it with the screws removed
in step 9
11. Set the A.C. input module in its mounting position and fasten it with the hardware removed
in step 8.
12. Snap the front cover in its mounting position on the bottom cover and fasten it with the
screws removed in step 7, torque the screws to 6-9 inch pounds. Set the lower PCA in its
mounting position and fasten it with the screws removed in step 7, torque the screws to 6-9
inch pounds. Re-install the cover on the lower PCA.
13. Set the wedge cover in its mounting position and fasten it with the screws removed in step
6., torque the screws to 6-9 inch pounds
14. Set the left and right cover sections in their mounting positions making sure that all of the
tabs on the left and right cover are correctly aligned in the bottom cover section.
15. Set the top cover in its mounting position, and press it into the two snaps shown in Diagram
7.2. Fasten the top cover section with the three screws removed in step 4. Torque the
screws to 6-9 inch pounds.
16. Place the access panel in its mounting position on the top cover and press it into place.
Front Cover
Bottom Cover
Mounting Screw
Snap
Snap