EasyManua.ls Logo

ProMinent DCM 5 Series User Manual

ProMinent DCM 5 Series
2 pages
To Next Page IconTo Next Page
Page #1 background imageLoading...
Page #1 background image
Visit our XTRANET <www.prominentxtranet.com> to:
• sign up for our electronic newsletter • download literature and manuals • validate your product warranty
BACK ENTER
ProMinent
®
OK
ALARM
Pool 750.0mV
7.40pH 85.0F
BACK ENTER
ProMinent
®
OK
ALARM
Pool 750.0mV
7.40pH 85.0F
BACK ENTER
ProMinent
®
OK
ALARM
ENT
ENT
ENT
ENT
ENT
ENT
ENT
ENT
ENT
ENT
ENT
ER
ER
ER
ER
ER
ER
ER
ER
ER
ER
ER
Editing, or Exit
7.40 pH
BACK ENTER
ProMinent
®
OK
ALARM
ENT
ENT
ENT
ENT
ENT
ENT
ENT
ENT
ENT
ENT
ENT
ER
ER
ER
ER
ER
ER
ER
ER
ER
ER
ER
Oxidant Pump_3 3
OFF: ppm control
BACK ENTER
ProMinent
®
OK
ALARM
ENT
ENT
ENT
ENT
ENT
ENT
ENT
ENT
ENT
ENT
ER
ER
ER
ER
ER
ER
ER
ER
ER
ER
ER
Editing, or Exit
7.40 pH
BACK ENTER
ProMinent
®
OK
ALARM
ENT
ENT
ENT
ENT
ENT
ENT
ENT
ENT
ENT
ENT
ENT
ER
ER
ER
ER
ER
ER
ER
ER
ER
ER
ER
Editing, or Exit
1.40 pH
BACK ENTER
ProMinent
®
OK
ALARM
BA
BA
BA
BA
BA
BA
BA
BA
BA
BA
BA
CK
CK
CK
CK
CK
CK
CK
CK
CK
CK
CK
C
pH Sensor A
7.40 pH
BACK ENTER
ProMinent
®
OK
ALARM
ENT
ENT
ENT
ENT
ENT
ENT
ENT
ENT
ENT
ENT
ENT
ENT
ER
ER
ER
ER
ER
ER
ER
ER
ER
ER
ER
ER
Editing, or Exit
1.50 pH
CAUTION
Before attempting calibration or commissioning of the DCM5 controller, water chemistry must be stable and within normal ranges
of 7.2-7.8 pH, Total Alkalinity 80-120 ppm, Free Chlorine 1-2 ppm
pH Calibration Adjusting Pump Setpoints
(Residual and Temperature calibrations are performed in the same
manner from their respective sensor menus, but eld ORP calibrations
are not normally needed.)
1. Perform a pH test and NOTE the results Note: “Turn OFF Setpoint” is the ideal point where chemical
control is achieved and “Turn ON Setpoint” is the point used to
dene the on/off deadband or proportional span needed.
2. Press
2 times
[Oxidant]
[pH Sensor_C]
1. Press
5 times
[pool Oxidant]
[pH Sensor]
[Acid Pump]
[ORP Sensor_D]
[Oxidant Pump_3]
3. Press
3 times
[Editing, ⏎ or Exit]
[Calibrate]
[Enter Value]
2. Press
3 times to
change the Turn ON
Setpoint [Editing, ⏎
or Exit]
4. Press
to
adjust displayed value
to match the tested
value, then press
to accept the change
3. Press
to
adjust the Turn ON
Setpoint, usually one
or two units (0.1 ppm)
below the Turn OFF
setpoint for Oxidant
feed systems. Then
press to accept the
new value.
5. Press
to return
to the main status
screen
5. Press
to
adjust the “Turn OFF
Setpoint”. This is the
point where oxidant
feed is satised, and
considered by most to
be the setpoint when
only 1 setponit is
used. Then press
to accept the new
value.
4. Press
then to
change the Turn OFF
Setpoint. (Default is
1.5ppm)
6. Pressing
BACK returns to the main status screen
2
1
2
3
5
3
4
5
DCM5_QSG.indd Rev1 (09/25/2012)(p/n: 7500581)
DCM 5 Series Controller
Quick Start Guide
Question and Answer IconNeed help?

Do you have a question about the ProMinent DCM 5 Series and is the answer not in the manual?

ProMinent DCM 5 Series Specifications

General IconGeneral
BrandProMinent
ModelDCM 5 Series
CategoryController
LanguageEnglish

Summary

pH Calibration

Initial pH Test and Recording

Perform an initial pH test and record the observed results before proceeding with calibration.

Navigate to pH Sensor Calibration Menu

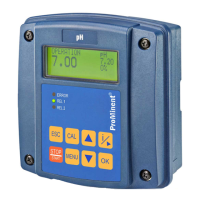
Press the specified buttons twice to access the pH sensor calibration menu.

Initiate pH Calibration Entry

Press buttons to select 'Calibrate' and 'Enter Value' for pH calibration.

Adjust and Confirm pH Value

Adjust the displayed pH value to match the test results and press to confirm.

Return to Main Screen After pH Calibration

Press the designated button to exit calibration and return to the main status display.

Adjusting Pump Setpoints

Select Pump or Sensor for Setpoint Adjustment

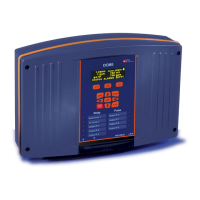
Navigate through the menu by pressing buttons to select the desired pump or sensor.

Access Turn ON Setpoint Editing

Press buttons three times to enter the editing mode for the Turn ON setpoint.

Set and Confirm Turn ON Setpoint

Adjust the Turn ON setpoint and press to save the new value.

Access and Set Turn OFF Setpoint

Press buttons to adjust the Turn OFF setpoint and confirm the change.

Finalize Turn OFF Setpoint Adjustment

Adjust the Turn OFF setpoint, which signifies feed satisfaction, and confirm.

Return to Main Screen After Setpoint Adjustment

Press the BACK button to exit setpoint adjustments and return to the main status screen.

Alarm Information and Acknowledgment

View Active Alarms

Press once to view active alarms, showing feeder status and alarmed inputs/outputs.

Changing Pump/Feeder Mode

Select Pump/Feeder for Mode Change

Press buttons to select the desired relay (1 or 3) for mode adjustment.

Access Mode Selection Screen

Press and hold a button to display AUTO, OFF, and ON mode options.

Set Output Mode (Auto, Off, On)

While holding a button, use other buttons to set the output to AUTO, OFF, or ON.

Clear All Alarms

Acknowledge and Reset Alarms

Press a button, then twice, to acknowledge and clear active alarms from the system.

Related product manuals