15 pulsar 3
If the battery is debalanced so heavily that it cannot be balanced during the charging process, the Pulsar 3 will
reduce the charging current and enter kinda after-balancing mode. The after-balancing will be indicated by
flashing „V“ (Volt) and "B".
Process set-up – Only balancing (Monitor)
We plug in the package to the charger through the balancer connection (do not plug current cables to the black
and red sockets). The “Monitor” information will then be displayed. Pressing the dial will start the cells’ balancing
process according to the current settings in the given program (Ib:x,xx balancing current, if Ib:0,0A – the charger
acts as a voltage monitor). Packages will be balanced in this operating mode in the whole voltage scope.
Prozess set-up – Test
If testing the internal resistance of the battery pack (as described in the above processes), first set the battery
type and discharge current. The most reliable values are calculated when the voltage of the battery pack is at
nominal voltage (eg LiPo 3.7-3.8 V / cell), and discharge in the range of 1 - 2C. In the main display, the internal
resistance, as measured by the charging cable is shown. In the test, display the total resistance (sum of individual
cells) and average value averaged over all cells (measured by balancing cables) are alternately displayed top left.
The difference between the mean value and the value from the main process display shows the quality of the
charging cable and the electrical connections used. A test takes 30 seconds and provides fairly reliable values,
but which may vary according to different measuring methods. The risk measurements during charging also bring
different (but valid) values because the measurement method is different. There will always be the real (true)
displayed measurement values without conform to a specific measurement method (cheating) to conduct further
comparisons with real measurements, which were not carried out with the Pulsar 3. The measurement during
charging begins about 1 minute after the start of the process and lasts until the first power reduction.
Info: The measurements during charging are possible only when pulse mode is switched on (Pulse ON)
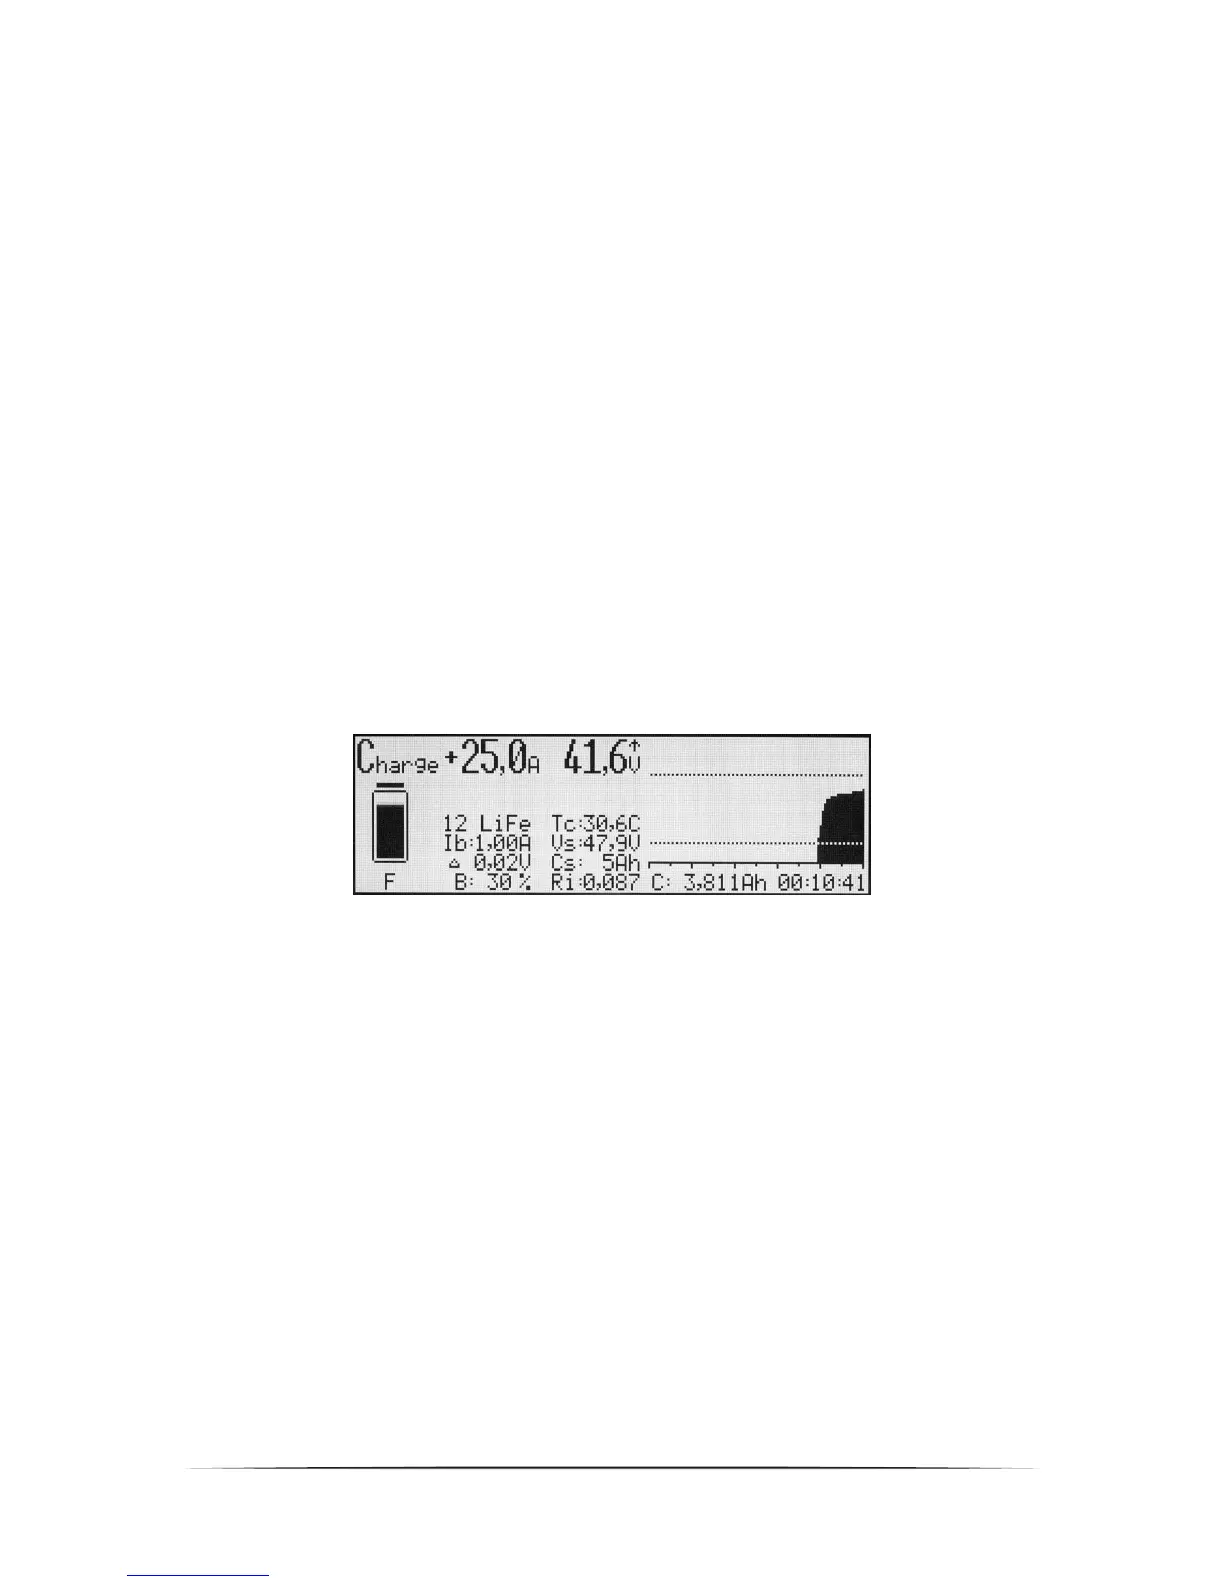
Program windows of finished processes
Process windows provide on-the-spot information concerning the processes’ progress. Three process windows
have been described below to make the displayed information’s interpretation easier. In the case of batteries not
plugged to the balancer the basic window (illus. below) or Memorys window, with history of the 5 last processes,
is displayed. The windows can be switched between with a turn of the dial or pressing it for a short time.
The window showed above (basic process window) contains the following information:
1. Charge – charging
2. +25A – current charge current
3. 41,6V – current voltage of the whole package
4. ↑ – voltage change tendency marker
5. Battery symbol – a graphic animation of the charging process
6. F – indicates that the charger is operating in Fast mode
7. 12 LiFe – battery type – 12 LiFe cell package
8. Ib: 1,00 A – balancing power (1A per cell), balancer plugged in
9. Δ 0,02V – difference in voltage between the strongest and the weakest cell in the package (0,02V),
balancer plugged in
10. V/c – the average voltage In the package estimated for one cell, balancer unplugged
11. B: 30% – current balancer power (30% of the set 1A), balancer plugged in
12. Tc: 30,6C – current temperature (30,6°C)
13. Vs: 47,9V – input voltage, power source (47,9V)
14. Cs: 5Ah – power consumed by the charger from the power source (5Ah) on a particular day
15. Ri: 0,087 – current internal resistance of the package (0,087Ω). The Ri value is estimated only during the
impulse charging (Pulse on in Setup).
16. Upper dotted line – final charge voltage
17. Voltage chart in the process – increases during charging, decreases during discharging
18. Lower dotted line – final discharge voltage
19. Time scale – with intervals each 10 and 5 minutes
20. C: 3,811Ah – current charged capacity (3,811Ah)
21. 00:10:41 – process duration