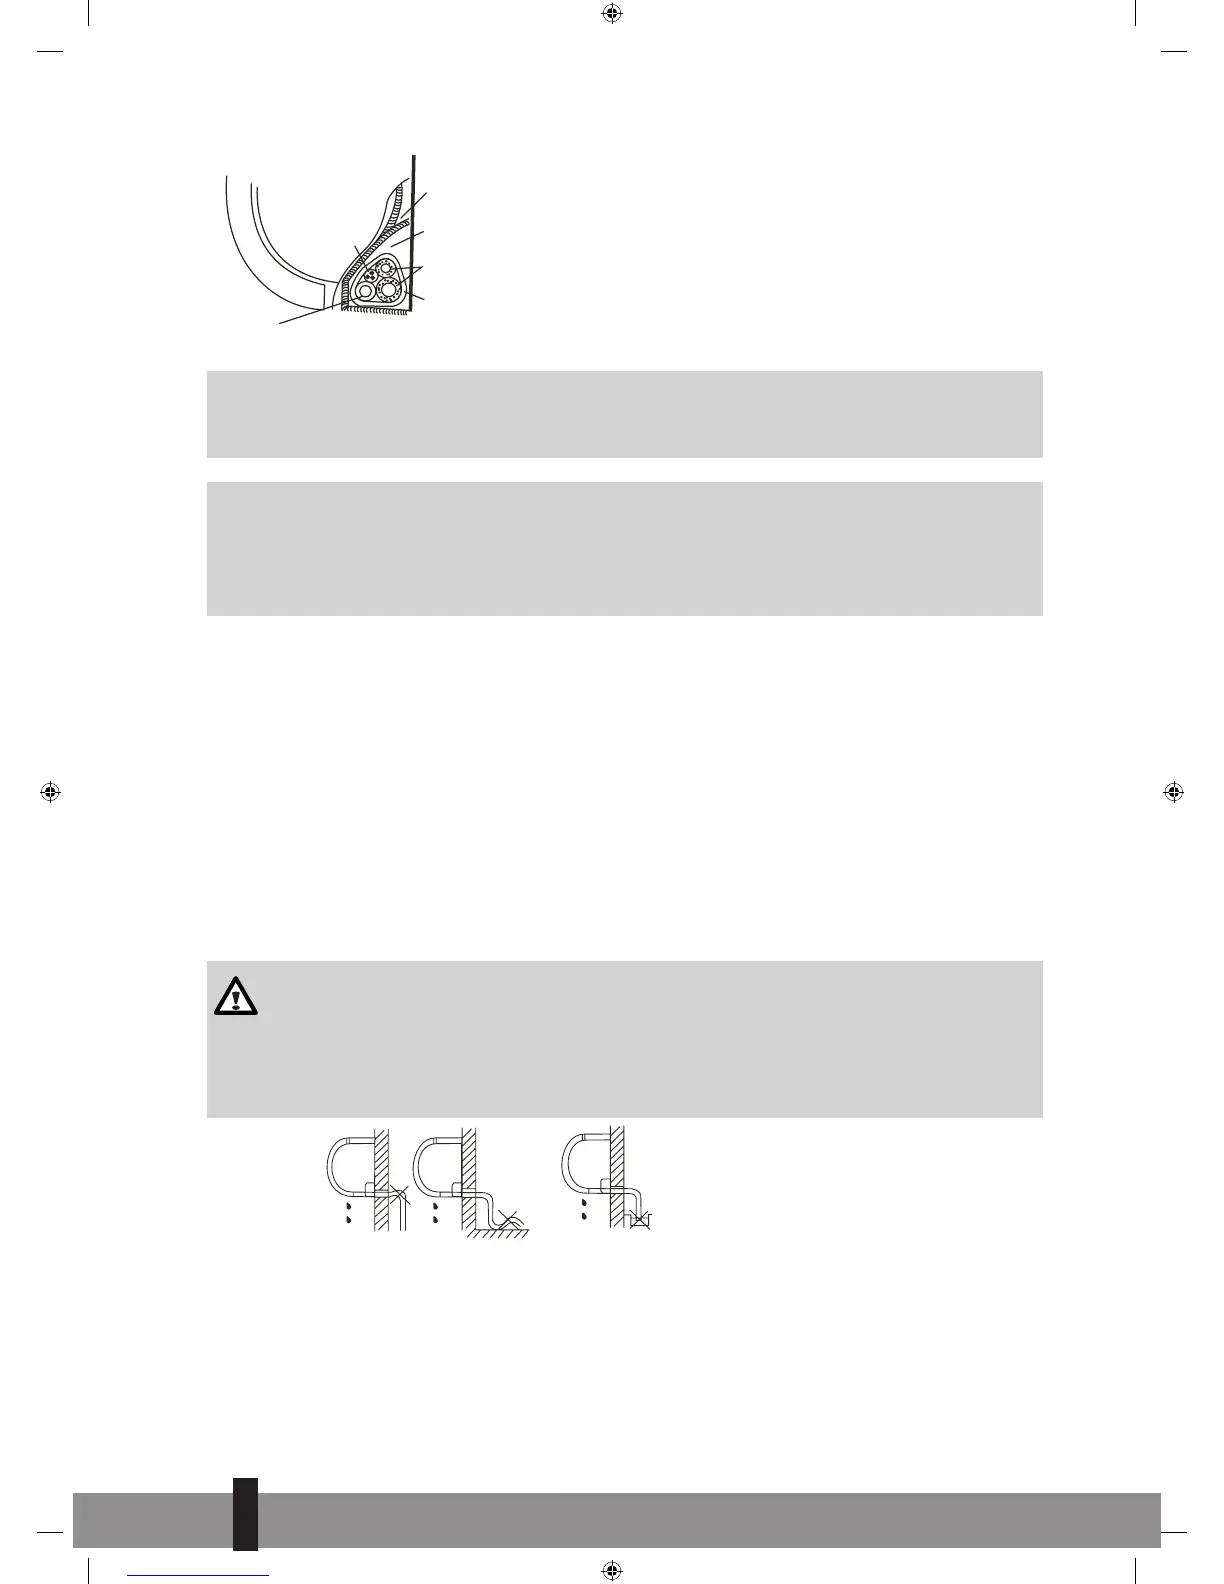
EasyManua.ls Logo

Qlima S-JA2518 User Manual

Qlima S-JA2518
84 pages
Go to English
To Next Page IconTo Next Page
To Previous Page IconTo Previous Page
Page #30 background image
30
Indoor unit
Ponding box
Pipe room
Connective pipe
Wrapping belt
Connective cable
Drain hose
Figure 14
G
ATTENTION
Copper lines must be insulated independently from each other.
G
ATTENTION
Always use the highest care when bending the piping. Make sure that the piping always is
bent and not buckled. In case of a buckled pipe: replace the complete piping or the buckled part,
as this is a potential refrigerant leak and may cause damage to the air conditioner.
8. CONNECTION THE CONDENSATION DRAINAGE HOSE FOR THE S-JA2518
MODELS
8.1 Connection the condensation discharge hose to the interior unit.
Connect the included condensation drainage hose to the interior unit by sliding the hose over the hose nip-
ple on the interior unit. Ensure that the condensation drainage hose always runs downwards and do not
hang the end in the water. See fig. 15.
Always run the condensation drainage hose under the coolant pipes to prevent that the condensation tray
from overflowing.
CAUTION
Be sure that the drain hose is located at the lowest side of the bundle. Locating at the upper
side can cause drain pan to overflow inside the unit.
Run the drain hose sloped downward over the whole length to drain out the condensed water
smoothly.
.
.
.
.
.
.
.
.
.
.
.
.
.
.
.
.
.
.
.
.
.
.
.
.
.
.
.
.
.
.
.
.
.
.
.
.
.
.
.
.
.
.
.
.
.
.
.
.
.
.
.
.
.
.
.
.
.
.
.
.
.
.
.
.
.
.
.
.
.
.
.
.
.
.
.
.
.
.
.
.
.
.
.
.
.
.
.
.
.
.
.
.
.
.
.
.
.
.
.
.
.
.
.
.
.
.
.
.
.
.
.
.
.
.
.
.
.
.
.
.
.
.
.
.
.
.
.
.
.
.
.
.
.
.
.
.
.
.
.
.
.
.
.
.
.
.
.
.
.
.
.
.
.
.
.
.
43
Do not block water flow by a rise.
Do not put the end of drain hose
into water.
Figure 15
4
30
Q_instal_S-JA2518 ('17) V2.indd 30 30-10-17 14:42
Question and Answer IconNeed help?

Do you have a question about the Qlima S-JA2518 and is the answer not in the manual?

Qlima S-JA2518 Specifications

General IconGeneral
BrandQlima
ModelS-JA2518
CategoryAir Conditioner
LanguageEnglish

Summary

1. Safety Precautions

2. Items Packed with the Unit

3. Activities for Installing the Air Conditioner for the S-JA2518 Models

4. Determining the Location of the Inside and Outside Unit

4.1 Determining the location of the inside and outside unit for the S-JA2518 models

Guidance on selecting indoor and outdoor unit placement.

4.2 Determining the location of the exterior unit for the S-JA2518 models

Guidelines for positioning the outdoor unit, considering noise and clearance.

5. Possibilities for Installing the Piping from the Interior Unit to the Exterior Unit

6. Mounting the Installation Plate and Making the Piping Feedthrough

6.1 Mounting the installation plate of the interior unit

Instructions for securely attaching the indoor unit's mounting plate to the wall.

6.2 Drilling the piping, condensation hose and cable feed-through

Details on drilling holes through the wall for unit connections.

7. Connecting the Coolant Pipes

7.1 Connecting the coolant pipes for the S-JA2518 models

Steps for properly connecting refrigerant pipes to indoor and outdoor units.

8. Connection the Condensation Drainage Hose for the S-JA2518 Models

8.1 Connection the condensation discharge hose to the interior unit

How to connect the drain hose to the indoor unit and ensure proper drainage.

8.2 Drain joint installation

Instructions for fitting the drain joint to the outdoor unit for condensate removal.

9. Electrical Work

10. Connecting the Electrical Cables

11. Evacuating the Cooling System of the S-JA2518 Models

12. Check for Coolant Leakage for the S-JA2518 Models

13. Topping Up Coolant for Piping Lengths Above 05 Metres

14. Test Running After Installation

Related product manuals