46
2
3
41
Max.
Med.
Min.
“STANDARD” OPERATING MODE
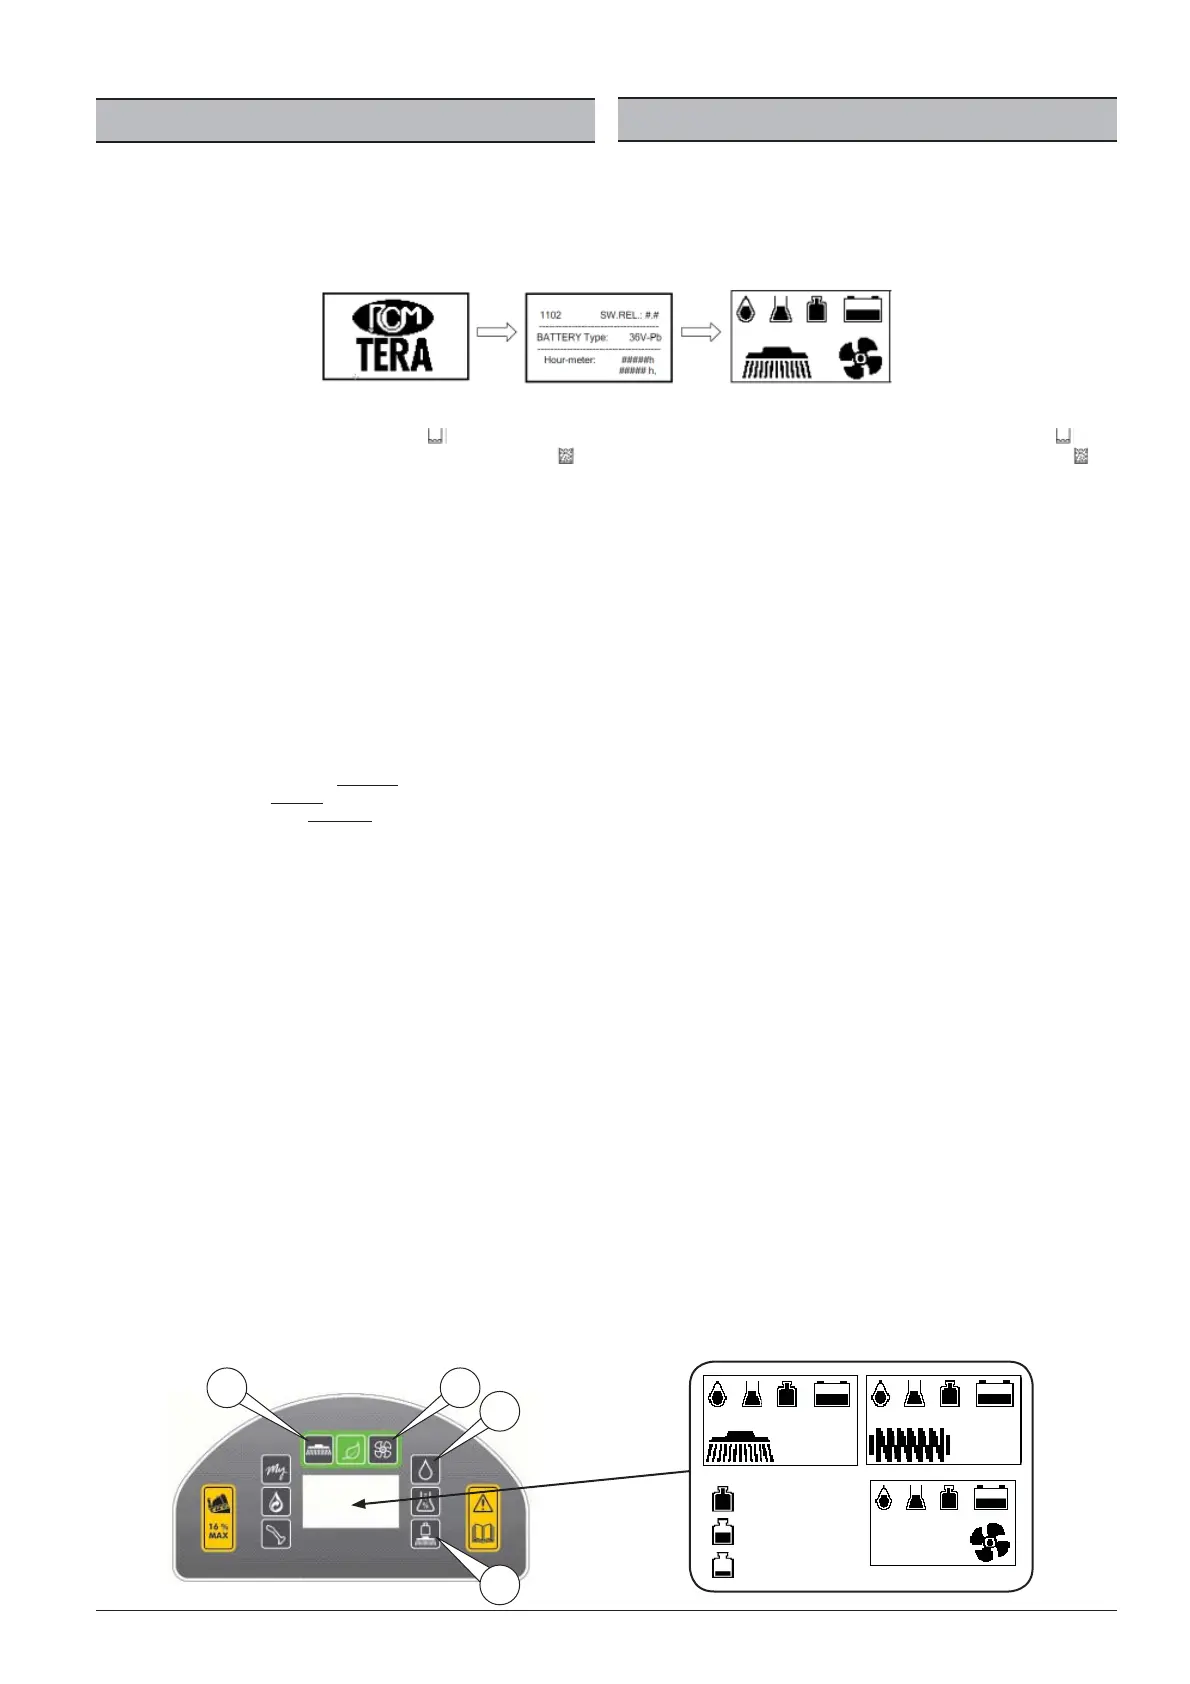
Switching on the machine
When the electrical system is switched on via the ignition key on position 1 (see
''COMPONENTS - POS.10"), the logo appears, then the display shows the machine
type, the software version, the battery voltage and the hour meter. Then another
screen appears, relative to the system status with the battery charge, the various
active functions and their settings and any alarms.
After the above sequence has nished, the display will show the status of the
clean water tank (solution). If it is empty, the symbol will appear, see to re l-
ling it. If, on the other hand, it is full, the display will show the symbol .
Before carrying out the washing operation, proceed as follows:
• Via the steering column switch described in the “COMPONENTS - POS.
11” chapter, set the speed and the travel direction of the scrubber-drier
as follows:
Gears:
• Select gear “I“ for a thorough wash or
• Select gear “II“ for a medium wash or
• Select gear “III“ for a fast wash.
• Rotate and lower the brushes using button “1”. , adjust the pressure of
the brushes on the oor by pressing button “2” then proceed as follows:
The function has three settings, minimum/medium/maximum. The display
shows THE SYMBOL with the selected pressure increment.
• Press the button once to set a minimum brush load.
• Press again to set a medium brush load.
• Press a third time to set a maximum brush load.
The pressure thus set will be automatically maintained.
• Open and adjust the washing water:
• Press button "3" to activate the function and adjust the washing water
ow on the brushes. The function provides for the adjustment of the
flow from fully closed to fully open.
The water adjustment thus set will be automatically maintained.
We recommend using an intermediate amount of water so that the entire surface
immediately after the brushes is well wet, without an excess of water creating
spraying, trickling or over owing of the squeegee.
• Engage the vacuum motors using button “4”.
The squeegee automatically lowers to vacuum the water.
Attention: the squeegee lowers only if the forward travel direction was selected
beforehand via the steering column switch on position “A” (see COMPONENTS -
POS.11) .
• Press the forward pedal (see “COMPONENTS” POS.14) so that the machi-
ne advances at the desired speed and direction, starting the washing
operation.
Should you wish to reverse during the washing and drying phase, change the
direction of travel via the steering column switch (see "COMPONENTS" POS.11)
on the "R" position, causing the squeegee lift automatically.
When the washing and drying is nished, proceed as follows:
• Stop the rotation of the brushes by pressing button “1”. The brushes lift
automatically, the water ow is interrupted.
• Stop the vacuum by pressing button “4”. The squeegee lifts automati-
cally.
MODO DE TRABAJO “ESTÁNDAR”
Encendido de la máquina
Cuando se conecta el sistema eléctrico con la llave de encendido en la pos.1 (vea
“COMPONENTES - POS.10), aparece el logotipo, sucesivamente se visualizan en
la pantalla el tipo de máquina, la versión de software, la tensión de la batería y el
contador de horas, luego aparece la pantalla en la que se visualiza el estado del
sistema con el nivel de carga de la batería, las diferentes funciones activas y la
correspondientes con guraciones y las posibles alarmas.
Cuando termina la secuencia descrita arriba, la pantalla mostrará el estado del
depósito de agua limpia (solución) si aparece vacío, se visualizará el símbolo
,
proceda a llenarlo. Si en cambio está lleno, la pantalla visualizará el símbolo
.
Antes de realizar la operación de fregado proceda de la manera siguiente:
• » Mediante el cambio de marchas descrito en el capítulo “COMPONENTES -
POS. 11”, con gure la velocidad y la dirección de marcha de la fregadora de la
manera siguiente:
Marchas:
• Seleccione la marcha “ I “, para una fase de lavado a fondo, o:
• Seleccione la marcha “ II “, para una fase de lavado medio, o:
• Seleccione la marcha “ III “, para una fase de lavado rápido.
• » Introduzca la rotación y bajada de los cepillos mediante el pulsador “1”. »,
regule la presión de los cepillos sobre el pavimento presionando el pulsador
“2” luego proceda de la manera siguiente:
La función consta de 3 regulaciones, mínima/media/máxima. La pantalla visualizará EL
SÍMBOLO con el incremento de presión que se ha seleccionado.
• Presione una sola vez el pulsador para regular una carga mínima de los cepillos.
• Presione una segunda vez para regular una carga media de los cepillos.
• Presione por tercera vez para regular una carga máxima de los cepillos.
La presión que se con gure de este modo se mantendrá automáticamente.
• Abra y regule el agua de lavado:
• Presione el pulsador “3” para activar la función y para regular el ujo de agua de
lavado en los cepillos. La función prevé la regulación del ujo desde completa-
mente cerrado hasta completamente abierto.
La regulación del agua con gurada de este modo se mantendrá automáticamente.
Se recomienda utilizar una cantidad intermedia de agua de forma que se quede bien
mojada toda la super cie inmediatamente después de pasar los cepillos, sin que un
exceso de agua pueda provocar salpicaduras, agua a raudales o desborde de los lim-
piasuelos.
• Conecte los motores de aspiración usando el pulsador “4”.
El limpiasuelos baja automáticamente y aspira el agua.
Atención: el limpiasuelos baja solo si antes se ha seleccionado la dirección de marcha
hacia adelante mediante marcha de conducción en posición “A” (vea COMPONENTES -
POS.11) .
• Pise el pedal de avance (vea “COMPONENTES” POS.14) de forma que la máq-
uina avance a la velocidad y con la dirección que desea, empezando la ope-
ración de lavado.
Si durante la fase de lavado y secado se desea proceder con marcha atrás, cambie la
dirección mediante la marcha (vea “COMPONENTES” POS.11) a la posición “R”, de este
modo el limpiasuelos sube automáticamente.
Cuando termina el lavado y secado proceda de la manera siguiente:
• Detenga la rotación de los cepillos pulsando “1”. los cepillos suben automátic-
amente, el ujo del agua se interrumpe.
• Detenga la aspiración pulsando “4”. el limpiasuelos sube automáticamente.