Prusa i3 – Build Manual
5. X-AXIS + Z-AXIS Rods
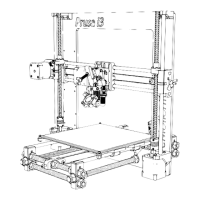
Now to complete all the axis assembly we need to build the X-Axis assembly and fit onto the Z-Axis rods.
5.1 X-Axis Assembly
Firstly assemble the basic X-Axis, take the X-Axis Idler and slot in one of the cage nuts to its housing (easiest
done by compressing the sides of the cage nut with a pair of needle nose plyers. Ensure the the centre of the nut
aligns with the hole for the M5 threaded rod (Fig 5.1a). Next put in the idler pulley (see appendix B) making
sure the head of the M4 bolt is on the front face of the idler (so the M4 nut is next to where the M5 threaded rod
will pass .. see Fig 5.1b) . Lastly slot in two LM8UU bearings .. the should both be flush with the bottom and
top edges of the idler (i.e. dont push the bearings together so they touch), then secure with cable ties (Fig 5.1b).
Note : an M5 cage nut is specifically used to allow some horizontal play in the nut, this keeps the Z movement
smooth and prevents Z-wobble. There is no vertical play under normal operation once the axis is level on both
sides and supporting the weight of the x-axis, although if you manually lift the x-axis you will notice a small
amount of vertical play which is normal.
Version: 1.3 Page: 23