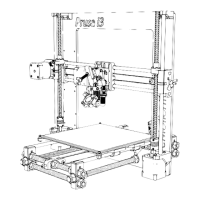
Prusa i3 – Build Manual
11.4 Extruder Calibration (Optional)
This step is not really necessary because your extruder comes pre-calibrated for 1.75mm filament, however
optionally you can also check your calibration by marking say 3cm on the filament above the idler (with a
marker or a small piece of tape) and then feeding 30mm via the menu and checking if 3cm exactly is fed down
to the idler. Note: Changes to the calibration of all the axis can be made from the LCD config menu, also they
can be made in the Configuration.h file of the Marlin Arduino Code.
11.5 End-stop Test
Make sure your x-axis is absolutely level (i.e. the X-Axis motor and the X-Axis idler are exactly the same
height from the table surface .. OR .. raise the X-axis up and line up the top smooth rod with the underneath of
the frame. If it isn't level then level it by holding both Z-couplers and turning the left/or right M5 threaded rods
until the axis is exactly level. Note: you can turn the Z-axis motors manually like this if the power is off OR
you have just reset the RAMPS using the LCD reset button OR you have selected menu option 'Disable
Steppers'.
IMPORTANT: do this slowly and carefully .. this is the stage you can destroy your hard work.
The end-stops are crucial .. if you auto-home and one of your end-stops is not triggering then the motor will
crash the axis and keep going. This is especially bad for the Z-axis where you will likely damage your hot-
end , your heated bed and probably one or more Z-axis structural parts.
Do this for each axis:
1. Reset the ramps using the LCD reset button or power off the power supply.
2. Center the axis (e.g. move the X-Carriage to the middle)
3. Hold Axis (e.g. the x-axis) end-stop closed with your finger, and while holding it closed , from the LCD
menu Move Axis, 1mm, X Axis (or Y or Z) .. and turn the knob right a fraction then back. The Axis
should move right (or forward for Y or up for Z) but refuse to move when you turn the knob back :- this
means your end-stop is working ok. Also if you go back to the LCD info front screen it will say end-
stop triggered {axis}.
Finally check that the end-stop triggers (bolts for X and Z, rear of the build plate for Y) are lined up correctly.
This is easy for the X and Y axis so check those first. For the Z-axis, carefully perform an auto-home from the
LCD menu, while ready to reset the printer using the LCD reset button or power supply power switch,
and stop the auto-home with the Z-axis approx 2cm away from triggering the end-stop.
Version: 1.3 Page: 52