Memory Channel
●Save simplex frequency or standard repeater station frequency.
1. Hold down [MHZ/SET] to set the main frequency
When TX-L is displayed, information about the main frequency is displayed on the left screen. When TX-R is displayed, information about
the main frequency is displayed on the right screen.
2.Press VFO key.
3.Rotate the coding knob to choose the needed frequency.
· Use the keyboard to directly input the needed frequency.
4.If saves standard repeater station frequency, please choose the following data:
· Frequency difference direction
· CTCSS/DCS/2TONE function
If saves simplex frequencies, choose other the related data (CTCSS or DCS set etc).
5.Press FUN key.
· If channel included the data, the symbol appears, and memory channel numbers appear and flash.
6.Rotate the coding knob or microphone UP/DWN key to choose the memory channel with the saved data.
7.Press MR key to save data in channel.
Save Non-standard Frequency Difference Repeater Station Frequency
1. Follow steps 1 to 6 of the storage simplex or standard relay station frequency. Store the required reception frequency and related data
2.Rotate the coding knob or press microphone UP/DWN key to choose the needed transmitting frequency.
3.Press FUN key.
4. Turn code short or press microphone [UP][DWN] key to select the pre-programmed receiving memory channel in which to store data.
5.Press MR key for (1s), and transmitting frequency is saved into the memory channel.
Note:
· Call out non-standard deviation frequency memory channel. "Ten" and "one" appear on the screen.
·Check transmitting frequency, first press FUN key, then press REV key.
·Non-standard frequency difference memory channel doesn’t save transmitting frequency difference status and reverse frequency status.
Call Out Memory Channel
Use tuning control knob
1.Press MR key to enter memory call-out mode (final used memory channel is called out).
2.Rotate the coding knob to choose the needed memory channel (empty memory channel can’t be called out, press VFO key to restore
VFO mode).
Use microphone keyboard
1.Press MR to enter memory call-out mode.
2.Press microphone key with Enter function.
3.Use microphone keyboard to input channel numbers.
·For the channel number as one-digital number, first input 0 or press Enter key after inputting channel number.
·For the channel number as two-digital number, directly input channel numbers.
Note:
· Unable to call out the empty memory channel, the intercom will beep incorrectly.
·After calling out the memory channel, data can be altered, such as narrowband, CTCSS or DCS, etc. However, once the other channel or
VFO mode is selected, settings will be deleted. To save these data forever, rewrite the channel content.
Delete Memory Channel
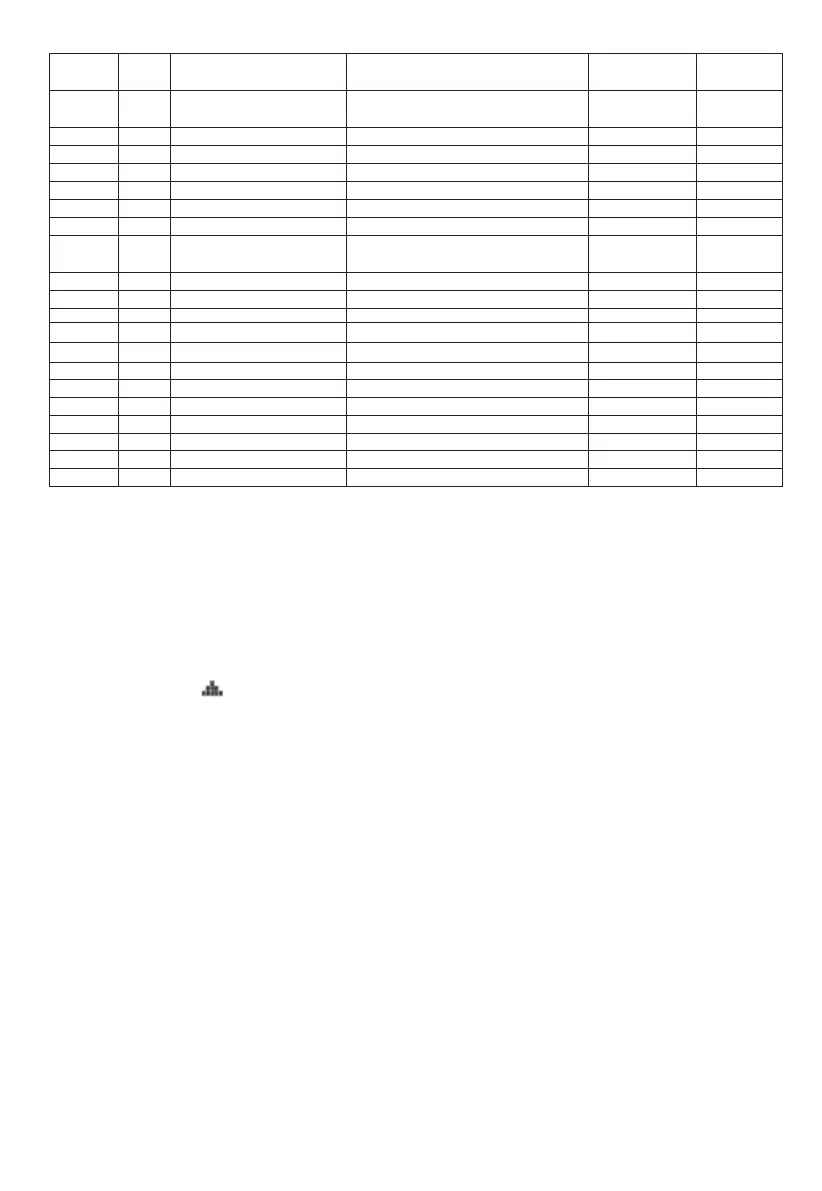
Screen
Display
L.LIG
WF.CLR
RX.CLR
TX.CLR
CONTR
K.LIG
CPD
SR
ANI
PTTID
RESET
MSKM
MSKBP
MSKGP
MSKRT
1DSOR
UN MUTE
TEND
TV OL
TA1L
Menu
Number
43
44
45
46
47
48
49
50
51
52
53
54
55
56
57
58
59
60
61
62
Function
Display backlight lights up
method
Standby backlight color
Receive backlight color
Transmit backlight color
LCD contrast adjustment
Key light lights up method
Compandor setting
Scramble frequency setting
ANI function
ID code
Reset selection
MSK monitor
MSK beep
MSK call group
MSK reset time
PTT ID type
Speaker turn on
Roger beep
Roger beep volume
End tone elimination code
Selection
AUTO/OFF/ON
1/2/3/4/5/6/7/8
1/2/3/4/5/6/7/8
1/2/3/4/5/6/7/8
0/1/2/3
OFF/ON/AUTO
ON/OFF
OFF/USER/3450/3400/3300/
3200/3100/3000Hz
ON/OFF
OFF/BOT/EOT/BOTH
VFO/FULL
OFF#/#ON
OFF#/#ON
oFF#/#1#/#2#/ ... /#10
oFF#/#1M#/#2M#/ ... /#10M
DTMF#/#MsK
Q#D#/#Q+o#/#Q.o
oFF#/#oN
1#/#2#/ ... /#25
oFF#/#oN
Default
ON
4
4
4
2
ON
OFF
OFF
OFF
VFO
VFO
ON
ON
OFF
10M
DTMF
QD
OFF
10
OFF
Reference
Page Number
38-39
39
39
39
39
-
43
44
34
-
45-46
36
36
36
36
36
44
45
45
-
07