Do you have a question about the Rittal VX IT Series and is the answer not in the manual?
CE declaration of conformity and product certificates are available for download on the Rittal website.
Assembly and operating instructions contain important information and should be stored near the product.
Observe safety instructions and other notes in this guide.
Includes instructions for optional accessories and RiCS configuration documents.
VX IT satisfies applicable requirements to EN 62 368-1 and UL 2416.
VX IT documents may be requested from Rittal in your preferred language.
Describes the VX IT's purpose, limitations, and proper usage.
Defines user groups (skilled, instructed, ordinary persons) for safety.
Provides important instructions for installation and modification of the enclosure.
Explains the meaning of safety symbols used throughout the manual.
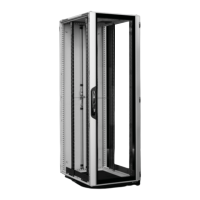
Details the standard supply scope and components of the VX IT enclosure.
Explains the rating plate and QR code data for standard and custom VX IT configurations.
Lists the included components for VX IT enclosures with standard 19˝ mounting angles.
Lists the included components for VX IT enclosures with dynamic 19˝ mounting angles.
Lists the included components for empty VX IT enclosures.
Details requirements for the installation location, including environment and load capacity.
Lists the necessary tools for assembly and installation.
Step-by-step guide for releasing packaging and unpacking the VX IT.
Instructions are located in the accessory bag supplied with the VX IT.
Instructions for dismantling aluminium front doors.
Instructions for dismantling rear doors of various types.
Instructions for dismantling the rear panel.
Instructions for dismantling the side panels of various types.
Instructions for removing any loose accessories supplied with the VX IT.
Guidance on safely lifting the VX IT rack from its pallet.
Instructions for removing the cardboard from the bottom of the rack.
Instructions for optional installation of the base or plinth.
Guide on installing castors or levelling feet, with reference to separate instructions.
Provides instructions and safety notes for safely moving the rack to its installation location.
Details on adjusting levelling feet and contact with the floor.
Instructions for adjusting the depth of the 19˝ level for specific rack widths and depths.
Instructions for adjusting the width of the 19˝ level for specific rack widths and depths.
Instructions on how to move the swing frame within the enclosure.
Instructions for swapping the hinges on the swing frame.
Instructions for baying VX IT racks to TS IT racks or other VX IT racks.
Details on how to securely fasten the rack to the floor using screw solutions.
Provides information on different screw-fastening solutions for floor mounting.
Instructions for installing or modifying gland plates for cable management.
Covers securing the VX IT during transport, shipping conditions, and load application.
Guidelines for moving VX IT racks on castors, considering the center of gravity.
Instructions for installing customer hardware, including securing the rack and component placement.
Describes cable entry in the roof for power and network cabling.
Instructions for optional dismantling and assembling of the roof plate.
Instructions for venting the roof plate, specific to 800 mm wide roof plates.
Details on cable entry in the base, including different base module types.
Overview of various accessories for cable routing within the enclosure.
Describes Plus and Basic kits for potential equalisation and improved EMC protection.
Explains the functional principle, application, and supply contents of the potential equalisation kits.
Step-by-step instructions for refitting the rear doors onto the enclosure.
Instructions for refitting the rear panel.
Instructions for refitting the side panels.
Instructions for fitting the aluminium front door with right-hand hinges.
Instructions for fitting the aluminium front door and swapping hinge to opposite side.
Note regarding impossibility of swapping hinge on divided IT rear door.
Instructions for fitting the sheet steel door and swapping hinge to opposite side.
Ensures the VX IT is correctly equipped with dismantled panels and sealed before commissioning.
Verify all electrical and mechanical connections are secure and comply with technical regulations.
The system commissioning must be performed by a qualified expert.
Instructions on how to open doors using the supplied key and notes on configuration racks.
Guidance on securing the enclosure when using a divided rear door without a secondary lock.
Provides contact details for Rittal International Service for technical queries.
Warning that only qualified personnel should rectify malfunctions.
Details on regular maintenance intervals and specific tasks like checking hinges and locks.
Specifies ambient temperature and humidity limits for storing the enclosure.
Detailed specifications for VX IT enclosures with standard 19˝ mounting angles.
Component availability for VX IT enclosures with standard 19˝ mounting angles.
Protection categories (Type/IP) for VX IT enclosures with standard 19˝ mounting angles.
Detailed specifications for VX IT enclosures with dynamic 19˝ mounting angles.
Component availability for VX IT enclosures with dynamic 19˝ mounting angles.
Protection categories (Type/IP) for VX IT enclosures with dynamic 19˝ mounting angles.
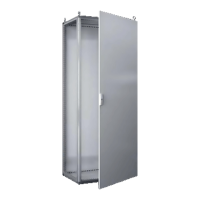
Specifications for empty VX IT enclosures, including dimensions and components.
Protection categories (Type/IP) for empty VX IT enclosures.
An overview of spare parts is available on the Rittal website.
Emphasizes the use of only original Rittal spare parts.
Warranty conditions are based on the sales and delivery conditions of Rittal agents.
| Color | RAL 7035 |
|---|---|
| Protection category | IP55 |
| Width | 600 mm |
| Depth | 1000 mm |
| Weight | Varies by model |
| Door Type | Single door |