www.scheppach.com / service@scheppach.com / +(49)-08223-4002-99 / +(49)-08223-4002-58
GB
|
23
7.
Open the packaging and remove the device care-
fully. Remove the packaging material as well as the
packaging and transport bracing (if available). Check
that the delivery is complete. Check the device and
accessory parts for transport damage. In case of
complaints the dealer must be informed immediate-
ly. Subsequent complaints will not be accepted. If
possible, store the packaging until the warranty pe-
riod has expired. Read the operating manual to make
yourself familiar with the device prior to using it. On-
ly use original parts for accessories as well as for
wearing and spare parts. Spare parts are available
from your specialized dealer. Specify our part num-
bers as well as the type and year of construction of
the device in your orders.
m ATTENTION
-
8. Attachment /
Connecting the cutting torch
• Insert the plasma burner plug (10a) into the plasma
burner connection socket (10) and tighten the union
nut hand-tight (see Fig. 1,3 + 4).
• Insert the plasma burner power plug (6) into the
plasma burner power socket (10) and tighten the
union nut hand-tight (see Fig. 1,3 + 4).
Connecting the ground cable
• Connect the ground terminal plug (9a) with the
ground terminal - connection socket (9). Make
and then turned. The connecting shaft must face
upwards when plugging in the ground cable plug
(9a). After plugging in, the connecting shaft must
be rotated in a clockwise direction until it reaches
the stop, in order to lock it in place (see Fig. 1,3 +
5). This does not require force!
Connect the compressed air hose
• Connect the compressed air hose (19) on the
back of the plasma cutter to the compressed air
connection (19a). To do so, insert the side of the
compressed air hose into the compressed air con-
nection (19a) of the plasma cutter without a quick
connector (see Fig. 9).
• The pressure can be set via the knob (21) on the
condensate separator (see Fig. 9 - 12). Select a
pressure of 4–4.5 bar.
• Always keep hands away from the work area when
the machine is running.
•
• Touching hot parts of the device or workpiece (burn
• In case of improper protection risk of accident and
• Harmful emissions from smoke and gases if there
extracted.
Warning! This electric tool generates an electro-
active or passive medical implants under certain
conditions. In order to prevent the risk of serious or
medical implants consult with their physician and the
manufacturer of the medical implant prior to operat-
ing the electric tool.
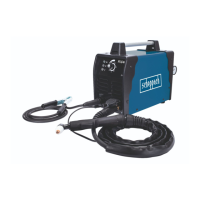
6. Technical data
Mains connection 230V ~ / 50Hz
Output 15 - 40A
On-load factor*
35% bei 40A (25°C)
20% bei 40A (40°C)
Working pressure 4 - 4,5 bar
Insulation class H
Cutting capacity
0,1 mm - 12 mm
( depending on the
material)
Material
Copper: 1 - 4 mm
Stainless steel: 1 - 8 mm
Aluminum: 1 - 8 mm
Iron: 1 - 10 mm
Steel: 1 - 12 mm
Dimensions L x W x H 375 x 169 x 250 mm
Weight 6 kg
Noise
m WARNING:
your health. If the machine noise exceeds 85 dB (A),
please wear suitable hearing protection.
On-load factor* = is the percentage of the operating
time, in which the machine can beused continuously
under normal temperature conditions. In relation to a
10-minute time period this means, for example, that
with a duty cycle of 20%, that it can be used for 2
minutes and then there should be a break of 8 min-
utes. If you exceed the duty cycle values then this will
trigger the overheating protection which will bring the
device to a stop until it has cooled down to the normal
working temperature. Exceeding the duty cycle val-
ues continuously can damage the device.
 Loading...