E-16
HTCN400_500DVW_E.fm03/10/29
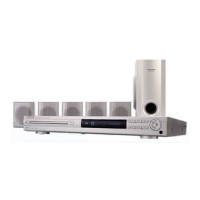
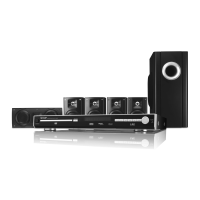
HT-CN400DVW
ENGLISH
92LCN500W0270
F
S
V
I
N
P
E
E
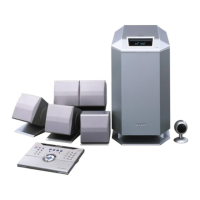
HT-CN500DVW
Preparation for Use
- Battery installation / Turning the power on -
Battery installation
Precautions for battery use:
" Replace all old batteries with new ones at the same time.
" Do not mix old and new batteries.
" Remove the batteries if the unit is not to be used for long periods of time. This will
prevent potential damage due to battery leakage.
Caution:
" Do not use rechargeable batteries (nickel-cadmium battery, etc.).
" Incorrect installation may cause the unit to malfunction.
Notes concerning use:
" Replace the batteries if the operating distance is reduced or if the operation
becomes erratic. Purchase 2 "AA" size batteries (UM/SUM-3, R6, HP-7 or similar).
" Periodically clean the transmitter on the remote control and the sensor on the unit
with a soft cloth.
" Exposing the sensor on the unit to strong light may interfere with operation.
Change the lighting or the direction of the unit.
" Keep the remote control away from moisture, heat, shock, and vibrations.
Turning the power on
! Test of the remote control
Check the remote control operation after making all the connections (see pages 11 -
14).
Point the remote control directly at the remote sensor on the unit.
The remote control can be used within the range shown below:
Press the ON/STAND-BY button. Does the power turn on? Now, you can enjoy your
system.
! To turn the power on
Press the ON/STAND-BY button.
If the power does not turn on, check the AC power lead is plugged in properly.
To set the unit to the stand-by mode:
Press the ON/STAND-BY button again.
The power stand-by indicator lights up.
1 Open the battery cover.
2 Insert the supplied batteries according to the direction indicated in
the battery compartment.
When inserting or removing the batteries, push them towards the battery termi-
nals.
3 Close the cover.
ENTER
ST/MO
DISPLAY
LANGUAGE
MUTE
MENU/PBC
TITLE
SUBTITLE
SET UP
OPEN/
CLOSE
ON/
STAND-BY
ON/
STAND-BY
Remote sensor
0.2 m - 6 m
(8" - 20')
Power stand-by indicator