1-3
BEFORE USING THE MACHINE►BEFORE USING THE MACHINE
PART NAMES AND FUNCTION
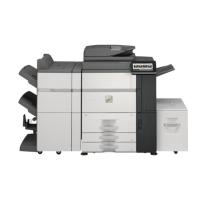
EXTERIOR
(1) Output tray (center tray)*
Printed paper is output into this tray.
(2) USB connector (A type)
This is used to connect a USB device such as a USB
memory device to the machine.
For the USB cable, use a shielded cable.
Supports USB 2.0 (Hi-Speed).
(3) Keyboard
Use this as a substitute for the soft keyboard displayed
on the touch panel. When not being used, it can be
stored under the operation panel.
► NAMES AND FUNCTIONS OF SOFT KEYBOARD
KEYS (page 1-171)
(4) Automatic document feeder
This automatically feeds and scans multiple originals.
Both sides of 2-sided originals can be automatically
scanned at one time.
► AUTOMATIC DOCUMENT FEEDER (page 1-92)
(5) Toner cover (Upper front cover)
Open this cover to replace the toner cartridge or to
remove misfed paper in the paper pass unit.
►
REPLACEMENT OF TONER CARTRIDGE (page 1-165)
(6) Front cover
Open this cover to switch the main power switch to "On"
or "Off".
►
TURNING ON THE POWER (page 1-10)
►
CLEANING THE LASER UNIT (page 1-159)
(7) Operation panel
This panel hosts the [Power] button, [Power Save]
button/indicator, [Home Screen] button/indicator, main
power indicator and touch panel. Use the touch panel to
operate each of these functions.
► OPERATION PANEL (page 1-9)
(8) Tray 1
Store paper in this tray. Up to 1200 sheets can be stored.
► LOADING PAPER IN THE TRAY 1/2 (page 1-66)
(9) Tray 3
Store paper in this tray. Up to 500 sheets can be stored.
► LOADING PAPER IN THE TRAY 3/4 (page 1-69)
(10) Tray 4
Store paper in this tray. Up to 500 sheets can be stored.
► LOADING PAPER IN THE TRAY 3/4 (page 1-69)
(11) Tray 2
Store paper in this tray. Up to 800 sheets can be stored.
► LOADING PAPER IN THE TRAY 1/2 (page 1-66)
*Optional
BEFORE USING THE MACHINE
(8) (9) (10) (11)
(1) (2) (3) (4) (5) (6) (7)