fåëí~ää~íáçå
22 oÉîáëáçå=MP=G=fkpq^iiqflk=fkpqor`qflkp=Ua^=G=USNJVOTPKV=
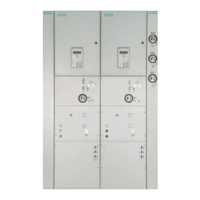
• Make-proof busbar earthing switch
• Top-mounted busbar sectionaliser
In these cases, the busbar joints are not accessible anymore after the transport units
have been installed.
For this reason, the busbar sections must be re-assembled from the panel on the left of
the panel joint to the panel on the right before assembly. The illustration below shows
the final position after re-assembling.
! Clear the assembly opening s: Remove all horizontal flange covers on the busbar
housings
a of the panel located on the left of the panel joint.
! Undo the busbar sections g at the joints d in the busbar housing through the
assembly opening
s. The busbar supports l remain on the disassembled busbar
sections.
! Take the busbar sections g out of the housings with the associated busbar supports
l through the vertical flange f.
! Mount the busbar sections at the joints j in the busbar housings h of the panel
located on the right of the panel joint. Assembly takes place through the vertical
flanges
k.
Fig. 14: Re-assembling the busbars
a
Busbar housing of the panel located on the left of the panel joint
h
Busbar housing of the panel located on the right of the panel joint
s
Assembly openings (horizontal flanges)
j
Joints of the panel located on the right of the panel joint
d
Joints of the panel located on the left of the panel joint
k
Vertical flanges of the panel located on the right of the panel joint
f
Vertical flanges of the panel located on the left of the panel joint
l
Busbar support
g
Busbar sections

 Loading...