139-2021.9 / 07 NXAIR M 83
Operating the circuit-breaker panel with HV HRC fuse
13 Operating the circuit-breaker panel with HV HRC fuse
Read and understand these instructions before attempting operating works.
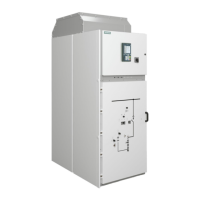
13.1 Control elements at the front side of the panel
Fig. 136:Control elements on the panel front
Door to the low-voltage compartment
Locking device for the door to the low-voltage
compartment
Test sockets for voltage detecting system
(type LRM)
Instruction label for closing the
high-voltage door
Opening for charging the spring in the circuit-
breaker / fuse combination manually (covered)
Handle for opening the high-voltage door
Control gate for opening and closing the
actuating opening for racking the withdrawable
circuit breaker / fuse combination
Actuating opening for racking the withdrawable
circuit breaker / fuse combination
Actuating opening for inserting the double-bit
key to control racking of the withdrawable circuit
breaker / fuse combination
Mechanical position indicator for withdrawable
circuit breaker / fuse combination
Actuating opening for feeder earthing switch
Operating slide for opening and closing the
actuating opening for operating the feeder
earthing switch
Mechanical position indicator for feeder
earthing switch
Operations counter for circuit-breaker/ fuse
combination
Spring state indicator for circuit-breaker / fuse
combination
CLOSED/OPEN indicator of the circuit-breaker /
fuse combination
Actuating opening for opening the circuit-breaker
/ fuse combination
Actuating opening for closing the circuit-breaker
/ fuse combination
Rotary button to close and open the actuating
opening located below

 Loading...