SKMP 1300 D4
■ 24
│
GB
│
IE
CAUTION! PROPERTY DAMAGE!
► To prevent the appliance from being
overloaded, do not exceed the specified
maximum filling quantities.
If the appliance is labouring: switch off the
appliance, remove half of the dough and
knead each half separately.
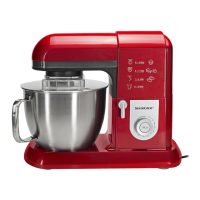
5) Depending on what you want to do, attach the
kneading hook , whisk - or beater 3 to
the drive shaft :
– Fit the kneading hook , whisk - or beater
3 onto the drive shaft so that the two
metal pins on the drive shaft lock into the
recesses on the attachment -3.
– Push the attachment -3 firmly onto
the drive shaft so that the spring com-
presses and turn the attachment anticlock-
wise a little way (towards
).
– Let go of the attachment. It is now firmly
attached to the drive shaft .
NOTE
► Please note that while kneading or stirring,
the mixture in the mixing bowl increases
in volume or is pressed upward slightly as a
result of the movement. You should therefore
never fill the mixing bowl right up to the
top!
6) Press the release lever upwards and push
the swivelling arm into the working position
with the mounted tool facing downwards.
7) Turn the rotary switch to the required level
(see the section “Functions”).
Adding more ingredients
WARNING! RISK OF INJURY!
► Never put your hand into the filling nose
during operation!
To add ingredients while the appliance is running,
open the filling nose on the lid .
Slowly add more ingredients via the filling nose .
ATTENTION! PROPERTY DAMAGE!
► Do not insert objects, such as forks or spoons,
into the filling nose !
► If you add ingredients during operation, food
can splash out of the appliance.
After you have finished using your
appliance
1) Turn the appliance off using the rotary switch .
2) Press the release lever upwards and move
the swivelling arm to the highest position.
3) Remove the attachment -3 from the
drive shaft by pushing the attachment
-3 against the drive shaft and turning
clockwise (towards
) at the same time.
You can now remove the attachment.
4) Remove the lid from the swivelling arm
by turning it clockwise (towards ) and
pulling it off.
5) Remove the mixing bowl by turning it anti-
clockwise and then pulling it upwards.
6) Clean the appliance (see section “Cleaning
and care”).
 Loading...