EN
10
Takethefollowingstepstoreduceriskofvibration-relatedinjury:
a) Wearwarmclothingwhenworkingincoldconditions.Keephandswarmanddry.
b) Ifnumbness,tingling,painorwhiteningoftheskinofngersorhandsisexperienced,stop
usingthetool,informemployer(whereappropriate)andconsultaqualiedhealthprofessional.
c) Operateandmaintainthetoolasrecommendedintheinstructionstopreventanunnecessary
increase in vibration levels.
d) Whereappropriate,supporttheweightofthetoolinastand,tensionerorbalancer.
e) Theriskfromvibrationisgenerallygreaterwhenthegripforceishigher.Holdthetoolwitha
light but safe grip, taking account of the required hand reaction forces.
f) Ensurethetoolandaccessoriesareproperlymountedandingoodrepair:improperlymounted
or damaged tools can cause excessive vibration.
g) Donotholdtheinsertedtoolwiththefreehand,asthisincreasesvibrationexposure.
h) Keepsuspendedhandlesinthecentralpositionandavoidpushingthehandlesintotheend
stops.
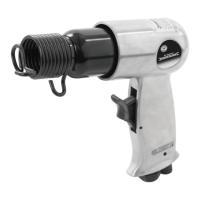
Intended Use
Airhammer,poweredbycompressedairfromacompressor,designedprimarilyforuseonvehicle
bodyworkandsimilarthinsheetmetalconstructions.
Notintendedforcommercialuse.
ThetoolmustONLYbeusedforitsintendedpurpose.Anyuseotherthanthosementionedinthis
manualwillbeconsideredacaseofmisuse.Theoperator,andnotthemanufacturer,shallbeliable
foranydamageorinjuryresultingfromsuchcasesofmisuse.Themanufacturershallnotbeliable
foranymodicationsmadetothetool,norforanydamageresultingfromsuchmodications.
Unpacking Your Tool
• Carefullyunpackandinspectyourtool.Fullyfamiliariseyourselfwithallitsfeaturesand
functions.
• Ensure that all parts of the tool are present and in good condition. If any parts are missing or
damaged, have such parts replaced before attempting to use this tool.
Before Use
WARNING:Alwaysdisconnectthetoolfromtheairsupplybeforeadjustmentormaintenance
is carried out.
Attaching to the air supply
WARNING:Donotusequick-disconnectcouplingsattoolinlet.Usehardenedsteel(ormaterial
withcomparableshockresistance)threadedhosettings.
Connecting a whip hose (not included) to the tool:
WARNING:Alwaysuseanairwhiphosewhenusingimpacttoolssuchasanairhammer.Anair
whiphoseisashort,exiblehosedesignedtokeepadistance
1. ApplysomePTFEtape(notincluded)tothethreadedhosettingofthewhiphose.Thiswillhelp
to maintain an airtight seal.
Note:ApplyPTFEtapetightlyandinaclockwisedirection,soitdoesnotcomeoffwhenthethread
isscrewedintothetool.
2. RemovetheprotectiveplugfromtheAirInlet(4).
3. Usingaspanner(notincluded)screwthethreadedhosettingonthewhiphoseintotheAirInlet
located at the base of the handle.
Connecting the quick connector to the whip hose:
Note:ThistoolissuppliedwithtwodifferentmaleairlineQuickConnectors(5)(Fig.I):
EQ-4–commonlyusedinEurope
EN-6–mainlyusedintheUK
• Ifthewhiphose(notincluded)isnotttedwithacompatibleconnector,choosetheconnector
thatiscompatiblewiththeairlinesystemyouareusing,andinstallasoutlinedbelow:
1. ApplyPTFEtapetothescrewthreadsoftheQuickConnector.
Note:ApplyPTFEtapetightlyandinaclockwisedirection,soitdoesnotcomeoffwhenthethread
isscrewedintothetool.
2. Using2xspanners(notsupplied)screwtheQuickConnectorintotheotherendofthewhip
hose.
3. Connecttoairline,pressurisecarefullyandcarryoutaleakcheck(e.g.bysprayingsmall
amountsofsoapywaterontotheoutsideoftheconnectors).
• AirlinesttedwithmatchingfemaleQuickConnectorswillnowbeapushttothetoolviathe
whiphose.
Recommended air supply
• Thistoolshouldbeconnectedtoaclean,dryairsupplywithinlineoilerandwaterseparator.
• Donotallowsupplypressuretoexceedthemaximumstated(see‘Specication’).
• Ensurethatwaterisdrainedfromairsystemdaily.
• Ensurethatallpartsofthesystem(hoses,couplers,etc.)arecorrectlyratedfortheairpressureto
be used.
Fitting accessories
WARNING:Alwaysdisconnectthetoolfromtheairsupplybeforeexaminingorchanging
accessories.Examineyourchiselsbeforeusingthem.Ifanaccessoryiswornorcracked,DONOTuse.
1. Insert the required accessory into the head of the air hammer.
2. ThreadtheQuick-ChangeSpring(1)overtheaccessoryandontothescrewthreadsontheheadof
the air hammer.
3. TightentheQuick-ChangeSpringsothatthescrewthreadsarefullyengaged,theendloopis
positionedvertically(12o'clockposition),andtheshankoftheaccessoryisretainedwithinthe
endcoil,asshowninthe‘ProductFamiliarisation’image.
4. Pull the accessory back and forth several times by hand, to check that it is securely retained.
Note:AccessoriescanalsoberemovedandttedwhentheQuick-ChangeSpringisscrewedon
tothebodyofthetool.Carefullypushtheendcoilofthespringsideways,sothatthecollarofthe
accessory can pass the retaining spring coil.
Setting tool power
Note: This air hammer features a built-in pressure regulator.
• ThetoolspeedcanbeadjustedbyrotatingtheAir/TorqueControlDial(3)asrequired.
Operation
1. Griptheairhammerrmlywithbothhands.
2. Restthetipoftheaccessoryontheworkpieceyouwishtochip/cut.
3. GentlypresstheTrigger(2)andmoveslowlyalongtheworkpiece.
IMPORTANT:DONOTallowtheairhammertorunin‘idlerotation’foranextendedperiodoftime.
Thiswillshortenitsservicelife.
Note:DONOTexertexcessivepressureonthetool–letthetooldothework.Ifthematerialis
notbeingcutasintended,examinetheaccessoryforwearanddamageandreplaceifnecessary.
Consider changing to a different accessory.
WARNING:Beawarethatairtoolsmayholdresidualpressureafteruse.Alwaysbleedair
pressure from the tool after shutting off air supply.
Accessories
• Accessories for this tool, including chisels and punches, are available from your Silverline
stockist.OthersparepartscanbeobtainedfromyourSilverlinedealeror
www.toolsparesonline.com.
1 Quick-Change Spring
2 Trigger
3 Air/Torque Control Dial
4 Air Inlet
5 Quick Connectors
6 Panel Cutting Chisel
7 Taper Punch
8 Spot Weld Breaker Chisel
9
Ripping Chisel
Product Familiarisation
Included Accessories:
394970_OwnerManual.indd 10394970_OwnerManual.indd 10 02/05/2024 08:3502/05/2024 08:35