26
USER MAINTENANCE GUIDE
ADJUSTMENT AND MAINTENANCE OF THE CHASSIS
Keep go-kart in original configuration
Use spare parts of Sodikart origin
This document can not be reproduced or released without the Sodikart authorization.MAN.GT4.EN.01
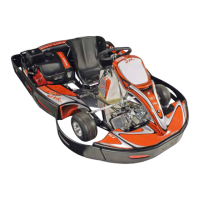
4.5 - Rear wheel axle unit adjustment
Legend
1Ruler
2Hub
3Axle
4 Screw
5Pin
• Place the go-kart on a trolley.
• Unscrew the nylstop nuts from the rear wheels with
the proper size wrench, and then remove wheels.
• Using a rule (1) or any depth gauge, measure
between the hub base (2) and the top of the axle (3).
• Undo the CHC screws (4) of the rear hub with an
appropriate wrench until the hub can slide along the
axle shaft and cotter pin (5).
• Move the hub (2) to the desired position with the rule
(1) in place against the hub base (2).
• Retighten screws (4) securely, repeat the operation on
the other hub.
• Replace both wheels following the rotation direction
indicated on tyre wall. Replace locknuts (nylstop) and
tighten securely.
Position of hub on axle
.
Accurate adjustment of the rear axle assembly will
greatly improve the go-kart performance.
Too wide an adjustment of rear wheels causes a
tendency to slide and too narrow an adjustment will
cause a tendency to jump.
Check the cotter pin of hub and rear axle are in their
slotted home.
Driving with badly tightened wheel screws may lead
to a serious or even fatal injury.
Exceeding the maximum rear wheel unit adjustment
may cause the breaking of the hub, and may lead to
a serious or even fatal injury.


 To Next Page