No direct sunlight
No rain exposure
No snow lay up
Direct Sunlight
Rain Exposure
Snow Lay up
4.3 Installation Precautions
Stay away from
antenna cables
Stay away from
combustibles
InstallationInstallation
1A
B
C
D
E
F
G
H
I
J
K
1
1
4
4/3/2
3
1
4
1
Description
L
M
1
2
6 mm European terminal
Number
Quantity
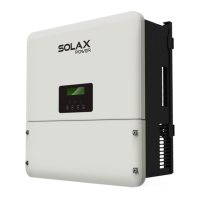
X1-Hybrid G4 series inverter
Bracket
Waterproof shield
PV terminal (positive*2 , negative*2)
Waterproof connector with RJ45
8 mm European terminal
(Expansion bolt, Gasket, Self-tapping bolt)*3
Battery connection terminal (positive*1, negative*1)
N
1
O
11
OT terminal (inverter grounding)
P
Meter (optional)
Manual
3
Q
Pocket WiFi
1
(RJ45 terminal adapter, CT)
R
2
1
☆
☆
☆
☆
☆
M5 inner hexagon bolt
PV pin angle (positive*2, negative*2)
1
RJ45 terminal
☆
24
25
Quick Installation Guide
▲
▲
▲
★
Note:
l “C”, “D”, “E”, “F”, “I” and “R” marked with "☆" indicate that they are not
included in the accessory package of M-series inverter, but included in
X1-Matebox.
l “K” marked with “★” indicates that, the D-series inverter is
equipped with 4 pieces for Australia and 3 pieces for other countries,
and the M-series inverter is equipped with 3 pieces for Australia and 2
pieces for other countries.
l “G”, “L” and “M” marked with “▲” indicate that they are included in
The protection level of X1-Hybrid G4 series inverters is IP 65, so that the
inverter can be installed outdoors.
Check the installation environment and pay attention to the following
conditions when installing:
• Do not expose to strong light.
• Do not touch flammable building materials.
• Do not approach flammable and explosive gases or liquids (e.g. where
chemicals are stored).
• Do not touch cold air directly.
• Do not approach TV antenna or cable.
• Do not place in areas above 3000 meters above sea level.
• Do not install in precipitation or high humidity, which may cause
corrosion or damage Internal devices.
• Keep the system out of reach of children.
If the inverter is installed in a narrow area, be sure to reserve appropriate
space for heat dissipation.
The ambient temperature of the installation site is -35 ~60 .°C °C
The maximum angle range of wall tilt ±5°.
Avoid direct sunlight, rain and snow weather.
Waterproof connector with RJ45 (COM/CAN/DRM/CT)
1
A
B
C
D
E
F
G
H
I
J
K
1
1
4
4/3
3
1
1
Description
L
M
1
2
6 mm European terminal
Number
Quantity
X1-Hybrid G4 series inverter
Bracket
Waterproof shield
PV terminal (positive*2 , negative*2)
Waterproof connector with RJ45
8 mm European terminal
(Expansion bolt, Gasket, Self-tapping bolt)*3
Battery connection terminal (positive*1, negative*1)
N
1
O
1
OT terminal (inverter grounding)
P
Meter (optional)
Manual
3
R
Pocket WiFi
1
RJ45 terminal adapter
2
1
M5 inner hexagon bolt
1
RJ45 terminal
Quick Installation Guide
★
1
A
B
C
D
E
F
G
H
1
3/2
1
Description
Number
Quantity
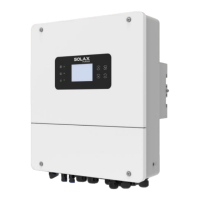
X1-Hybrid G4 series inverter
Bracket
Waterproof connector with RJ45
(Expansion bolt, Gasket, Self-tapping bolt)*3
1
1
Manual
3
Pocket WiFi
1
M5 inner hexagon bolt
Quick Installation Guide
★
X1-Hybrid G4 M series
X1-Hybrid G4 D series
Meter (optional)
R
1
Note:
“E” marked with “★” indicates that, the M-series inverter is equipped
with 3 pieces for Australia and 2 pieces for other countries, and the D-
series inverter is equipped with 4 pieces for Australia and 3 pieces for
other countries.
Q
1
CT

 Loading...