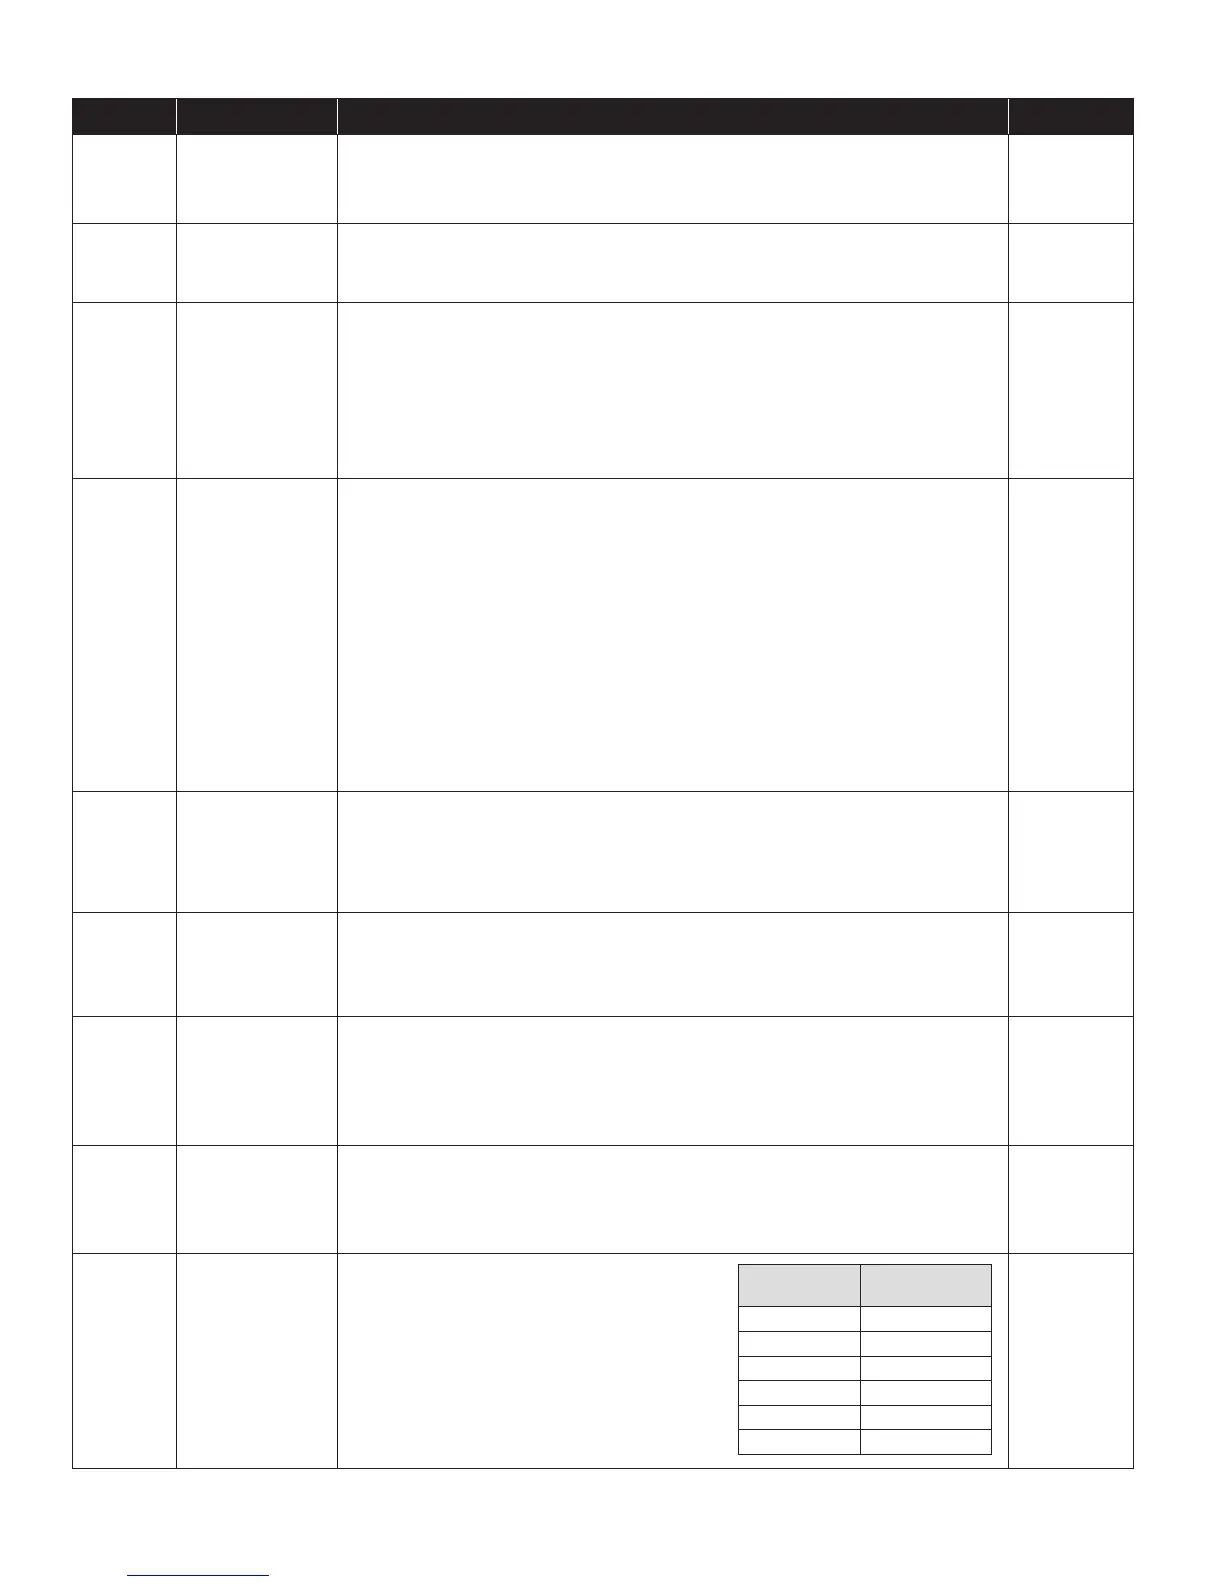
Table 4. Error Codes
Error Code Failure Mode Action Reset
E1 Internal Humidity
or Temperature
Sensor Open or
Shorted
1. Check the connection between the sensor board and control board.
2. If connection okay, replace sensor board, Part No. Y6476.
Cycle Power
E2 High Refrigeration
Pressure
1. Verify that the fan works, the backow damper swings freely and there is no blocked or
restricted duct.
2. If the fault persists, call Technical Support.
Cycle Power
E3 Y6456
Remote Control
Communication
Loss
1. Check connections between Y6456 and dehumidier control board. Terminals should be
fully inserted and secured in the control board and Y6456 control terminals.
2. If connections are correct and secure, turn off the dehumidier and remove the Y6456.
Use a short section of 4-wire cable to reconnect the Y6456 to the control board. Turn
the dehumidier back on and increase the dryness level setting on the Y6456. If the
dehumidier turns on, the problem is with the wiring between the dehumidier and
control.
3. If the dehumidier does not turn on, call Technical Support at 1-800-453-6669.
Self-Correcting
E4 Insufcient
Capacity
1. Check the frost sensor connection at the power board. Terminal should be fully seated on
the power board pins.
2. Remove the side access panel and verify that the sensor is secured to the suction line.
3. If the sensor is connected and secured to the refrigeration line proceed to the next step.
4. Reset the fault by cycling power to the dehumidier.
5. Turn the humidity setting down (below room/home humidity level) to make a
dehumidication call.
6. Allow the fan and compressor to run for approximately 10-15 minutes and then enter
diagnostic test mode by simultaneously pressing the UP ARROW and MODE buttons
for 3 seconds. The LCD will display the temperature measured by the internal sensor
while also displaying AIR SAMPLING and ON, the humidity measured by the internal
sensor while also displaying %RH and ON, and the frost sensor temperature while also
displaying ON. Scroll through these values and by using the UP/DOWN arrow buttons.
7. Record values and call Technical Support.
Cycle Power
E5 High Temperature
Thermistor Failure
1. Check the high temperature sensor connection at the power board. Terminal should be
fully seated on the power board pins.
2. Remove the side access panel and verify the sensor is not damaged and connected to
the refrigeration line coming from the compressor.
3. If the sensor is connected and secured to the refrigeration line, contact Technical Support.
Cycle Power
E6 Low Temperature
Thermistor Failure
1. Check the low temperature sensor connection at the power board.
2. Remove the side access panel and verify the sensor is not damaged and connected to
the suction line.
3. If the sensor is connected and secured to the refrigeration line, contact Technical Support.
Cycle Power
E7 Float Switch Open 1. Empty the condensate pan.
2. Check the oat switch connection at the control board.
3. If not using a oat switch, verify jumper is between oat switch terminals on dehumidier
control board.
4. If the problem persists, replace the oat switch.
Self-Correcting
E8 Inlet Air
Temperature Out
of 50°F – 104°F or
dew point below
40°F
1. Verify all duct is properly sealed.
2. If no signs of leak points, contact Technical Support.
Self-Correcting
E9 Outdoor
Temperature
Sensor Open or
Shorted
1. Check the sensor connection at the power board.
2. Remove the wires from the terminals and
measure the resistance. An short circuit will have
a resistance very close to 0 Ohms and an open
circuit will have a very very high resistance. The
table at right can be used to approximate the
resistance based on outdoor temperature.
3. If the sensor is not reading correctly, replace the
sensor, Part No. 58N66.
Outdoor
Temperature
Resistance
0°F 84,500 Ohms
20°F 46,000 Ohms
40°F 26,000 Ohms
60°F 15,500 Ohms
80°F 9,500 Ohms
100°F 6,000 Ohms
Self-Correcting
20