2
2
3
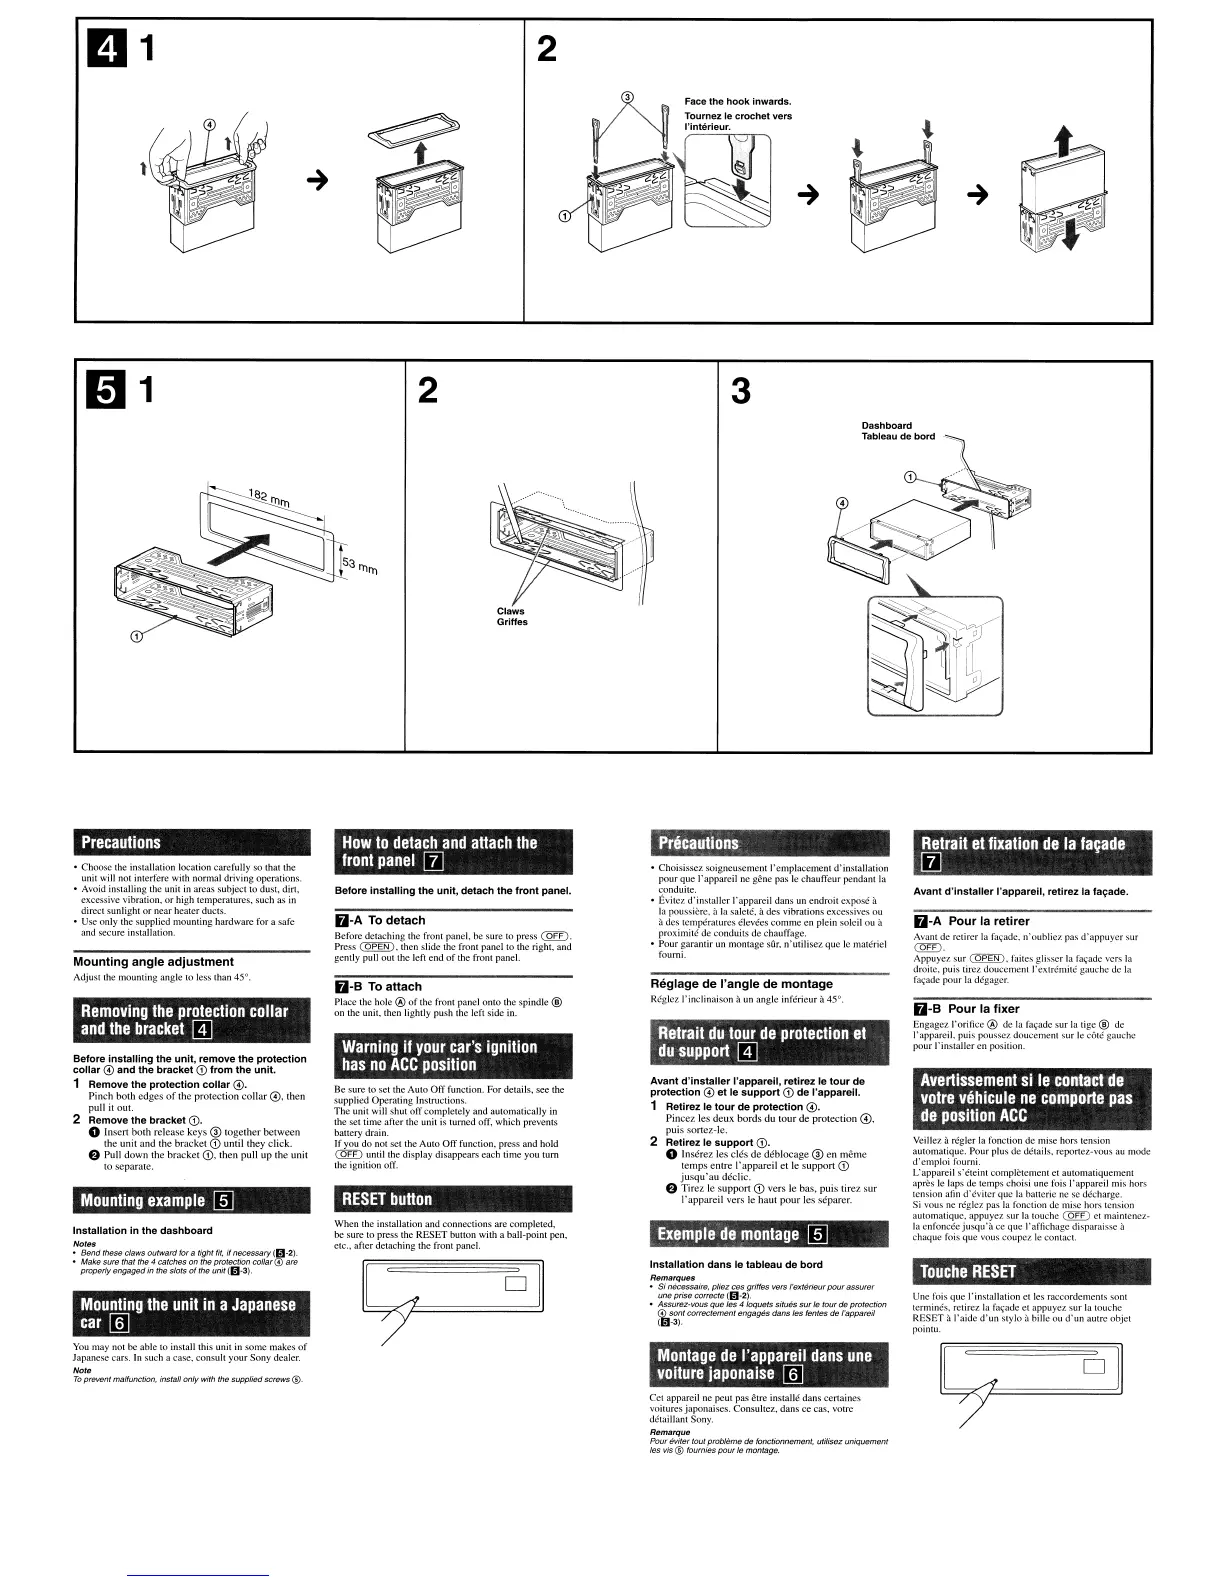
Dashboard
Tableau
de
bard
Claws
Griffes
Precautions
• Choose the installation location carefully so thai the
unit will
nO!
interfere with
nonnal
driving
operations.
• Avoid installing the unit in areas subject
to
dust, dirt.
excessive vibration.
or
high lcmperalUrcs. such as in
direct sunlight or ncar healer ducts.
• Usc only the supplied mounting hardware for a safe
and secure installation.
Mounting
angle
adjustment
Adjust the mounting angle to less than 45°.
Removing
the
protection
collar
and
the
bracket
@]
Before
installing
the unit, remove the protection
collar
@ and the bracket
<D
from
the unit.
1 Remove the protection
collar
@.
Pinch both edges
of
the protcction
collar@.
then
pull
irou!.
2 Remove the bracket
CD.
o Insen
bOlh
release keys @ together between
the unit and
the
bracket
<D
until they click.
e
Pull
down
the
brackel
CD,
Ihen
pull
up
the
unil
10 scpar:uc.
Mounting
example
ffiJ
Installation in the dashboard
Notes
•
Bend
these
claws
outward
for a tight fit.
;(
necessary
(g-2).
• Make
sure
that
the
4 catches
on
the protection
coIlar@are
properly
engaged
in
the
slots
01
the
unit
(11-3).
Mounting
the
unit
in
a
Japanese
car
[§]
You
may
nOI
be
able to inslallthis unit
in
some makes
of
Japanese cars.
In
such a case, consult your Sony dealer.
Note
To
prevent malfunction, install only
with
the
supplied
screws@
How
to
detach
and
attach
the
front
panel
[l]
Before
installing
the unit, detach the
front
panel.
61-A
To
detach
Bcfore dctaching thc front panel.
be
sure to press CQIT).
Press
(OPEN
),
then slide the front panel
10
the righI, and
gently pull
Oul
the
1eC!
end
of
the front panel.
61-B
To
attach
Place the hole @
of
the fronl panel onlo Ihe
spindle@
on Ihe unit, thcll lightly push thc left side in.
Warning
if
your
car's
ignition
has
no
ACC
position
Be sure to sct the Auto
OfT
function.
r"'Or
details,
see
Ihe
supplied Operating Inslructions.
The
unit will shut
off
completely and automatically in
the
scttime
after the ullit is turned off. which prevents
batterydmin.
~d~n~~t
t~t
~~:p~~I~i~~~~~li:a:"t~~:
~:~
~~~
the ignition off.
RESET
button
When the inSlallation and connections arc completed,
be
sure
10
press the RESET bullon with a ball-point pen,
etc.. after detaching the fronl panel.
Precautions
• Choisisscz soigncuscment I'emplacement d'installation
pour
que I'appareil ne gene pas
Ie
chauffeur pendant
la
conduite.
• Evitez d'jnstaller I'appareil dans un endroit expose a
la
poussierc, ilIa
saleh=',
ades vibrations excessives ou
ades temperatures elevees
comme
en plein solcil ou
iJ.
proximitc
de
conduits de chauffage.
• Pour garantir un montage sur,
n'utilisel
que
Ie
matericl
fourni.
Reglage
de
I'angle
de
montage
Rcglcz I'inclinaison aun angle inferieur a45°,
Retrait
du
tour
de
protection
et
du
support
@]
Avant
d'installer
I'appareil, retirez Ie
tour
de
protection
@ et Ie
support
CD
de I'apparell,
1 Retirez Ie
tour
de
protection
@.
Pincez
les
deux
bords
du
tour
de
prOleclion
@,
puis sortez-Ie.
2 Retirez Ie
support
CD,
o
Inserez
les
des
de
deblocage
@
en
meme
lemps
entre
rappareil
et Ie
suppon
<D
jusqu'au
dedic.
e
Tirez
Ie
suppon
CD
vers Ie bas,
puis
tirez
sur
rappareil
vers
Ie
haUl
pour
les
separer.
Exemple
de
montage
ffiJ
Installation
dans
Ie tableau de bord
Remarques
• Si necessaire,
pliez
ces
griffes \0'815 f'extOrieur
pour
assurer
une
prise
correcte
(g-2)
• Assurez-IIOUS
que
1es
4 Ioquets
siwes
sur
Ie
tour
de
protection
~~t
correctement
engages
dans
Ies fentes
de
rappareil
Montage
de
I'appareil
dans
une
voiture
japonaise
[§]
eet
appareil ne peut pas etre installe dans certaines
voitures japonaises. Consullez, dans ce cas,
vOlrc
detaillnTll Sony.
Remarque
Pour
eviler
fout probleme
de
foncUonnement, ulilisez uniquement
les
vis@
fournies
pour
Ie
montage.
Retrait
et
fixation
de
la
fa~ade
[l]
Avant
d'installer
I'appareil, retirez la
fa~ade,
61-A
Pour
la
retirer
Avant de rctirer
la
fa,adc, n'oubliez pas
d'appuyer
sur
CQill.
Appuyez
sur
(OPEN
l,
failes glisser la t:'l,nde vers
la
droite, puis tircz douccmel11 I'cxtrcmitc gauche
de
la
fa(,'adc
pour la dcgager.
O-B
Pour
la
fixer
Engagcz
I'orifice@
dc
In
fa(,'adc sur
la
tigc ® de
l'apparcil. puis pousscz doul:crnent
sur
Ie
cotC
gauche
pour
rinstaller
en position.
Avertissement
si
Ie
contact
de
votre
vehicule
ne
comporte
pas
de
position
ACC
Veillez arcglcr la fonciion
de
mise hors tension
aUlomalique. Pour plus
de
delails, reportez-vous au mode
d'cmploi
fourni.
L'appareil s'cteint comp!ctement et automatiqucmeTll
apres
Ie
laps de temps
choi.~i
une fois rappareil mis hors
tension afin
d'cvitcr
que
la balleric
ne
sc dcrhargc.
5i
vous
ne
reglez pas
la
fonction de mise hors tcnsion
automaliquc. appuyez
sur
la touche
<QED
CI
maiTllcncz-
la cnfoncec
jusqu'a
cc que I'affichagc disparaisse a
chaque fois
que
vous coupcz
Ie
contact.
Touche
RESET
Une fois que I'illstallatioll
clles
raccordements sont
tennines, rclirez la fa(,'ade et appuyez
sur
la
touche
RESET a
raide
d'un
stylo
iJ.
billc ou
d'un
autre objct
pointu.
 Loading...