EasyManua.ls Logo

Sony DXC-637 - Viewfinder Display Information and Menus; Viewfinder Screen Indications

Sony DXC-637
63 pages
Print Icon
To Next Page IconTo Next Page
To Previous Page IconTo Previous Page
Loading...
mt
Viewfinder
Screen
Indications
and
Menus
eessceseeeercce
er
ceseeenenrsre
tessa
SE
Viewfinder
Screen
indications
and
Menus
Displaying
the
advanced
menus
and
¢
To
reinitialize
all
settings
in
the
advanced
Display
by
holding
Status
indications
switching
to
the
normal
indications
menus
to
their
factory
defaults,
press
the
UP/
the
DISP
CHG
switch
Use
the
following
procedure
to
display
the
advanced
ON
button,
A
confirmation
screen
appears.
indi
j
i
-
-
up
while
the
normal
:
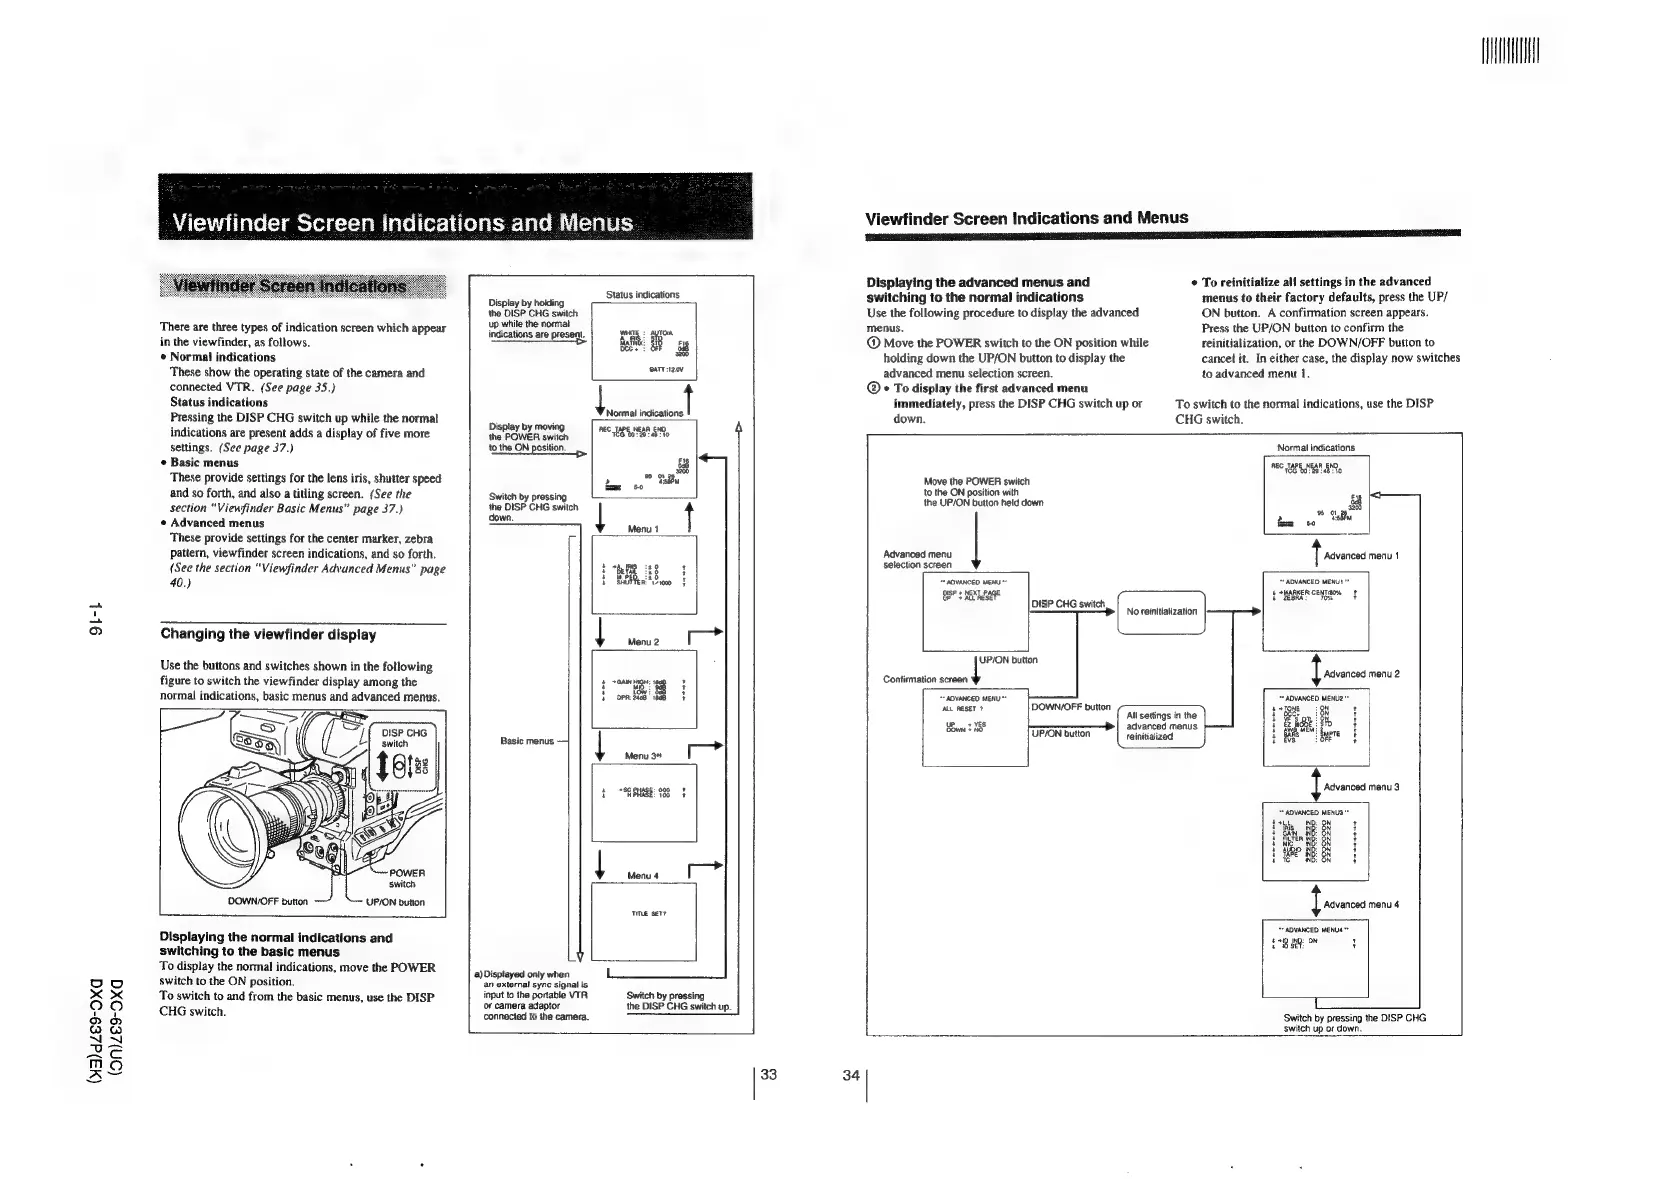
There
are
three
types
of
indication
screen
which
appear
indications
are
preseat.
yng,
:
auton
menus.
;
-
:
Press
the
UP/ON
button
to
confirm
the
in
the
viewfinder,
as
follows.
a
a
a
a
Mata:
38
Bg
@
Move
the
POWER
switch
to
the
ON
position
while
reinitialization,
or
the
DOWN/OFF
button
to
¢
Normal
indications
=
holding
down
the
UP/ON
button
to
display
the
cancel
it.
In
either
case,
the
display
now
switches
These
show
the
operating
state
of
the
camera
and
ee
advanced
menu
selection
screen.
to
advanced
menu
1.
connected
VTR.
(See
page
35.)
@®-«To
display
the
first
advanced
menu
Status
indications
|
ae
immediately,
press
the
DISP
CHG
switch
up
or
To
switch
to
the
normal
indications,
use
the
DISP
Pressing
the
DISP
CHG
switch
up
while
the
normal
Bid
a
Honmal
indications
down.
CHG
switch.
indications
are
present
adds
a
display
of
five
more
ea
POWEH
caine
Mae
Ste
my
settings.
(See
page
37.)
to
the
ON
position.
Normal
indications
¢
Basic
menus
638
REC
TAPE
WEAR
ENO
A
rs
a
3200
4CG
00:29
148:
10
These
provide
settings
for
the
lens
iris,
shutter
speed
te
iB
Move
the
POWER
switch
and
so
forth,
4
itis
.
i i
to
the
ON
position
with
so
forth,
and
also
a
titling
screen.
(See
the
Switch
by
pressing
the
UP/ON
button
held
down
58
section
“Viewfinder
Basic
Menus”
page
37.)
bes
DISP
CHG
switch
Cr
ae
a
Advanced
menus
a.
sain
tom
These
provide
settings
for
the
center
marker,
zebra
ie
pattern,
viewfinder
screen
indications,
and
so
forth.
Advanced
menu
f
rcvancs
menu
1
(See
the
section
“Viewfinder
Advanced
Menus”
page
i
ia
128
I
selection
screen
40.)
{Salven
S100
“
ADVANCED
MENU
**
*
ADVANCED
MENUI"*
DISP
+
NEXT
PAGE
+
*+MARKER:CENT®O%
=f
UP
+
ALL
RESE
‘
BRA
:
10%
t
DISP
CHG
switch
=
Ser
eS
ee
ner
ae
ee
2
Giswile
No
reinitialization
—h
o
5
Changing
the
viewfinder
display
|
wens
ie!
: A ;
UP/ON
button
Use
the
buttons
and
switches
shown
in
the
following
|
"
{
pavers
figure
to
switch
the
viewfinder
display
among
the
$
7GAIN
HIGH:
1
:
Confirmation
screen
normal
indications,
basic
menus
and
advanced
menus.
b
opr:aeas
ves
~
ADVANCED
MENU"
™
ADVANCED
MENU2**
ALL
RESET
7
DOWN/OFF
button
Fate
24TONE
=:
ON
t
A
All
settings
in
the
4
a
Sh
4
SS
UP»
YES
_—
4
EZ
MODE
:
t
one
UP/ON
button
par
rc
cae
i
GAS":
Supre
=O
i
Basic
menus
-4
a
EWS
t
Menu
3%
J
£
“SE
GNASE:
090
t
Advanced
menu
3
“ADVANCED
MENUS
**
oe
ee
4+
GAIN
IND:
ON
t
1
HREPAR
|
4
AUDIO
IND:
ON
;
|
tHE
,
Menu
4
I
switch
OOWN/OFF
button
UP/ON
button
t
Advanced
menu
4
Tme
set?
"ADVANCED
MENU4**
Displaying
the
normal
indications
and
3718
Se:
;
switching
to
the
basic
menus
To
displ
indicati
a
i
splay
the
normal
indications,
move
the
POWER
a)
Displayed
only
when
switch
to
the
ON
position.
an
external
sync
signal
is
To
switch
to
and
from
the
basic
menus,
use
the
DISP
input
to
the
portable
VTA
Switch
by
pressing
CHG
switch
or
camera
adaptor
the
DISP
CHG
switch
up.
switch.
connected
to
the
camera.
Switch
by
pressing
the
DISP
CHG
switch
up
or
down.
(W3)dZ€9-Oxd
(on)ze9-oxad
33
34