18
Recording on
MDs
This chapter explains the various ways to
record to an MD , as well as how to mark
track numbers and perform synchro-
recording with other components.
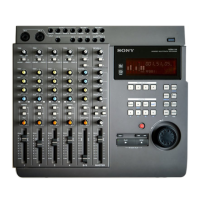
Recording on an MD
If the MD has recorded material on it, the recorder will
automatically start recording from the end of the recorded
portion.
POWER
LEVEL / DISPLAY / CHAR TIME
INPUT
AMS
1 Turn on the mixer and program source.
2 Select the source on the mixer.
3 Press POWER to turn on the recorder.
4 Insert a recordable MD.
5 Use INPUT to select the position that corresponds to
the input jacks (connector) connected to the
program source.
If the source is connected Display to be selected
to the connector or jacks
DIGITAL COAXIAL COAX
ANALOG (UNBAL) UNBAL
ANALOG (BAL) BAL
6 If necessary, locate the point on the MD to start
recording from.
If you want to record on a new MD or start recording
from the end of the recorded portion, go to step 7.
• To record over from the beginning of an existing
MD track
Turn AMS (or press ./> repeatedly) until the
number of the track to be recorded over appears.
• To record over from the middle of an MD track
Turn AMS (or press ./> repeatedly) until the
number of the track to be recorded over appears,
then press 7 to start playback. Press 7 again at
the point you want to start recording from.
7 Press z
The recorder changes to recording pause.
8 If necessary, adjust the recording level.
For details, see “Adjusting the Recording Level” on
page 21.
9 Press 7
Recording starts.
10 Start playing the program source.