Do you have a question about the Sony MDS-E12 and is the answer not in the manual?
Information on using a specific jig for checking BD waveforms.
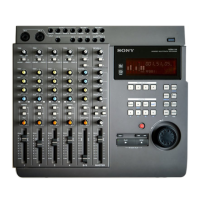
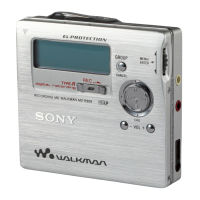
Explanation of the primary controls on the main unit.
Details on how to use the remote control functions.
Explanation of LP2 and LP4 stereo modes for extended recording.
Important considerations and limitations when recording.
Specific operations during CD synchro-recording.
Procedure for removing unwanted tracks from an MD.
How to change the order of tracks on an MD.
Method for splitting a single track into two.
Process for merging two tracks into one.
Instructions for naming tracks or the entire MD.
Copying existing names to other MD tracks or discs.
Applying a name to all tracks and the disc at once.
Bulk deletion of all track and disc names.
Steps to connect an external keyboard to the recorder.
Procedure for selecting the keyboard type (US/10-key).
How to map characters to keyboard keys.
Detailed steps for assigning characters to keys.
How to remove a single character assignment.
How to reset all custom key assignments.
Explanation of self-diagnosis error codes.
Meaning of various messages displayed by the recorder.
Essential safety guidelines before using test modes.
Specific test for laser emission modes.
Steps to enter and configure test modes.
Procedure to exit test mode and return to standby.
Fundamental controls within test mode.
Cross-reference to detailed adjustment procedures.
Note on modes not used for servicing.
Steps to activate continuous playback mode.
How to select playback segments.
Procedure to exit continuous playback.
Steps to activate continuous recording mode.
How to select recording segments.
Procedure to exit continuous recording.
Steps to execute the auto diagnosis function.
How to view software version information.
Procedure to resolve non-volatile memory errors.
Safety precautions for laser emission tests.
Steps to enter and configure test modes.
Procedure to exit test mode.
Fundamental controls within test mode.
Cross-reference to detailed adjustment procedures.
Note on non-serviceable test modes.
Steps to activate continuous playback mode.
How to select playback segments.
Procedure to exit continuous playback.
Steps to activate continuous recording mode.
How to select recording segments.
Procedure to exit continuous recording.
Steps to execute the auto diagnosis function.
How to view software version information.
Procedure to resolve non-volatile memory errors.
Guidance on replacing parts and performing related adjustments.
Essential checks to perform before replacing any components.
List of replacement parts and their associated adjustments.
Diagnostic check for temperature sensitivity.
Diagnostic check for laser power output.
Diagram showing how to connect equipment for laser power check.
Steps to perform the laser power check.
Steps to perform the IOP comparison.
Steps to perform the auto check function.
How to record IOP values into non-volatile memory.
How to read recorded IOP values.
Steps for adjusting temperature compensation.
Target values for temperature adjustment.
Diagram showing connections for laser power adjustment.
Steps to adjust laser power.
Target values for laser power adjustment.
Procedure to save IOP values to non-volatile memory.
Location of components on BD Board Side A.
Location of components on BD Board Side B.
Essential checks before replacing parts.
List of parts requiring adjustment.
Diagnostic check for temperature impact.
Diagnostic check for laser power.
Connection diagram for laser power check.
Steps to perform the laser power check.
Procedure for comparing IOP values.
Steps for the auto check function.
How to record IOP values into memory.
How to read recorded IOP values.
Steps for temperature compensation adjustment.
Target values for temperature compensation.
Connections for laser power adjustment.
Steps to adjust laser power.
Target values for laser power.
Procedure to save IOP values to non-volatile memory.
Location of components on BD Board Side A.
Location of components on BD Board Side B.
Essential checks before replacing parts.
List of parts requiring adjustment.
Diagnostic check for temperature sensitivity.
Diagnostic check for laser power.
Connection diagram for laser power check.
Steps to perform the laser power check.
Procedure for comparing IOP values.
Steps for the auto check function.
How to record IOP values into memory.
How to read recorded IOP values.
Steps for temperature compensation adjustment.
Target values for temperature compensation.
Connections for laser power adjustment.
Steps to adjust laser power.
Target values for laser power.
Procedure to save IOP values to non-volatile memory.
Location of components on BD Board Side A.
Location of components on BD Board Side B.
Physical locations of all circuit boards.
General notes for wiring boards and schematic diagrams.
Explanations for symbols used in schematic diagrams.
Explanations for symbols used in printed wiring boards.
Block diagrams for the main section ICs.
Block diagrams for the CNT section ICs.
Placement of semiconductors on the main PCB.
Component locations on the main board's solder side.
Component locations on the main board's solder side.
Component locations for AC/FL/HP/KEY/PSW/SIRCS boards.
Component locations for BAL/CNT boards.
Component locations on the BD board.
Pin functions for the IC310 system control IC.
Exploded view of the front mechanical section.
List of capacitors with part numbers and specifications.
List of connectors with part numbers.
List of diodes with part numbers.
List of ferrite bead components.
List of integrated circuits with part numbers.
List of jack connectors.
List of switches with part numbers.
List of resistors with part numbers.
List of integrated circuits.
List of transistors.
List of resistors.
List of capacitors.
List of connectors.
List of diodes.
List of ferrite beads.
List of filters.
List of integrated circuits.
List of jacks.
List of transistors.
List of resistors.
List of switches.
List of capacitors.
List of connectors.
List of diodes.
List of ferrite beads.
List of filters.
List of integrated circuits.
List of jacks.
List of transistors.
List of resistors.
List of switches.
List of capacitors.
List of connectors.
List of diodes.
List of ferrite beads.
List of filters.
List of integrated circuits.
List of jacks.
List of transistors.
List of diodes.
List of ferrite beads.
List of filters.
List of integrated circuits.
List of jacks.
List of resistors.
List of ferrite beads.
List of filters.
List of integrated circuits.
List of jacks.
List of transistors.
List of resistors.
List of switches.
Configuration settings for SCMS selector jumpers.
Important notes for replacing motor driver ICs.
List of additional repair parts for specific models.
General notes related to the supplement.
Serial number ranges for specific model variants.
Table detailing SCMS jumper settings.
Diagram showing board-in wire connections.
Explanations for symbols used in schematic diagrams.
Explanations for symbols used in printed wiring boards.
Placement of semiconductors on the main board's component side.
Placement of semiconductors on the main board's solder side.
Exploded view of the front mechanical section.
List of capacitors with part numbers and specifications.
List of connectors with part numbers.
List of diodes with part numbers.
List of ferrite beads.
List of integrated circuits.
List of jack connectors.
List of switches with part numbers.
List of resistors with part numbers.
List of resistors.
List of switches.
List of capacitors.
List of connectors.
List of diodes.
List of ferrite beads.
List of filters.
List of integrated circuits.
List of jacks.
List of transistors.
List of resistors.
List of switches.
List of capacitors.
List of connectors.
List of diodes.
List of ferrite beads.
List of filters.
List of integrated circuits.
List of jacks.
List of transistors.
List of resistors.
List of switches.
List of capacitors.
List of connectors.
List of diodes.
List of ferrite beads.
List of filters.
List of integrated circuits.
List of jacks.
List of transistors.
List of resistors.
List of switches.
List of resistors.
List of vibrator components.
List of ferrite beads.
List of filters.
List of integrated circuits.
List of jacks.
List of switches.
| Type | Minidisc Recorder |
|---|---|
| Model | MDS-E12 |
| Recording Format | ATRAC |
| Recording Media | MiniDisc |
| Playback Format | ATRAC |
| Sampling Frequency | 44.1 kHz |
| Dynamic Range | 98dB |
| Wow and Flutter | Below measurable limit |
| Power Supply | AC 230V, 50/60Hz |
| Frequency Response | 5 Hz - 20 kHz |
| Analog Inputs | RCA |
| Analog Outputs | RCA |
| Digital Inputs | Optical, Coaxial |
| Digital Outputs | Optical |