Do you have a question about the Sony MP-CL1 and is the answer not in the manual?
Warning about pointing the laser light at eyes or people.
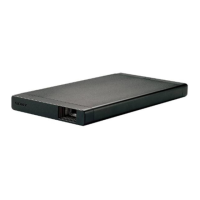
Describes Micro USB charging port and USB OUT for power supply.
Details the power button and status indicator lamps.
Lists HDMI/MHL input and AUDIO OUT jacks for connectivity.
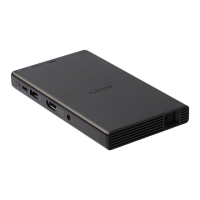
Explains the Jog Lever for menu navigation and selection.
Covers strap hole, speaker, Wi-Fi antenna, ventilation, and lens.
How to adjust the audio volume using the Jog Lever.
How to check battery status via the power lamp blinking patterns.
Instructions on how to navigate through the projected menu items.
How to select values within the menu using the Jog Lever.
How to navigate and select items within submenus.
How to change values using the adjustment bar and confirm.
Instructions on how to exit the menu using the Jog Lever.
Exits the current menu or setting.
Selects the input source from HDMI/MHL or screen mirroring.
Adjusts image distortion to correct trapezoidal shapes.
Corrects vertical distortion, overwriting preset values.
Corrects horizontal distortion, overwriting preset values.
Flips the projected image horizontally, used for rear projection.
Adjusts the contrast of the projected image.
Adjusts the color tones of the projected image.
Adjusts the color intensity of the projected image.
Displays and allows changing the product's device name.
Sets the product to turn off automatically after a specified time.
Adjusts horizontal/vertical alignment of color items for clarity.
Adjusts synchronization timing for flickering or blurred images.
Resets all settings to their factory default values.
Instructions for updating the product's software via the website.
Displays the help guide and other important product information.
Displays the text being entered via the on-screen keyboard.
Closes the keyboard without saving input text.
Switches between numbers, symbols, uppercase, and lowercase modes.
Clears the current text in the text field.
Moves the cursor left or right within the text field.
Deletes characters to the left or right of the cursor.
Saves the entered text and closes the on-screen keyboard.
Selects the screen mirroring input source in the product's menu.
Searches for connectable devices on the screen mirroring enabled device.
Connects to the product by tapping its name in the device list.
Exits the menu after projecting the screen.
Important notes regarding screen mirroring operation and compatibility.
Connects the product and device using supplied adaptor and HDMI cable.
Selects the HDMI/MHL input source in the product's menu.
Exits the menu after projecting the HDMI-compatible device screen.
Connects product and device using MHL/HDMI adaptors and cable.
Selects the HDMI/MHL input source in the product's menu.
Exits the menu after projecting the MHL-compatible device screen.
Note on supplying power to connected devices during MHL connection.
Adjusts horizontal/vertical alignment of color items for a clear image.
Adjusts the horizontal or vertical position of a selected color item.
Repeats the color item adjustment process as needed.
Saves the adjusted values.
Closes the Optical alignment screen.
Reverts settings to the most recently saved values using Cancel.
Reverts settings to the default values using Initialize.
Adjusts synchronization timing for flickering or blurred images.
Initiates the adjustment process for biphase alignment.
Adjusts the three lines for clarity without blur.
Saves the new biphase alignment value.
Closes the Biphase alignment screen.
Reverts to the most recently saved biphase alignment value.
Reverts to the default biphase alignment values.
Common operational issues and their solutions.
Explains why the product may not charge and the correct charging method.
Addresses fan noise, stating it is not a malfunction but temperature-related.
Troubleshooting steps for when no image is projected.
Solution for issues related to the absence of sound.
Explains the meaning of the red blinking charge lamp when charging other devices.
How to fix flickering or blurred images by adjusting synchronization timing.
Solutions for trapezoidal image shape, including angle adjustment and keystone correction.
How to flip the image back to normal if it appears reversed.
Steps to take when the projected image is unclear.
How to adjust brightness when the image is too dark.
How to adjust color settings when colors are not appropriate.
Solutions for choppy screen mirroring projection.
Steps to take when screen mirroring connection fails.
Note about turning off Wi-Fi on the source device for screen mirroring.
Final advice to contact support if issues persist.
Important usage guidelines and precautions for the product.
| Display Technology | Laser Beam Scanning |
|---|---|
| Resolution | 1920 x 720 |
| Brightness | 32 lumens |
| Contrast Ratio | 80, 000:1 |
| Battery Life | up to 2 hours |
| Aspect Ratio | 16:9 |
| Built-in Speaker | Yes |
| Projection Size | up to 120 inches |
| Connectivity | HDMI, MHL, Wi-Fi |
| Weight | 210 g |
| Dimensions | Approx. 149.5 mm x 77.0 mm x 13.0 mm (5 7/8 inches x 3 1/8 inches x 1/2 inches) |