Do you have a question about the Soundstream RESERVE and is the answer not in the manual?
Steps for removing the original head unit from Street Glide models.
Remove outer and inner fairing bolts and disconnect harnesses for Street Glide.
Detach the upper support bracket by removing multiple screws on Street Glide.
Disconnect main wire harness, USB, radio antenna, GPS, and SiriusXM cables.
Unscrew the four mounting screws to detach the head unit assembly.
Steps for removing the original head unit from Road Glide models.
Detach turn signals, fairing bolts, windshield, and support brackets on Road Glide.
Unplug turn signal harnesses and disconnect the outer fairing on Road Glide.
Unplug main wire harness, USB, radio, GPS, and SiriusXM cables from the unit.
Unscrew the four mounting bolts to release the head unit assembly.
Mount the HDHU.14 unit into the original head unit's mounting position.
Connect USB, antenna cables, and optional RCA/microphone connections.
Connect the OEM harness to the HDHU.14 harness and vice-versa.
Connect Scosche module or wire alternate modules to control signals.
Secure the fairing support bracket and reassemble the fairing.
Warranty terms for products not installed by an authorized dealer.
Warranty terms for products purchased and installed by an authorized dealer.
Conditions and damages that void the product warranty.
Governing law and limitations for warranty disputes.
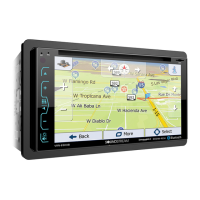
This document provides an installation guide for the Soundstream Reserve HDHU.14+ head unit, designed as an upgrade for 2014 and newer Harley-Davidson motorcycles. The guide covers both Street Glide and Road Glide models, detailing the removal of the original head unit and the installation of the new one.
The Soundstream Reserve HDHU.14+ head unit is a modern audio and infotainment system intended to replace the factory unit in compatible Harley-Davidson motorcycles. Its primary function is to provide enhanced audio playback, navigation, and communication features, integrating seamlessly with the motorcycle's existing electrical system and controls.
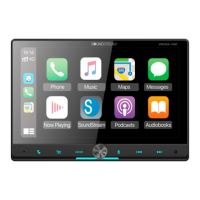
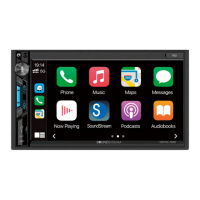
The HDHU.14+ head unit offers a range of advanced usage features to improve the riding experience. It supports both Android Auto and Apple CarPlay, allowing riders to connect their smartphones and access familiar apps for navigation, music, messaging, and calls directly through the head unit's display. This integration provides a safer and more convenient way to interact with smartphone functionalities while riding.
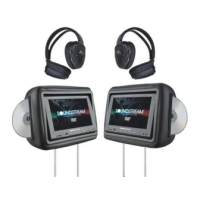
Bluetooth connectivity is a core feature, enabling wireless audio streaming from a smartphone or other Bluetooth-enabled devices. This allows riders to listen to their favorite music or podcasts without the need for physical connections. The unit also includes a 3.5mm connection for an included Bluetooth calling microphone, facilitating hands-free phone calls for improved safety and communication on the road.
For audio output, the HDHU.14+ provides low-level RCA outputs for aftermarket amplifiers. These include dedicated outputs for a subwoofer amplifier, rear channel speaker amplifier, and front channel speaker amplifier. This allows riders to customize and upgrade their audio system with external amplifiers and speakers for a more powerful and refined sound experience. The unit is designed to work with existing OEM USB and radio antenna cables, ensuring that factory functionalities like USB media playback and radio reception are maintained or enhanced.
The installation process is designed to integrate the new head unit with the motorcycle's existing handlebar controls. For Street Glide models, the guide details the removal of the outer fairing, inner fairing bolts, and the upper support bracket, followed by the disconnection of various electrical connectors such as the main wire harness, USB cable, radio antenna, GPS antenna, and SiriusXM antenna (if equipped). For Road Glide models, the process involves detaching turn signals, removing windshield bolts, factory vents, and additional inner fairing bolts, along with the disconnection of similar electrical connections.
Once the original head unit is removed, the HDHU.14+ is installed into the OEM location and secured with the original mounting screws. The OEM USB and radio antenna cables are then connected to the matching sockets on the back of the new head unit. If aftermarket amplifiers are used, the corresponding RCA cables are connected at this stage. The Bluetooth calling microphone, if used, is secured to a desired location and its cable routed to the head unit.
A crucial step in the installation involves connecting the included wire harness for the HDHU.14+ to the motorcycle's OEM wire harness. This ensures proper power and signal distribution. The guide also addresses handlebar control integration, providing instructions for connecting either a Scosche handlebar integration module or an alternative module. For alternative modules, specific wiring connections are detailed, including ACC turn-on, illumination, CAN, ground, and 12V connections, as well as Key/SWC (Steering Wheel Control) ground, SWC 1, and SWC 2 connections. This ensures that riders can continue to use their existing handlebar controls to manage the head unit's functions, such as volume, track changes, and call management, without taking their hands off the handlebars.
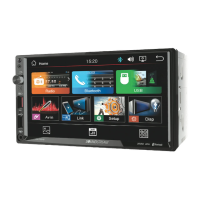
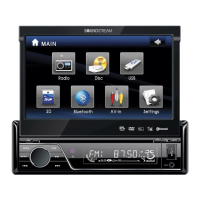
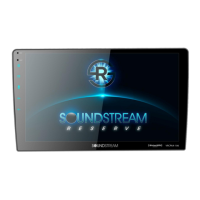
The head unit's interface is designed for ease of use, featuring a clear display and intuitive controls. The visual representation on the front of the unit shows a modern display with touch controls, indicating a user-friendly experience. The presence of a "RESERVE" logo and "SOUNDSTREAM" branding suggests a premium audio experience.
While the manual does not explicitly detail routine maintenance features for the head unit itself, it emphasizes proper installation procedures to ensure longevity and optimal performance. The initial step of removing the main fuse/battery cables before beginning any work is a critical safety and maintenance practice, preventing accidental vehicle start-up and potential damage to the electrical system or the installer.
The guide stresses the importance of storing removed screws and components in a safe place for re-installation, which is a key aspect of maintaining the motorcycle's integrity and ensuring all parts are correctly reassembled. Laying the fairing on a protected flat surface during removal prevents damage to its finish, contributing to the overall aesthetic maintenance of the motorcycle.
The warranty information provided in the manual outlines the terms for repair or replacement, which serves as a maintenance-related feature from a consumer protection standpoint. A limited 90-day consumer warranty is offered, extending to a limited one-year warranty if the product is purchased and installed by a Soundstream Technologies authorized dealer. This extended warranty period highlights the manufacturer's confidence in the product when installed professionally, suggesting that proper installation contributes significantly to the unit's reliability and reduces the likelihood of issues.
The warranty explicitly states that it is void if the product has been damaged by accident, unreasonable use, neglect, improper service, or other causes not arising from defects in materials or construction. It also does not cover damage caused by installation or removal of the unit, external static or noise, antenna problems, weak reception, speaker damage, electrical system issues, cosmetic damage, misuse, failure to follow operating instructions, accidental spills, customer-applied cleaners, environmental causes (floods, fallout, chemicals, salt, hail, lightning, extreme temperatures), accidents, road hazards, fire, theft, loss, vandalism, improper connection to other equipment, modification of existing equipment, or tampering. These exclusions indirectly inform users about practices to avoid to maintain the unit's warranty and, by extension, its functionality.
The requirement to return the unit with proof of purchase and installation by an authorized dealer for warranty claims underscores the importance of professional installation for long-term reliability and support. This also implies that any issues arising from DIY installation might not be covered, encouraging users to seek professional help for installation to ensure proper functioning and maintenance of warranty coverage.
In summary, the Soundstream Reserve HDHU.14+ head unit is a comprehensive upgrade for Harley-Davidson motorcycles, offering advanced connectivity, enhanced audio capabilities, and seamless integration with existing controls. Its design and installation process prioritize user convenience and safety, while the warranty terms emphasize the importance of professional installation for long-term reliability and support.
| Touchscreen | Yes |
|---|---|
| Resolution | 1024x600 |
| RAM | 2GB |
| Bluetooth | Yes |
| Wi-Fi | Yes |
| GPS | Yes |
| USB | Yes |
| SD Card Slot | Yes |
| Radio Tuner | AM/FM |
| Subwoofer Output | Yes |
| Steering Wheel Control Compatible | Yes |
| Backup Camera Input | Yes |
| USB Port | Yes |
| GPS Navigation | Yes |
| Rear Camera Input | Yes |
| DVD Player | No |
| AM/FM Radio | Yes |
| Operating System | Android |
| Processor | Quad Core |
| Apple CarPlay | Yes |
| Android Auto | Yes |
| RCA Pre-Outs | 3 pairs |