Do you have a question about the Spectra GL1425C and is the answer not in the manual?
Identifies and explains the function of the GL1425C's buttons, display, and LEDs for user interface.
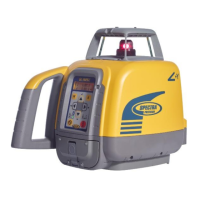
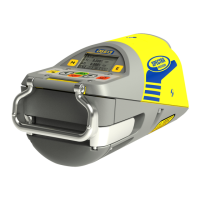
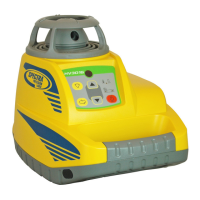
Details external components like handles, battery doors, charger jacks, and tripod mounting threads.
Details sighting guides, beam exit, scope notches, slope indications, and mounting thread specifications.
Instructions for installing the battery pack and information on the worldwide charger unit.
Identifies the buttons, LCD display, and LEDs on the RC1402 remote control unit.
Explains how to power the remote control on/off and its product compatibility.
Provides two distinct methods for establishing a radio connection between the RC1402 and the laser.
Describes the process of turning the laser on, including initialization and initial display states.
Details the meaning of the status LED flashes during self-leveling, leveling, and alerts.
Explains the method to safely turn off the GL1425C laser by pressing the power button.
Instructions for entering and exiting standby mode to conserve battery life while maintaining setup.
Details how to bypass automatic leveling for manual horizontal or vertical slope adjustments.
Explains how to electronically turn off laser beam sections to prevent interference with job site reflections.
Describes using Line Scan for vertical alignment, centering the rotor, and manual adjustments.
Guides on using menu buttons and arrow keys to select features and submenus.
Procedure for entering grade values by selecting individual digits and signs using control buttons.
Method for setting grade values by changing digits incrementally using arrow buttons.
Explains how to select and confirm the desired rotation speed for the laser from the menu.
The Spectra Precision GL1425C is a dual-grade laser designed for various construction and surveying applications, offering both horizontal and vertical setup capabilities. It is equipped with a range of features for precise leveling, grading, and alignment tasks.
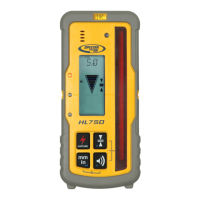
The GL1425C operates in automatic self-leveling mode upon power-on, ensuring accurate and consistent measurements. It supports dual-grade entry, allowing users to set slopes along both X and Y axes. The laser beam can be used for horizontal and vertical applications, with specific modes for line scanning in vertical setups and electronic masking of the beam in up to three lighthouse sections to prevent interference. The device includes a shock warning (HI-alert) system that activates if the laser is disturbed, maintaining measurement integrity. A standby mode is available to conserve battery life while keeping the HI-alert active. The laser is compatible with the RC1402 remote control, as well as HL760 and CR700 receivers, enabling remote operation and enhanced functionality.
The GL1425C features a robust design with clear indications for positive X and Y slopes. It includes a 5/8" x 11 mounting thread for both horizontal and vertical orientations. The device is powered by a NiMH battery pack (B10) and can also operate with 4 x D-Cell alkaline batteries. Charging is facilitated by a worldwide charger (CH10). The laser's LCD display provides real-time information on grade values, mask mode, rotation speed, internal product temperature, and battery status. The RC1402 remote control, which mirrors the GL1425C's keypad functionality, is powered by two AA batteries. The laser's self-leveling process is indicated by a flashing status LED, which then lights solid or flashes every four seconds once leveled and HI-alert is activated.
| Brand | Spectra |
|---|---|
| Model | GL1425C |
| Category | Measuring Instruments |
| Language | English |