Hardware and layout UM1658
16/39 DocID025097 Rev 1
4.3 Power supply and power selection
The power supply is provided either by the host PC through the USB cable, or by an
external 5 V power supply.
The D1 and D2 diodes protect the 5 V and 3 V pins from external power supplies:
• 5 V and 3 V can be used as output power supplies when another application board is
connected to pins P1 and P2.
In this case, the 5 V and 3 V pins deliver a 5 V or 3 V power supply and power
consumption must be lower than 100 mA.
• 5 V can also be used as input power supplies; for example, when the USB connector is
not connected to the PC.
In this case, the 32F0308DISCOVERY board must be powered by a power supply unit
or by auxiliary equipment complying with standard EN-60950-1: 2006+A11/2009, and
must be Safety Extra Low Voltage (SELV) with limited power capability.
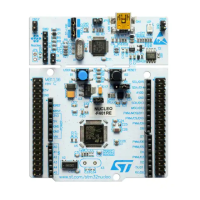
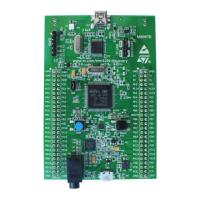
4.4 LEDs
• LD1 PWR: Red LED indicates that the board is powered.
• LD2 COM: Tricolor LED (COM) advises on the communication status as follows:
– Slow blinking Red LED/Off: At power on before USB initialization
– Fast blinking Red LED/Off: After the first correct communication between PC and
STLINK/V2 (enumeration)
– Red LED On: When initialization between PC and ST-LINK/V2 is successfully
finished
– Green LED On: After successful target communication initialization
– Blinking Red/Green LED: During communication with target
– Red LED On: Communication finished and OK
– Orange LED On: Communication failure
• User LD3: Green user LED connected to the I/O PC9 of the STM32F030R8T6.
• User LD4: Blue user LED connected to the I/O PC8 of the STM32F030R8T6.
4.5 Push buttons
• B1 USER: User push button connected to the I/O PA0 of the STM32F030R8T6.
• B2 RESET: Push button used to RESET the STM32F030R8T6.
4.6 JP2 (Idd)
Jumper JP2, labeled Idd, allows the consumption of STM32F030R8T6 to be measured by
removing the jumper and connecting an ammeter.
• Jumper on: STM32F030R8T6 is powered (default).
• Jumper off: an ammeter must be connected to measure the STM32F030R8T6 current,
(if there is no ammeter, the STM32F030R8T6 is not powered).