12 13
3.2 Specifications
1) Display: TFT color display (320 x 240 dpi)
2) Operating Temperature: 0 to 60°C (32 to
140 F° )
3) Storage Temperature: -20 to 70°C (-4 to
158 F° )
4) External Power : 8.0 to 18.0V power
provided via vehicle battery
5) Dimensions: Length: 124mm(4. 88^ ),
Width: 70mm (2. 76” ) Height:
20nun(0. 79”)
6) NW : 0. 21kg(0.46 Ib)GW:0.29kg(0.64 Ib)
3.3 Accessories Included
1) User’ s Manual - Instructions on tool
operations.
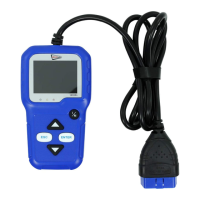
2) 0BDII cable - Provides power to tool and
communicates between tool and vehicle.
3) USB cable - Used to upgrade the scan
tool, and to print retrieved data.
4) Protective Nylon case - A nylon case to
store the tool when not in use.
3.4 Navigation Characters
Characters used navigate the scan tool are:
Identifies the control module number from
which data is retrieved Indicates the Test ID
in On-Board Mon.Test.
3.5 Keyboard
No solvents such as alcohol are allowed to
clean the keypad or display. Use a mild non-
abrasive detergent and a soft cotton cloth.
Do not soak the keypad as the keypad
is not waterproof.
3.6 Power
The scan tool is powered via the vehicle Data
Link Connector (DLC).Just follow the steps
below to turn on the scan tool:
1) Connect the OBDII Cable to scan tool.
2) Find DLC on vehicle. A plastic DLC cover
may be found for some vehicles and you
need to remove it before plugging the
OBDII cable.
3) plug OBD II cable to the vehicle’s DLC.
3.7 Tool Setup
Use the UP/DOWN scroll button to Select
[Tool Setup] in the Main Menu and press
OK, The screen will display the interface
as shown below:
The scan tool allows you to make the
following adjustments, settings:
1) Select language: Selects desired
language press UP/DOWN key to Choose
[Language] and press OK button, the screen
will display the interface as shown on the
next page.
You can press UP/DOWN key to select any
option and press OK button to convert, Press
ESC key to return.
3) Beep: ON/OFF the Beeper. Press UP/
DOWN key to Choose [Beep] and press OK
button, the screen will display the interface
as shown below:
You can press UP/DOWN key to select any
language and press OK button to confirm.
The system will convert to the chosen
language interface at once.
2) Unit of Measure: Measurement unit
setting. Press UP/DOWN key to Choose [Unit
of Measure] and press OK button, the screen
will display the interface as shown.
Flow
Speed
Distance
Pressure 1
Pressure 2
Pressure 3
Pressure 4
Temperature
g/s
km/h
km
kPa
kPa
kPa
Pa
°C
You can press OK button to cover ON or OFF ,
Press ESC key to return.
4) Device Self-Test: LED Keyboard, LCD
display detection. Press UP/DOWN key to
Choose [Device Self-Test] and press OK
button, the screen will display the interface
as shown below:
A. Screen Test
The Screen Test function checks if the LCD
display is working normally.
1) From Tool Setup screen, use the UP/
DOWN scroll button to select Tool Self-
Test, and press the OK button.
2) Select Screen Test from Tool Self-Test
menu and press the OK button to start
test. Press ESC key to return.
3) Look for missing spots in the colour bar,
white , black LCD display.
4) When completed, press the ESC button to
exit.
B. Key Test
The Key Test function verifies if the keys are
functioning properly.
Tool Setup
Language
Unit of Measure
Beep
Device Self-Test
ON
Tool Setup
Español
Deutsch
English
Français
PycckЙЙ
Italiano
Dutch
Portuguȇs