6-8
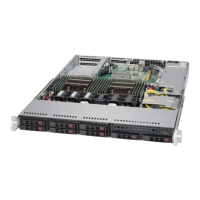
SUPERSERVER 1028TR-T/TF User's Manual
Installing a Hard Drive into a Drive Carrier
1. Insert a drive into the carrier with the PCB side facing down and the
connector end toward the rear of the carrier.
2. Align the drive in the carrier so that the screw holes of both line up. Note that
there are holes in the carrier marked “SATA” to aid in correct installation.
3. Secure the drive to the carrier with four screws as illustrated below.
4. Insert the drive carrier into its bay, keeping the carrier oriented so that the
hard drive is on the top of the carrier and the release button is on the right
side. When the carrier reaches the rear of the bay, the release handle will
retract.
5. Push the handle in until it clicks into its locked position.
Figure 6-7. Removing Dummy Drive from Tray
1
3
Drive Tray
Dummy Drive
1
3
1
3
1
3
Warning: Enterprise level hard disk drives are recommended for use in
Supermicro chassis and servers. For information on recommended HDDs,
visit the Supermicro Web site at http://www.supermicro.com/products/nfo/fi les/
storage/SAS-CompList.pdf
 Loading...