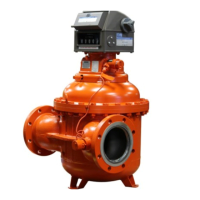
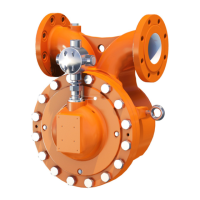
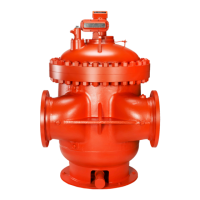
The Smith Meter® Rotary Vane PD Meters, specifically the 3-Bladed Double Case PD Meters (models JB10, K12, and M16), are positive displacement (PD) meters designed for accurate measurement of fluid flow. These meters are characterized by their double-case construction, which enhances ease of maintenance and service.
Function Description:
The core function of these meters is to precisely measure fluid flow using a positive displacement principle. The measuring mechanism, an "inner unit," is bolted into an "outer housing." This double-case design is crucial as it isolates the measuring chamber from external distortions caused by pressure differentials and piping strains. Fluid flows through the meter, turning a rotor equipped with blades. These blades rotate around a fixed cam, which causes them to move outwards, sweeping the inner surface of the meter body without touching it. This action forms six precise volume chambers per revolution, allowing for accurate measurement of the product flow.
Important Technical Specifications:
- Models: JB10 (S1, S3, S5, S6, S7, S8), K12 (S3, S5, S6, S7), M16 (S3, S5, S6).
- Meter Clearances: Sized for specific temperatures and viscosities. Special clearances may apply for meters built to operate at higher temperatures and viscosities (consult factory for 6-digit serial number meters).
- Rotor To Block Clearance:
- 10": .004"-.008"
- 12": .005"-.010"
- 16": .009"-.014"
- Rotor Adj. Total End Clearance:
- 10": .010"-.016"
- 12": .014"-.022"
- 16": .016"-.022"
- Blade Slot Clearance:
- 10": .002"-.006"
- 12": .003"-.008"
- 16": .003"-.010"
- Blade Ends Below Rotor Clearance:
- 10": .000"-.004"
- 12": .000"-.004"
- 16": .004"-.008"
- Blade Roller Over Cam Radius Clearance:
- 10": .001"-.006"
- 12": .001"-.006"
- 16": .001"-.006"
- Blade Tip To Housing Clearance:
- 10": .008"-.013"
- 12": .013"-.018"
- 16": .015"-.024"
- Standard Temperature Ranges:
- JB10: -20°F (-29°C) to 125°F (52°C)
- K12: -20°F (-29°C) to 115°F (46°C)
- M16: -20°F (-29°C) to 105°F (41°C)
- Standard Viscosity Limit: Less than 1,000 SSU (200 mPa•s).
- Torque Values for Cinch Bolts (Dry or Wet FT*LB):
- JB10 (S1 to S7, 5/8" Stud Size): 110-125
- K12 (S1 to S6, 7/8" Stud Size): 255-270
- M16 (S1 to S6, 1" Stud Size, 1993-Present only): 450-465
- Torque Values for Cover Studs (Dry FT*LB):
- M16 (Pre 1993):
- S1 (1-1/4" Stud): 960-1,070
- S3 & S5 (1-1/2" Stud): 1,545-1,710
- S6 (1-3/4" Stud): 2,760-3,050
- M16 (1993-Present):
- S1 (1-1/4" Stud): 960-1,070
- S3 & S5 (1-1/2" Stud): 1,545-1,710
- S6 (1-3/4" Stud): 2,760-3,050
- K12:
- S1 (1" Stud): 610-675
- S3 & S5 (1" Stud): 610-675
- S6 (1-1/4" Stud): 690-1,070
- S7 (1-1/2" Stud): 1,545-1,710
- JB10 (Pre 1998):
- S1 (3/4" Stud): 248-275
- S3 & S5 (1" Stud): 610-675
- JB10 (1998-2003):
- S1 (1-1/8" Stud): 760-840
- S3 & S5 (1-1/8" Stud): 760-840
- JB10 (2003-Present):
- S1 (1-1/8" Stud): 760-840
- S3 & S5 (1" Stud): 610-675
- S6 (1-3/8" Stud): 1,295-1,430
- Torque Values for Packing Gland Bolts (Dry):
- PG-30, HP-4, HP-12 (5/16" Bolt Size): 12-16
- PG-144, PG-222, HP-2 (7/16" Bolt Size): 35-47
Usage Features:
- Double Case Design: This fundamental feature means that pipe connections are confined to the outer housing. This prevents piping strains from distorting the measuring chamber, ensuring consistent accuracy.
- Removable Inner Unit: The measuring unit can be removed vertically from the outer housing with minimal spillage and without disturbing pipe connections. This simplifies inspection and maintenance significantly.
- Interchangeability: Within a given meter size, complete metering units and their parts are interchangeable, which streamlines repairs and part replacement.
- Vent Location: Meters are equipped with a vent location, likely for releasing trapped air or gas during operation or maintenance.
- Calibrator Drive Gear: The design includes a calibrator drive gear, indicating compatibility with calibration systems to ensure measurement accuracy.
Maintenance Features:
- Ease of Disassembly: The design emphasizes simple removal and disassembly steps, encouraging periodic preventive maintenance inspections.
- Clearance Checks: The manual provides detailed procedures for checking various clearances (rotor to block, rotor end, blade slot, blade ends below rotor, blade roller over cam radius, blade tip to housing) using feeler gauges and micrometers. These checks are critical for assessing wear and determining the need for part replacement.
- Part Replacement Guidelines: Parts that are worn, nicked, gouged, or rough should be replaced or dressed with a fine file or crocus cloth.
- Match-Marking: Blades and rotor slots are matched during assembly. Users are instructed to match-mark them before disassembly to ensure proper reassembly and prevent misalignment. Similarly, yokes and blades are matched and numbered.
- Packing Gland Maintenance: Glycerine solution is used as a sealant and lubricant. The gland should be serviced at intervals determined by experience, not exceeding 60 days.
- Cleaning: All removed parts should be thoroughly washed and cleaned in solvent. The inner unit's top and interior surfaces should be washed with solvent, kerosene, or other liquid cleaner before removal. Water should not be used.
- Reassembly Procedures: Reassembly is performed in reverse of disassembly, with specific precautions noted throughout the manual, including proper alignment of components, torque specifications for bolts and studs, and the use of Loctite 518 for sealing surfaces.
- Adjusting Rotor: Procedures for adjusting the rotor's position to achieve correct top and bottom clearances are detailed, involving an adjusting screw and lock nut.
- Blade Dressing: For new blades or when clearances are too close, blades can be dressed down using a Vixen (Babbit Metal) file, ensuring sharp, clean-cut edges.
- Bearing Replacement: Instructions are provided for removing and replacing rotor bearings in the cover assembly if they are worn or damaged.
- Record Keeping: It is suggested to maintain a detailed record for each meter, including nameplate data, clearances ("as found" and "as assembled"), totalizer readings, meter factor, and parts used. This record helps in scheduling preventive maintenance and identifying meter factor drift.