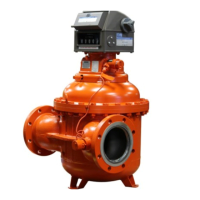
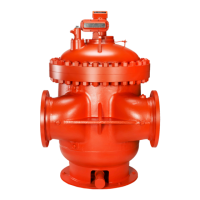
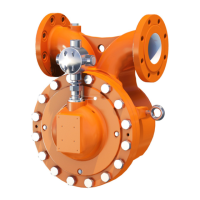
The Smith Meter PRIME 4 is a rotary positive-displacement meter designed for measuring product flow in two directions. Its robust construction features an accurately machined housing containing a rotor that revolves on tungsten carbide bearings. The rotor carries two evenly spaced Polyketone blades. As liquid flows through the meter, the rotor and blades revolve about a fixed cam, causing the blades to reciprocate. This movement creates a continuous series of closed measuring chambers of precise volume between the blades, rotor, housing, and covers. A key design aspect is that neither the blades nor the rotor contact the stationary walls of the measuring chamber, ensuring undisturbed product flow and preventing energy waste from unnecessary hydraulic bending of the liquid.
Function Description:
The meter operates by capturing and displacing a known volume of liquid with each revolution of its rotor and blades. Unmeasured liquid enters the meter, causing the rotor and blades to turn. As the blades extend and retract due to the fixed cam, they form measuring chambers. For instance, when blades A and B are fully extended, they form a measuring chamber. As the rotor makes a one-eighth revolution, blade A remains extended while blade B partially retracts and its opposite end begins to extend. After a quarter revolution, both blades A and B are fully extended, enclosing an exact known volume of new liquid. As the rotor continues to turn, the measured liquid moves out, and new measuring chambers are formed. This cycle repeats as long as liquid flows. The rotation of the rotor is converted into electronic pulses via an exciter gear, which is an integral part of the rotor, and a pulse pick-up located in a well on the side of the meter cover. The meter typically produces approximately 50 pulses per gallon (13 pulses per liter).
Important Technical Specifications:
- Electrical Ratings: 28 VDC, 50 mA max.
- Pulse Output: Approximately 50 pulses per gallon (13 pulses per liter).
- Approved Installations:
- ATEX- and IECEx-Approved:
- Marking: Ex db IIB T5...T6 Gb, IP65 or IP66
- Ambient Temperature (Ta): -50 °C to +70 °C
- Process Temperature (Tprocess): -20 °C to 93 °C
- Temperature Class: T5 ≤ 93 °C / T6 ≤ 80 °C
- Equipment Covered: Type SG Sensor
- Certificates: DEMKO 19 ATEX 2266X, IECEX TUN 15.0029X
- Standards Used: IEC 60079-0 7th Edition, EN 60079-0:2018; IEC 60079-1 7th Edition, EN 60079-1:2014
- Wiring: Cable entries, stopping boxes, or plugs must be certified to EN 60079-1 with 3/4-inch 14 NPT threaded entry. Wiring conductors and cable glands must have a temperature rating of at least 70 °C. For conduit systems, an Ex d certified sealing device is required at the J-Box enclosure entrance. Unused entries must be blocked with an Ex d IIC IP device.
- UL Brazil-Approved:
- Marking: Ex db IIC T5 ... T6 Tamb = -50 °C ≤ Tamb ≤ + 70 °C, IP65 or IP66
- Process Temperature (Tprocess): -20 °C to +93 °C
- Temperature Class: T5 ≤ 93 °C / T6 ≤ 80 °C
- Equipment Covered: Type SG Sensor
- Certificate: UL-BR 19.1164X
- Standards Used: ABNT NBR IEC 60079-1
- Wiring: Cable ends must be installed securely and protected from mechanical damage. Connection cables must meet thermal requirements. Equipotential/ground connection must be ensured.
- Wire Connections (Quadrature/Two Channel):
- "B" Signal (Lagging) to terminal 4
- "A" Signal (Leading) to terminal 1
- 6-28 Vdc to terminal 7
- Logic Common to terminal 3
- For reverse flow, yellow wire becomes "A" signal and white wire becomes "B" signal.
Usage Features:
- Precision Measurement: The meter is a precision instrument designed for accurate flow measurement.
- Two-Directional Flow: Capable of measuring product flow in both directions.
- Undisturbed Flow: The design ensures that product flow is undisturbed during metering, minimizing hydraulic bending and energy loss.
- Robust Construction: Built with durable materials like tungsten carbide bearings and Polyketone blades for longevity.
- Air and Vapor Management: Requires a deaerator or air eliminator to keep air and vapor out of the meter for optimal performance.
- Flow Protection: Protection with a 40-mesh strainer and a downstream flow-limiting valve is recommended to prevent damage from excessive flow rates or contaminants.
- Start-Up Procedure: A specific start-up procedure is critical to prevent meter damage from hydraulic shock, especially when air is present in the line or meter. This involves:
- Gravity feeding the meter with the upstream valve slowly opened to vent air.
- Closing the upstream isolation valve and energizing the pump.
- Slowly opening the upstream isolation valve to pressurize the meter and flow control valve, operating between 50 to 75 gpm.
- Initiating low flow (50-75 gpm) for multiple batches (at least 300 gallons) to expel all air.
- Venting air from the high-point vent until no air is evident.
- Gradually opening the isolation valve for normal operation after all air is bled.
- Product Compatibility: The meter has been tested on kerosene, and its median K-factor is provided. It is important not to calibrate the meter with water or allow water to stand in the meter.
Maintenance Features:
- Protection During Installation: Must be protected from adverse weather and accidental abuse.
- Pipe Support: Adequate pipe support close to the meter is required, as the meter is supported by its flanges. Piping must not exert undue strain on the meter.
- Pre-Installation Flushing: If idle or stored, the meter should be flushed with a light lubricating oil before installation.
- Rotor Leveling: The meter housing must be level to ensure the rotor does not gravitate to one side.
- Drain Plug Accessibility: Ensure the drain plug is accessible but cannot be accidentally drained.
- Thermal Expansion Protection: A relief valve is necessary to protect the meter and system from high-pressure damage due to thermal expansion.
- Piping Cleanliness: All internal piping must be cleaned of rust, dirt, welding shot, and other foreign material before operation.
- Pressure Testing: If the system is pressure-tested with water or flushed for debris, the meter should be removed and a spool piece installed in its place.
- Repair Restrictions: Repairs to explosion-proof joints or sensor housings for ATEX/IECEx/UL Brazil-approved installations may only be carried out by the manufacturer or an Ex certified repair shop, adhering to specific design specifications and not based on general values in standards.
- Documentation: Maintaining detailed records (model, serial number, operating rate, product type, clearances, totalizer readings, meter factor) is recommended for a preventive maintenance program.
- Enclosure Safety: Do not open the enclosure in hazardous areas unless certain it is not explosive. Disconnect power circuits before opening to prevent ignition and electric shock. Keep the enclosure properly closed during operation when circuits are energized.