Home
Teledyne
IP Camera
Linea
Page 32
Teledyne Linea - Page 32
90 pages
Manual
Save Page as PDF
To Next Page
To Next Page
To Previous Page
To Previous Page
Loading...
32
Linea 2K an
d
4K Monochrome Line Scan Camera User's Manual
03
-
032
-
20206
-00
Teledyne DALSA
G
e
n
ICam
p
ar
am
e
te
r
s
to
s
e
t:
I / O
Co
n
tr
o
l
s
>
Tr
i
g
g
e
r
M
o
d
e
>
O
n
Cam
e
r
a Co
n
tr
o
l
>
E
xp
o
s
u
r
e
M
o
d
e
>
Ti
m
e
d
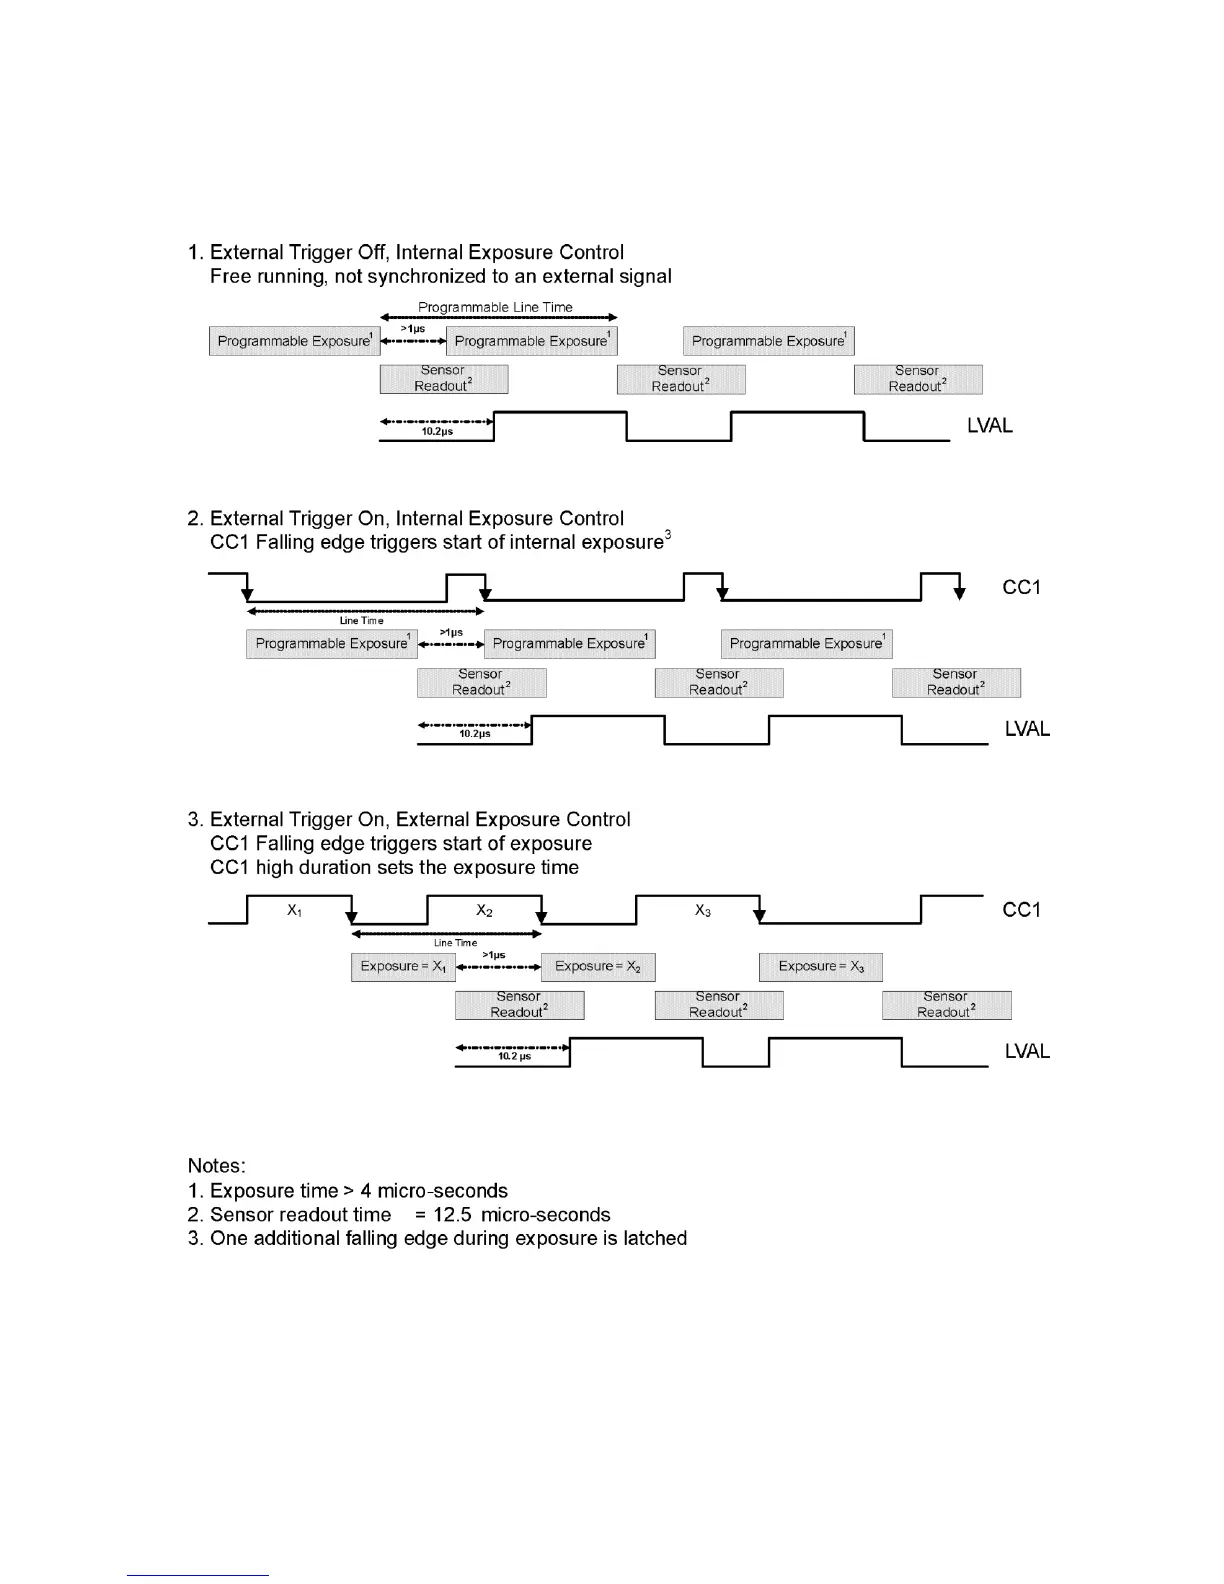
Figure
12
. Exposu
re Modes
31
33
Table of Contents
Main Page
Table of Contents
3
System Precautions and Cleaning
6
Precautions
6
Electrostatic Discharge and the CMOS Sensor
6
The Linea Camera
7
Camera Highlights
7
Camera Performance Specifications
8
Certifications and Compliance
9
Supported Industry Standards
9
Responsivity
10
Mechanicals
11
Quick, Simple Steps to Acquire an Image
12
Software and Hardware Setup
13
Recommended System Requirements
13
Setup Steps: Overview
13
Install and Configure Frame Grabber and Software
13
Connect Camera Link and Power Cables
13
Establish Communicating with the Camera
13
Operate the Camera
13
Step 1. Install and Configure the Frame Grabber and Software
14
Install Frame Grabber
14
Install Sapera LT and Camexpert GUI
14
Step 2. Connect Data, Trigger, and Power Cables
15
Data Connector: Camera Link
16
Camera Link Bit Definitions
18
Camera Link Drive Capability
19
Input Signals, Camera Link
19
Output Signals, Camera Link Clocking Signals
19
Power Connector
20
Pocl Power over Camera Link
20
Leds
21
Step 3. Establish Communication with the Camera
21
Power on the Camera
21
Connect to the Frame Grabber
21
Connect to the Camera
21
Check LED Status
22
Software Interface
22
Using Sapera Camexpert with Linea Cameras
23
Camexpert Panes
24
Camera Operation
26
Factory Settings
26
Check Camera and Sensor Information
26
Saving and Restoring Camera Settings
27
Verify Temperature and Voltage
27
Camera Link Configuration
29
Trigger Modes
29
Exposure Controls
29
Exposure Modes in Detail
30
Set Line Rate
33
Set Exposure Time
36
Control Gain and Black Level
36
Set Image Size
37
Set Baud Rate
37
Pixel Format
38
Pixel Readout Direction (Mirroring Mode)
38
Resetting the Camera
38
Calibrating the Camera
39
Contrast Enhancement
42
Appendix A: Genicam Commands
43
Camera Information Category
43
Camera Information Feature Descriptions
44
Camera Configuration Selection Dialog
47
Camera Power-Up Configuration
47
User Set Configuration Management
47
Camera Control Category
48
Camera Control Feature Descriptions
49
Digital I/O Control Feature Descriptions
50
Flat Field Category
51
Flat Field Control Feature Description
52
Region of Interest (ROI)
53
Image Format Control Category
53
Image Format Control Feature Description
54
Binning
55
Area of Interest (AOI) Setup
56
Transport Layer Control Category
58
Transport Layer Feature Descriptions
59
Acquisition and Transfer Control Category
59
Acquisition and Transfer Control Feature Descriptions
60
Serial Port Control Category
61
Serial Port Control Feature Descriptions
61
File Access Control Category
62
File Access Control Feature Descriptions
63
File Access Via the Camexpert Tool
64
Download a List of Camera Parameters
65
Appendix B: ASCII Commands
67
Port Configuration
68
Disabling the Esc Key for Direct Access to ASCII Commands
69
Commands
69
Appendix C: Error and Warning Messages
78
Appendix D: Quick Setup and Image Acquisition
80
Appendix E: the Sensor Window
83
Cleaning and Protecting against Dust, Oil, and Scratches
83
Cleaning the Sensor Window
84
Appendix F: Camera, Frame Grabber Communication
85
Setting up Communication between the Camera and the Frame Grabber
85
EMC Declaration of Conformity
87
Revision History
88
Index
89
Related product manuals
Teledyne BOA Pro
27 pages